Sky’s the Limit Post-its
April 17th, 2012
Happy Tuesday! Just a quick post to share another one of my class projects from last Friday before I head off to work. I purchased a bunch of super cute post it note folders from Pick Your Plum and could hardly wait to use them for a class project.
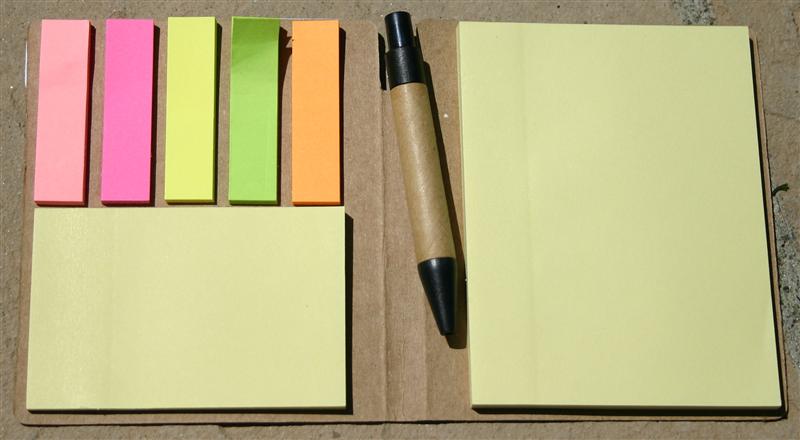
Here it is open. The post-it notes and pen came in this kraft folder and all we had to do was decorate it. Are you familiar with Pick Your Plum? It’s this amazing site that has a different incredible deal almost every day. You sign up for their e-mail alerts and you have to be sure to check them first thing in the morning because most things sell out pretty quickly. Most of the items they offer are oriented toward crafts, sewing, and jewelry making. They also sometimes have baby things and party stuff. I just checked today and it’s satin baby rompers. You just never know. I’ve purchased from them a few times and shipping is always very fast. I highly recommened you sign up for their e-mails!
So here’s the post-it folder finished.
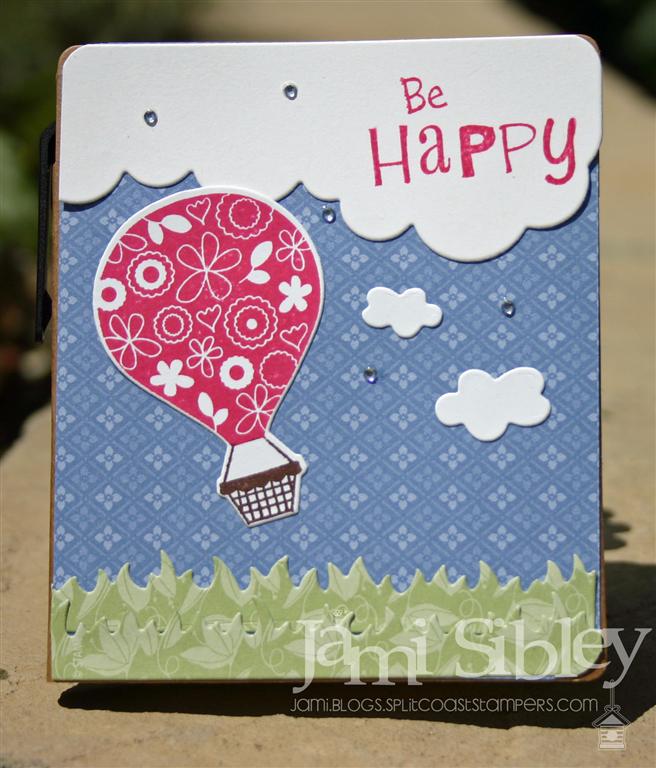
We used Taylored Expressions Sky’s the Limit stamp and die set along with the TE Cloud Border Die and the TE Grass Border Die. Papers are from some SU 6×6 hostess stacks. Ink is SU Melon Mambo and a choclate chip marker for the basket of the balloon. The finishing touch is several of Taylor’s Tiny Twinkles.
This was such a fun project and so easy too! Of course you could easily create a simple post it note folder of your own with just a pad of post-its and some kraft cardstock.
Thanks for stopping by. Have a great day!
![]()
Quick and Cute Christmas Bag
November 22nd, 2011
Happy Tuesday! Thank you to everyone who offered congratulations on our new family member through e-mail, Facebook and comments here on the blog. The pups are becoming better friends each day and we are enjoying them immensely. 🙂
Today I want to show you a quick and simple gift bag and tag that we created in my class last week. You’ll notice that the bag uses just a 2″ strip of patterned paper. This is a great way to use all those scraps you end up with from 6×6 pads when you cut 4″ pieces for cards.
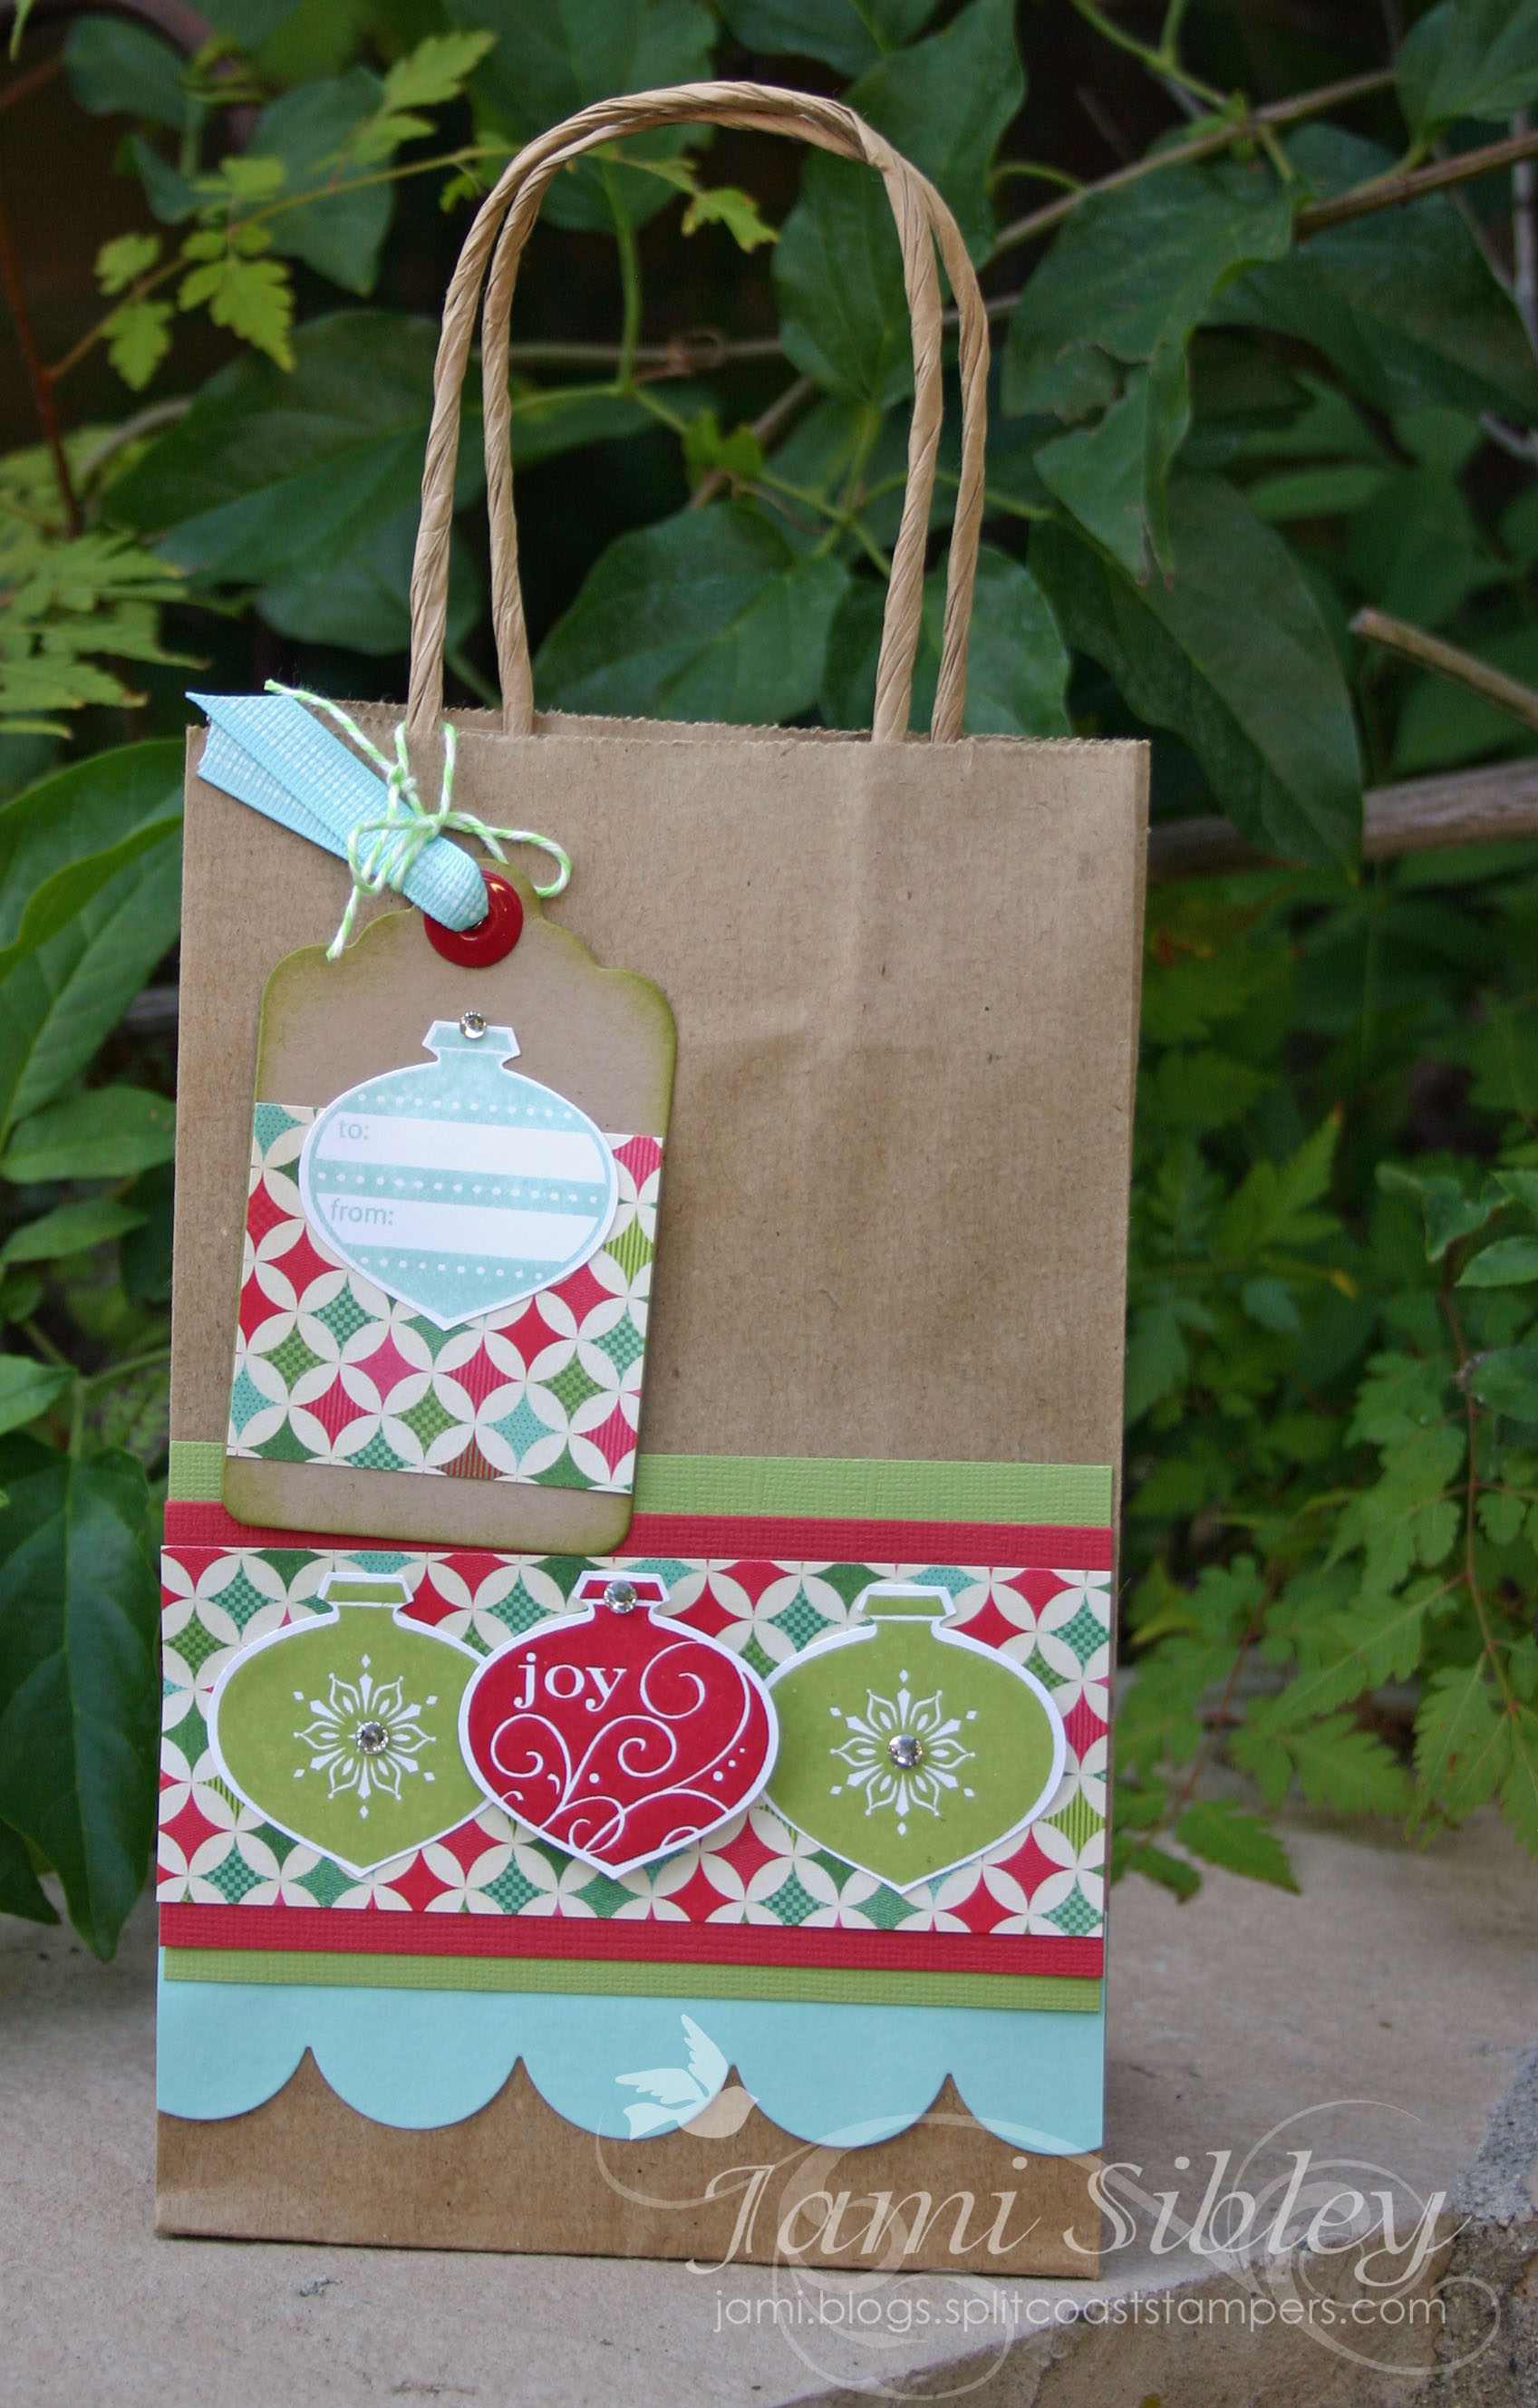
We started with a simple kraft gift bag. I purchased a package of a dozen at Joann’s. The papers, cardstocks and ribbon are from the TE 12 Days of Christmas Project Pantry. Since I was using a 6×6 pad, everyone in class got a different patterned paper. It was fun to see how all the different bags turned out. I wish I had taken a photo of them. Since the papers were all from the same collection we could all use the same colored cardstocks and inks. The stamp set is SU Delightful Decorations used with the coordinating punch. Ink colors are Lucky Limeade, Real Red and Pool Party. The middle ornament on the back is popped up on double thick (1/8″ as opposef to 1/16″) foam tape. Everyone got a kick out of the HUGE roll I had out on the table. Seriously – it’s the size of a pizza! LOL! The tags are die cuts that can be ordered in sets of 10 from the Favor Box Department at Taylored Expressions. There are tons of colors to choose from. The large eyelets are coming very soon to the TE Store.
These bags are so quick and easy to create! It would be great to have some made up and on hand, but they can also be done last minute just using the scraps from the last project left on your stamp table! Just be sure to have some plain gift bags on hand at all times. I like to have kraft and white in two sizes.
I’m off to work. I hope you have a fantastic day!
![]()
WOW! What a Weekend!!!
November 21st, 2011
Happy Monday! We had quite the eventful weekend here! If you read my last post, then you are aware that we had an appointment for someone to come meet Roger on Saturday and most likely take him home. Friday was Curt’s day off and I swear all we did all day was discuss Roger and what we should do. In the afternoon we ran some errands that included buying some toys and food to go with Roger. Each purchase we made seemed to stab at our hearts. And we recognized that each day Tessa seemed to get along a bit better with Roger and maybe it would indeed be ok. We questioned if perhaps God really meant Roger for us, in the way that I am absolutley certain that He intended Tessa for us. Finally aorund 7:30 pm, Curt uttered the fateful words “I think we should keep him.” I called and cancelled the appointment.
So…please welcome Roger Dog Sibley!!

You might notice his tag. 🙂 On Saturday, we bought him a new collar and a tag with his name and our phone numbers on it. We also bought him a bed. We took him to the vet for a check up and to get his shots started. The vet believes he is between 1 and 1 1/2 years old and gave him a clean bill of health. He seems quite happy to be staying. And Tessa seems pretty ok with it too…except when Roger wants my attention when she is in my lap…LOL!

So…ok everyone…now you can say “I told you so!” Gosh that was an agonizing and emotionally exhausting week!
That was Friday and Saturday…now on to Sunday! I was registered to take a Configurations Class at the Inspiration Emporium Warehouse in Anaheim on Sunday afternoon. Although I was excited about the class, truth be told, I didn’t really want to go when it came right down to it. I had to rush to get there from church, it was pouring down rain, and I was tired and just wanted to chill with the pups. But, boy oh boy am I ever glad I went. IT WAS A BLAST and I am beyond thrilled with the outcome of my project. Here are several photos –
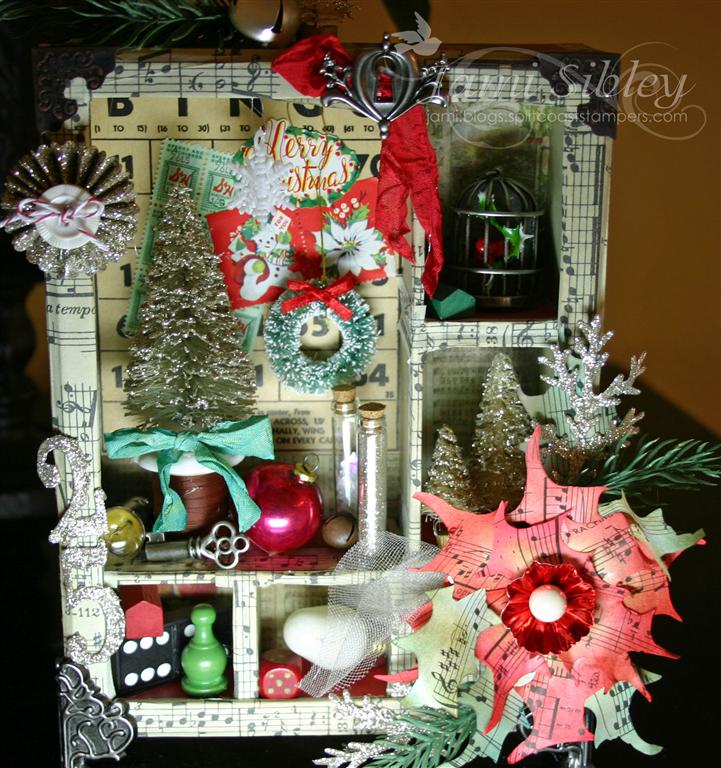
Michelle Fowler was an incredible instructor and I look forward to taking more classes from her in the future. It had been so long since I had taken a class, I almost didn’t know how to act. LOL! Here are some close ups –
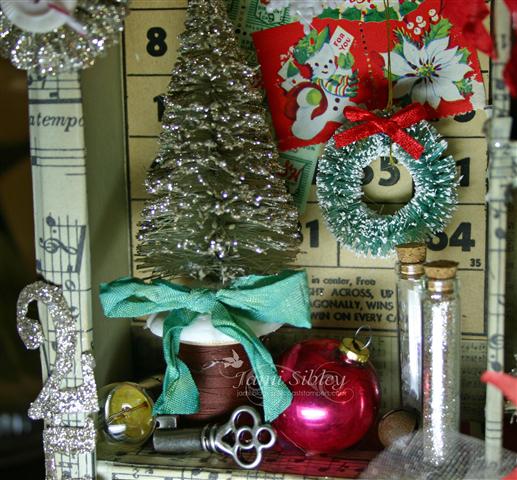
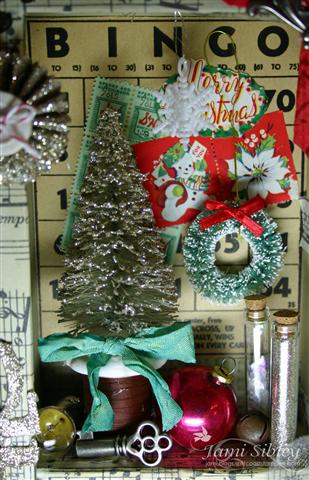
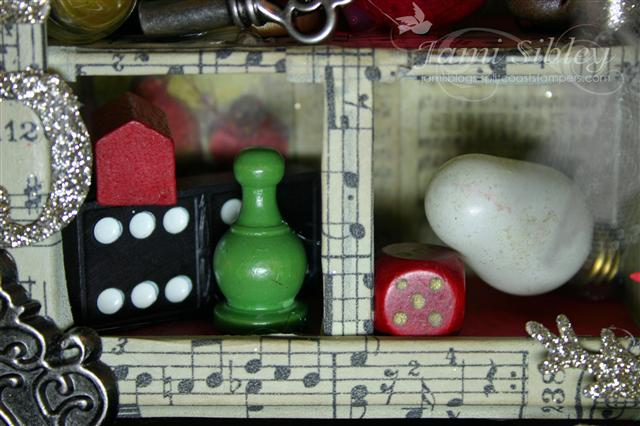


Yes, that’s a little Tim Holtz birdcage with a sprig of holly inside and a vintage Monopoly piece! Here I am with the teacher, Chelle.
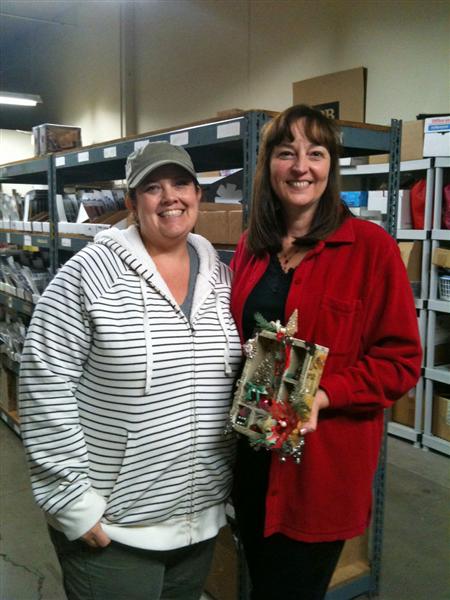
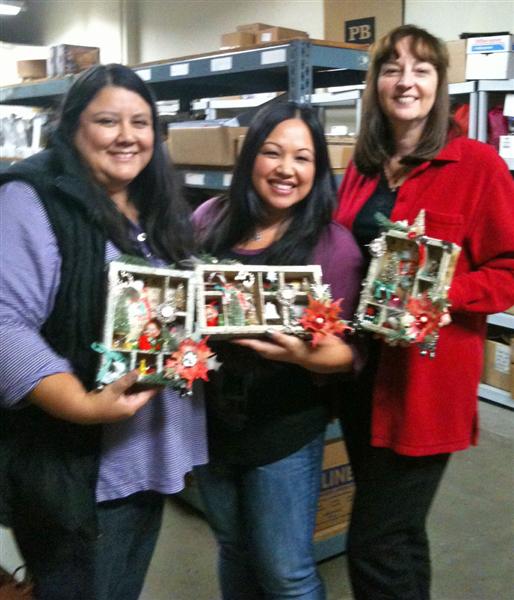
And here I am with friends Rachel Stzonyk (fellow TE Sketch Crew Member) and, of course, owner of Inspiration Emporium the sweet Joy Kennedy.
I think the class was scheduled for 3 hours, but we were there for 5 hours. It was the fastest 5 hours EVER! Can’t remember when I have had so much fun crafting. And of course the photos just don’t do it justice. I would highly recommend everyone get a Configurations box, some Tissue Tape and 12 x 12 papers and try one of these!
Thanks for stopping by and sharing in my eventful weekend! We have a short week ahead with tons to do, and then hopfully some fun and relaxation over the holiday weekend. I hope you’re having a great Monday!
![]()
My First Paper Bag Album
September 29th, 2011
Happy Thursday! Sorry for the delay. I had hoped to have this up by Monday, but it’s just always somethin’. LOL!
I held my September Stamp Class two weeks ago and the project was a paper bag album – my very first paper bag album ever! I had gotten gorgeous paper kits from My Mind’s Eye (Lush Collection) and was dying to do a special project with them in class. During my August class I spouted off that we would make paper bag albums, despite the fact that I had never made one and at that point really didn’t have a clue as to how it was done. But I had wanted to make one for years and this seemed like the perfect opportunity to learn! I watched a bunch of videos on YouTube, which I was extremely grateful for, but ultimately chose a more simplictic approach that worked really well for me. The Rocket Scientist helped me put together a video to show you the album page by page as well as a little tutorial on how it’s constructed. I even have a couple of tips in case you want to teach something similar in a class like I did. I hope you enjoy it.
[youtube]https://www.youtube.com/watch?v=V3uVPvlora8[/youtube]
Some of the ladies in my class asked that I post still photos also for easy reference. So here’s the book, page by page.
Here’s the cover (the scallop is made with the TE Medium Scallop Die and the leaf is a SU punch):

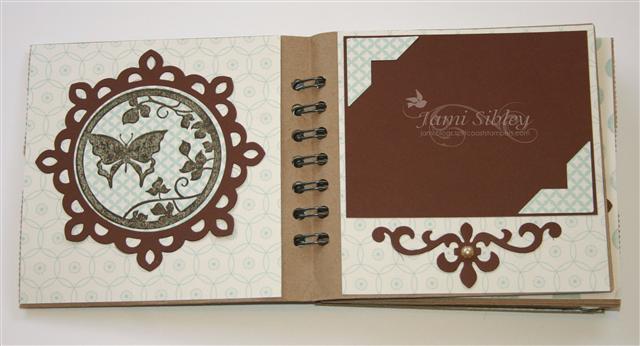
Pages 1 and 2:
Pages 3 and 4 (under the scallop is a little pocket for a memento):
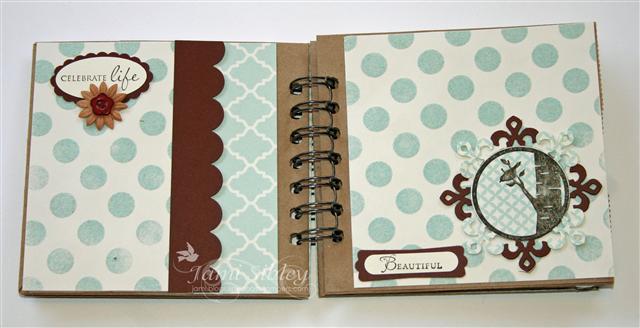
Pages 5 and 6:
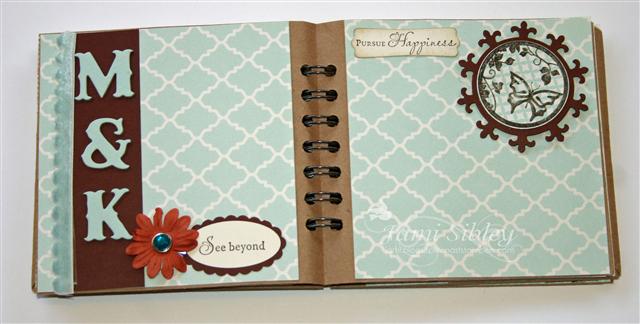
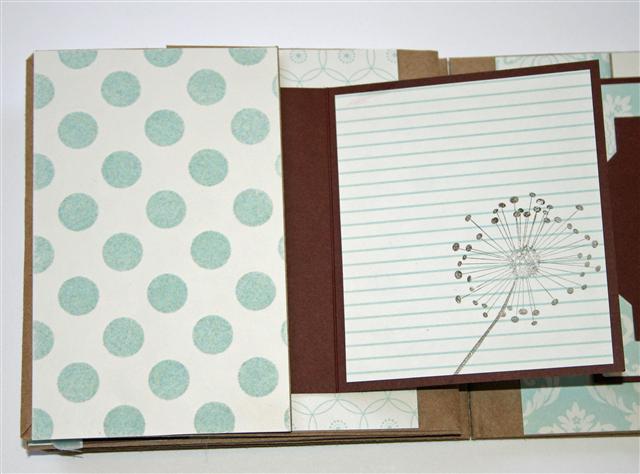
Pages 7 and 8 (these are little fold-over cards tucked into pockets created by the feet/flaps of the bags):
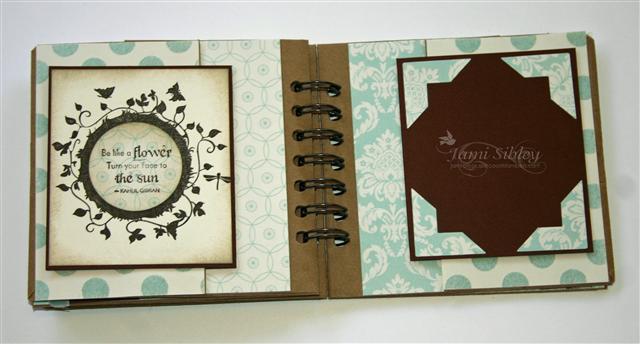
Page 7 – showing the journaling card open:
Pages 9 and 10:
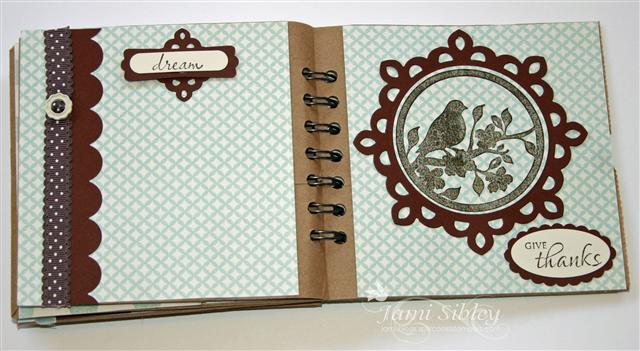
The insert cards (these are tucked into the 3 bag top openings):
This project was created with 3 brown lunch sacks, the MME Lush kit, my Cinch Binding Machine, Spellbinders Fleur de Lis Dies and stamps from Taylored Expressions: Embrace Beauty, Summer Afternoon, Celebrate Life, Discover Your Wings.
I created mine for my niece and her husband who will be celebrating their First Wedding Anniversary soon with a little trip. There are plenty of spots to add photos as well as opportunities to journal about the trip. I hope they like it. I was tickled pink with it! I had so much fun with this project that I want to do one for Christmas now! Oh and did you see the card I created to go with it? Just scroll down one post or click here.
So tell me, have you ever made a paper bag album? If you haven’t, you really need to! Check out my video and let me know if you have any questions. I will admit that this was a big project for an evening class, but really it went pretty smoothly and I think everyone loved the result. Next month we’re back to cards though. 😉
![]()
Birthday Bag
July 19th, 2011
Happy Tuesday! It seems so weird to be getting ready to go to work while seeing all the photos from CHA on my Facebook feed. But, alas, I can’t just sit and daydream all day. LOL! Before I head out to the office I wanted to share another prjoject we made in my class last week. This might be my favorite.
It’s a birthday gift bag and matching tag. I had almost forgotten how easy and fun it is to decorate custom gift bags. I always keep a stash of white and kraft bags on hand, but am often in too much of a hurry when it comes time to wrap a gift to actually decorate them. This bag is approximately 5.25″ x 8.5″ – perfect to be covered with a half sheet of cardstock and some fun patterned papers. I think I might do up a few of these to have on hand. 🙂

Here’s a close up of the tag made with TE stamp sets Kid at Heart and It’s a Banner Day 1 along with the coordinating TE dies for both sets. Inks are the new SU Pool Party and Lucky Limeade. I think that would also make a really cute focal point on a card!
Thanks for stopping by. I gotta run. Have a great day!
![]()
Long time, no see!
December 23rd, 2010
Hey Y’all! First let me say that I never intended to take a month long break from blogging, but somehow that’s what happened. Things have just been crazy busy with the combination of Christmas coming and planning a big 90th birthday party (for 4 days after Christmas) for my uncle…plus of course all the regular *stuff* of life. In fact, I should be in bed right now, but I just had to take some time to get back in touch here.
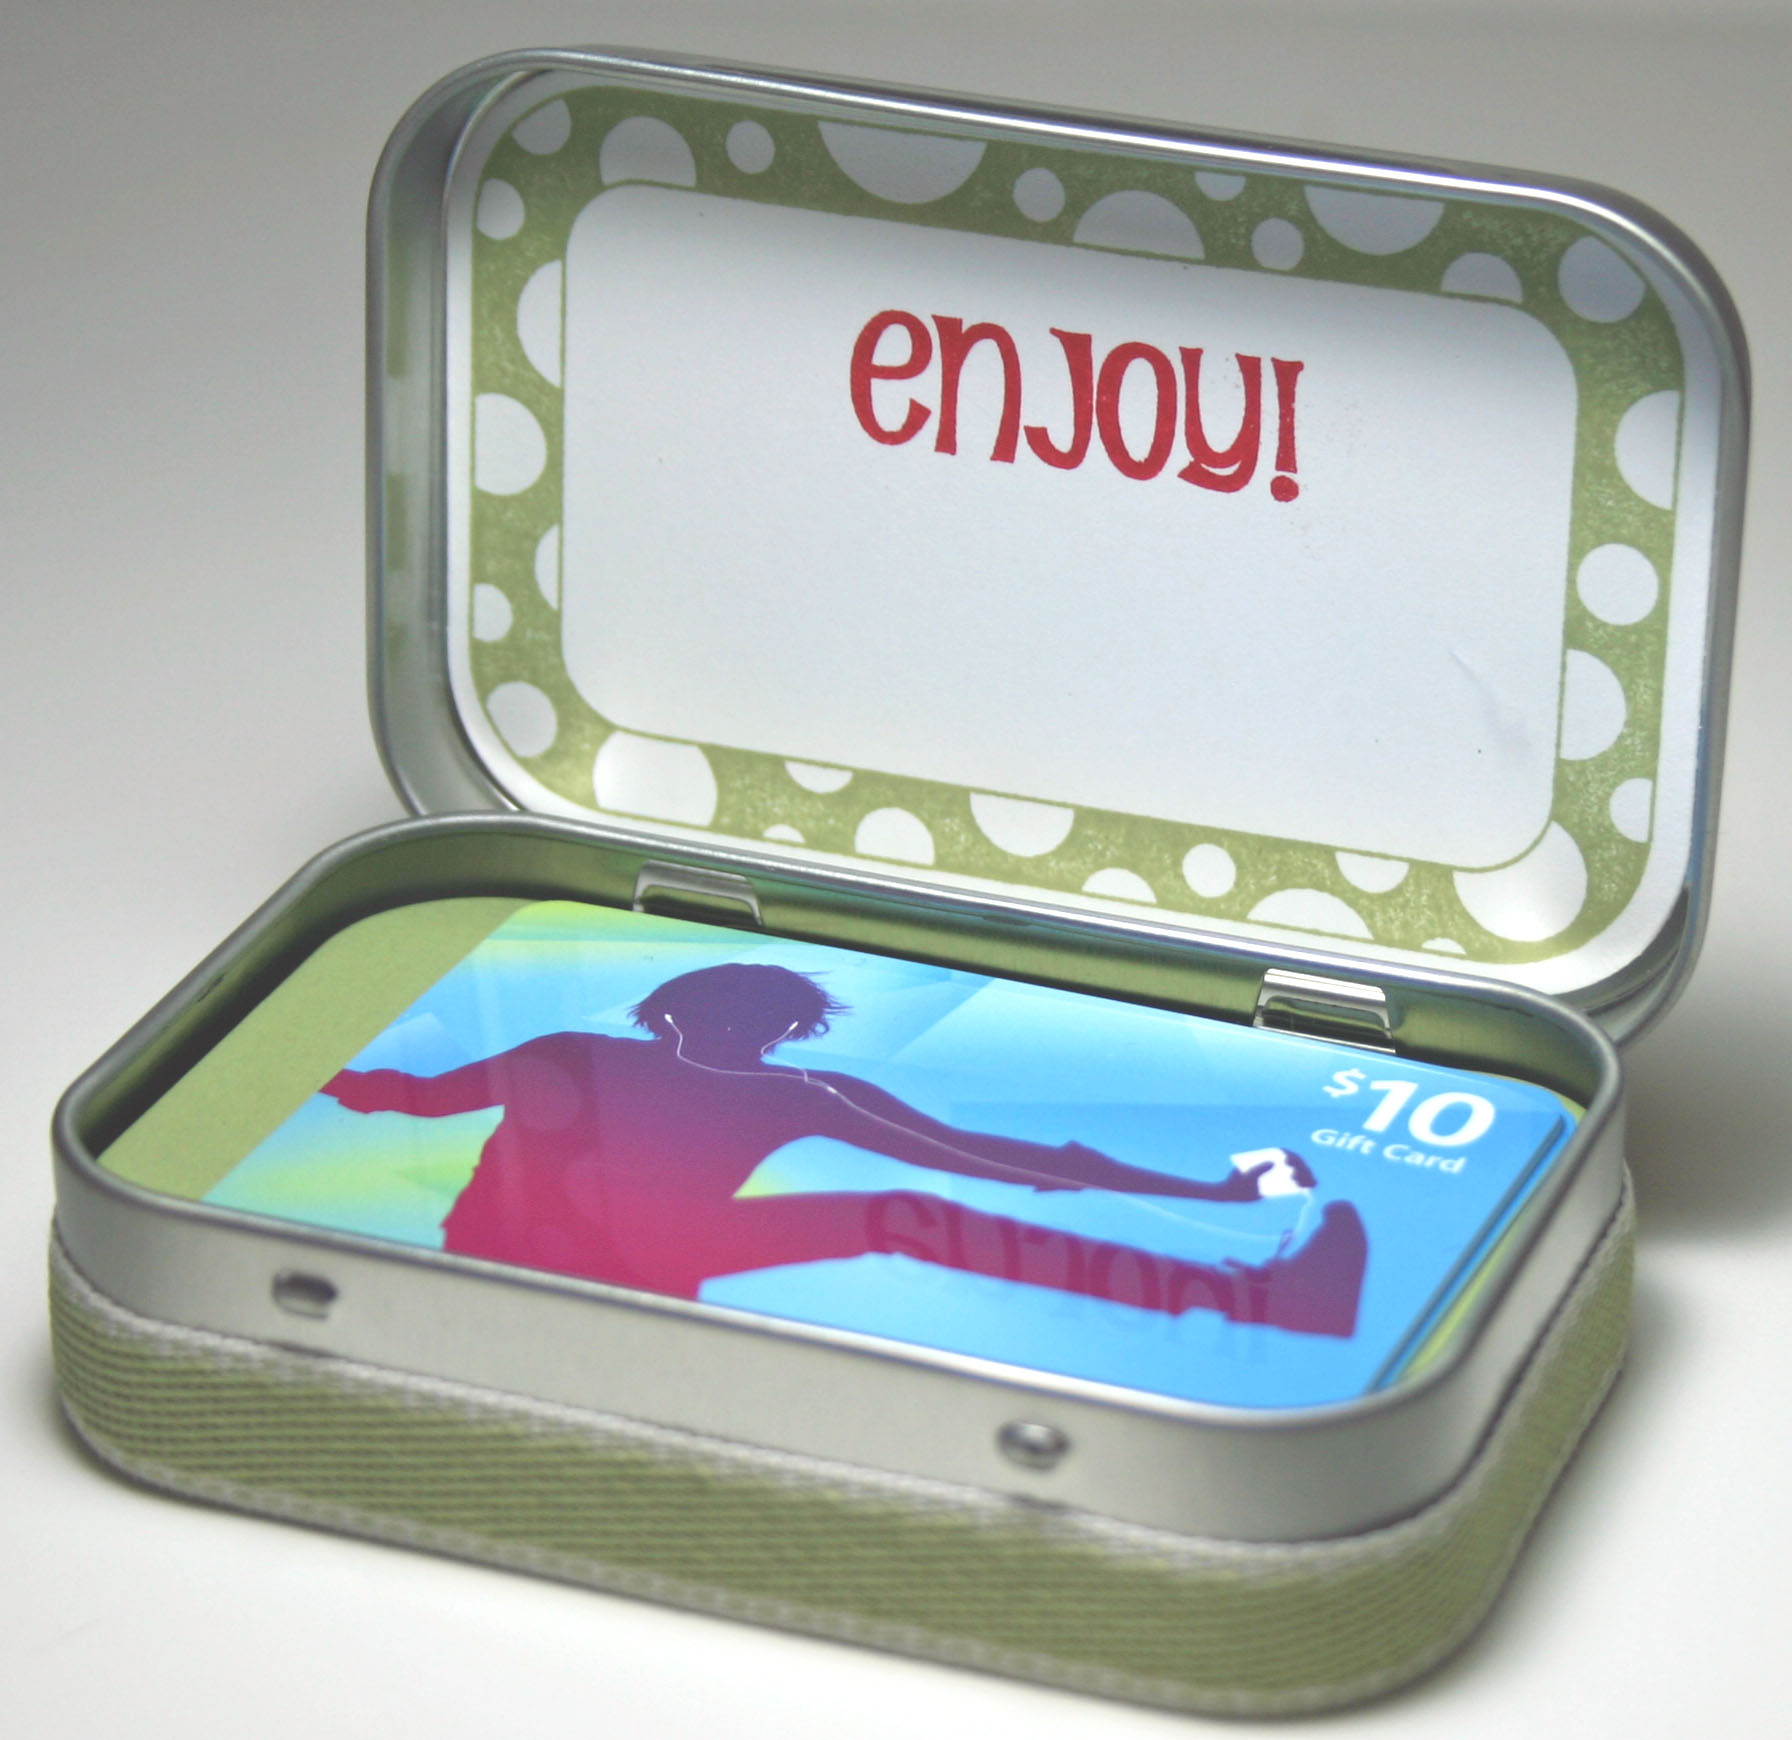
Earlier this month I held a stamp class that was all about packaaging gift cards for Christmas. Two of the projects featured a set I concepted for Taylored Expressions called Enjoy. It’s late so I won’t go into a lot of detail on these projects, but you can let me know if you have any questions.
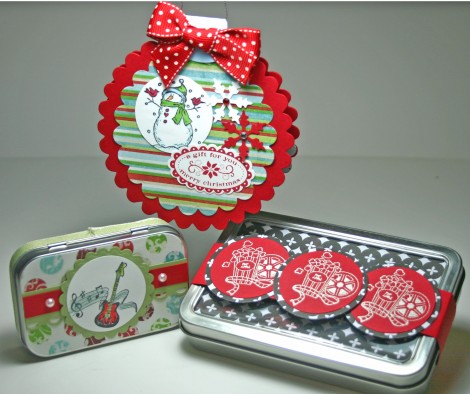
Two of these projects are very similar to ones I shared previously – the movie tickets gift tin and the mini hinged tin (this time for iTunes). Here are a few close ups. Remember that you can click on any of these photos to see them larger.
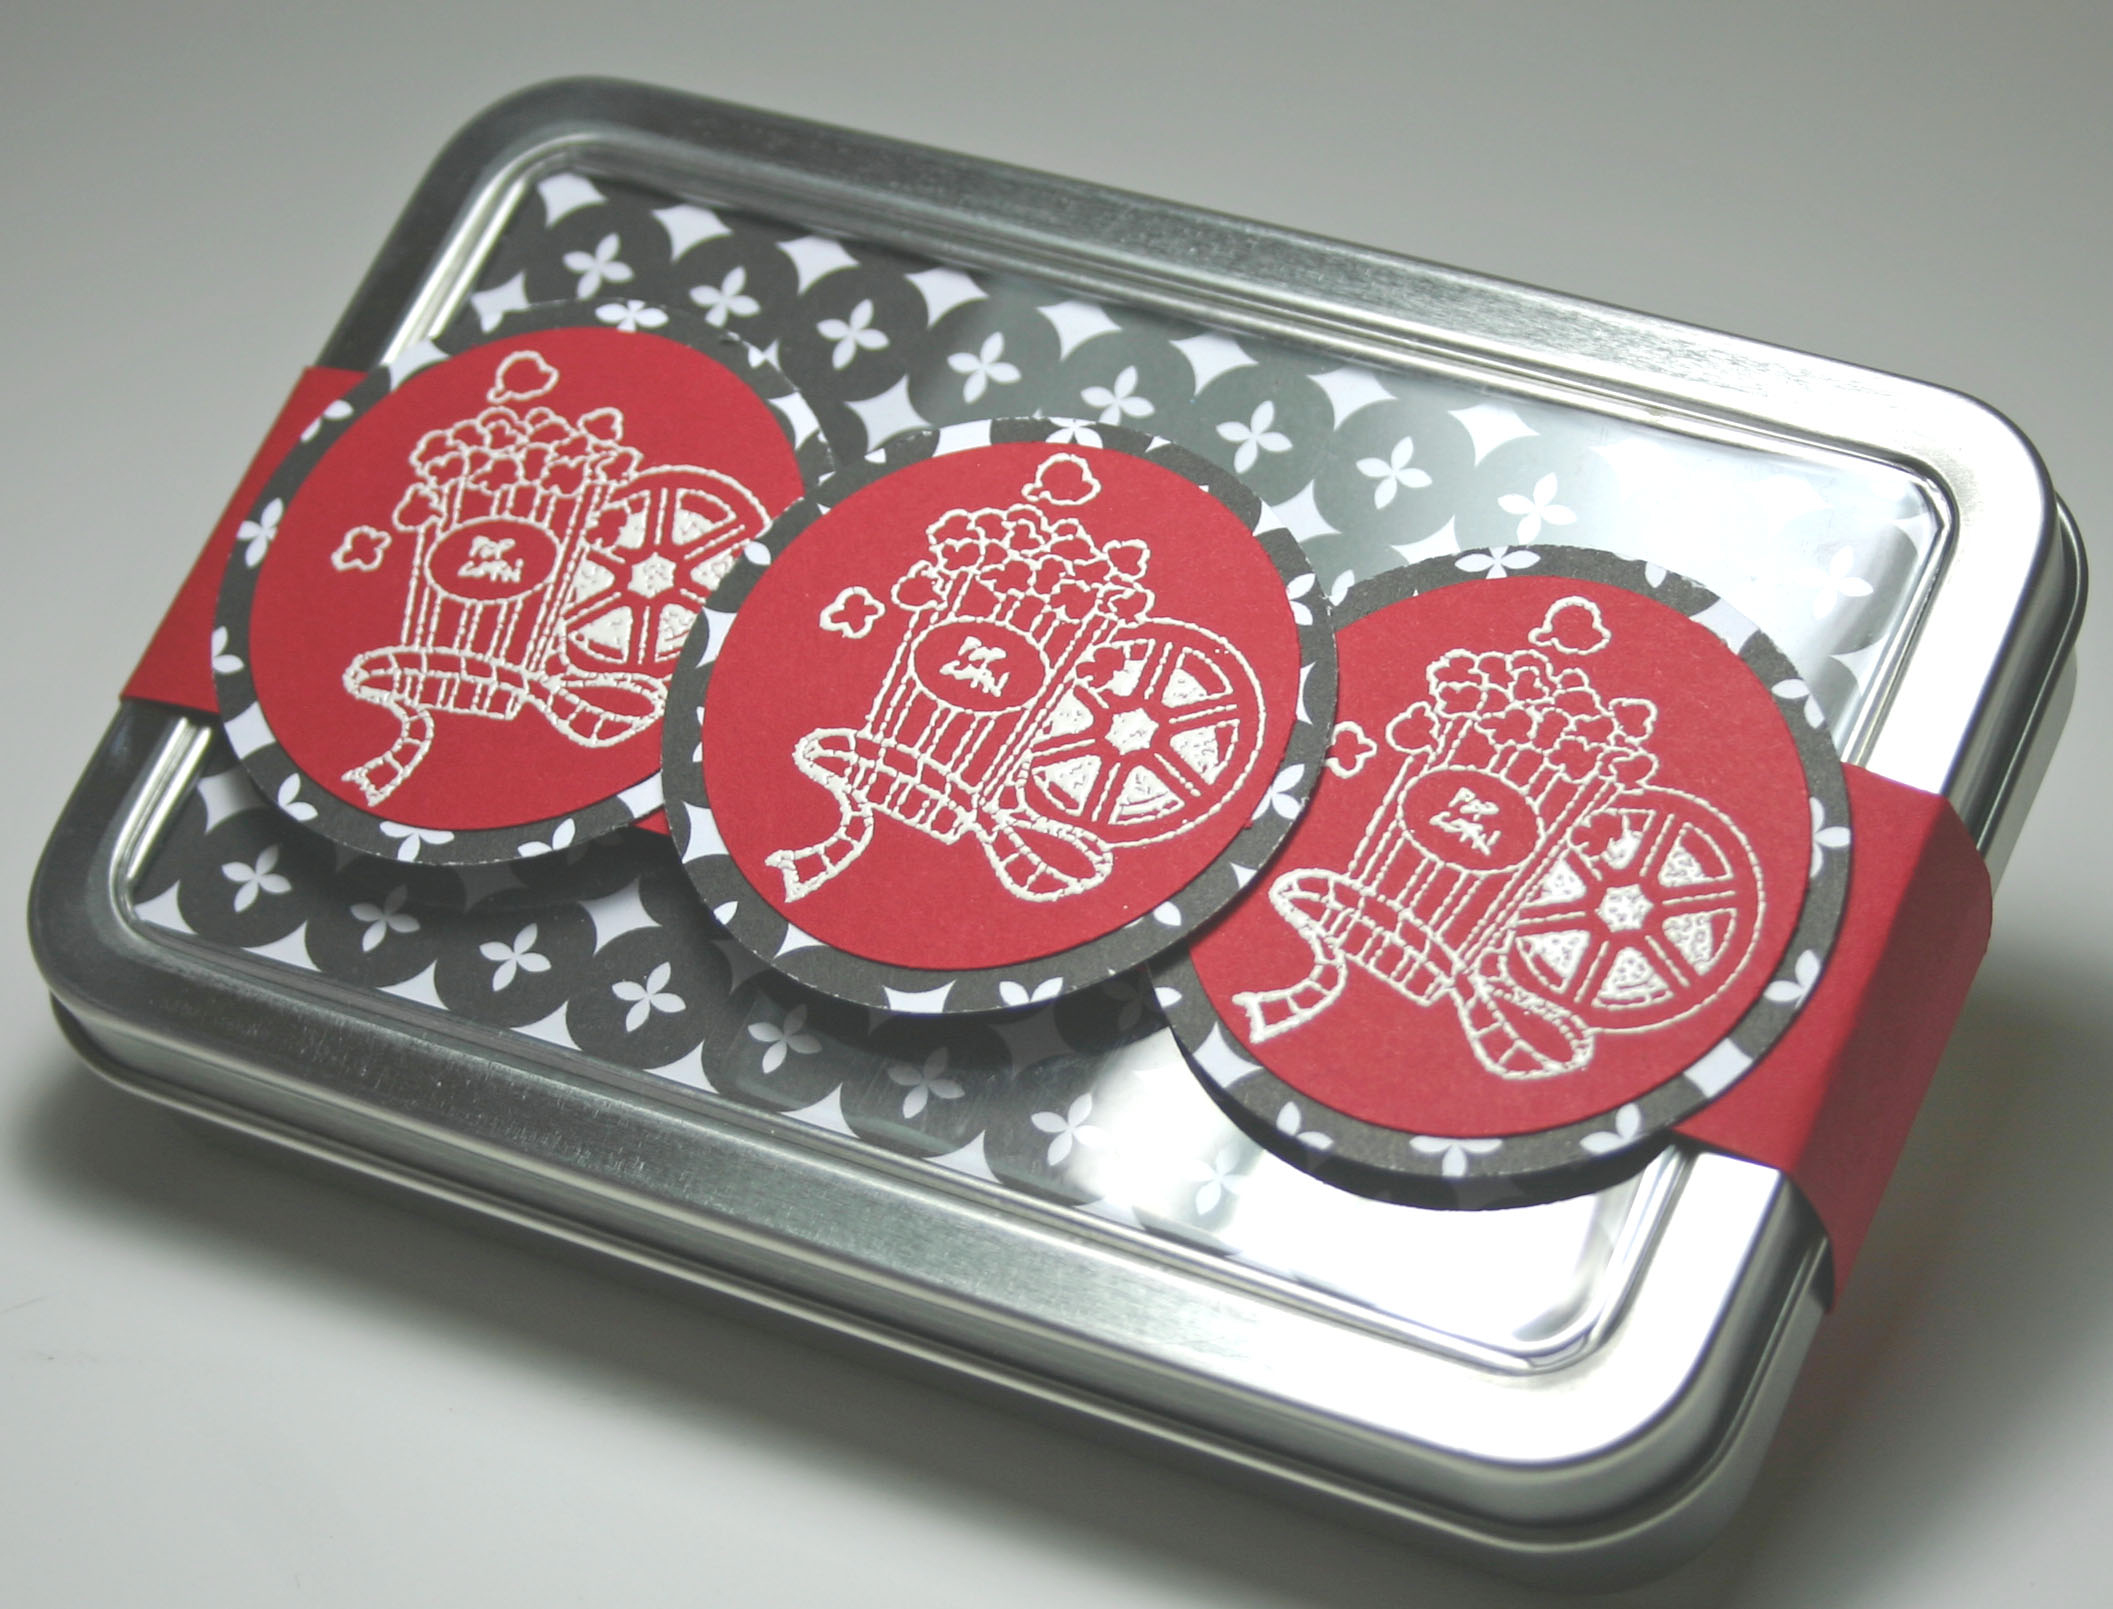
This is the tin that you may know as a “nugget tin” – perfect for the movie tickets you purchase at Costco. I think I ended up making something like 6 or 7 of these for gifts. Next is the mini hinged (or altoids style) tin.
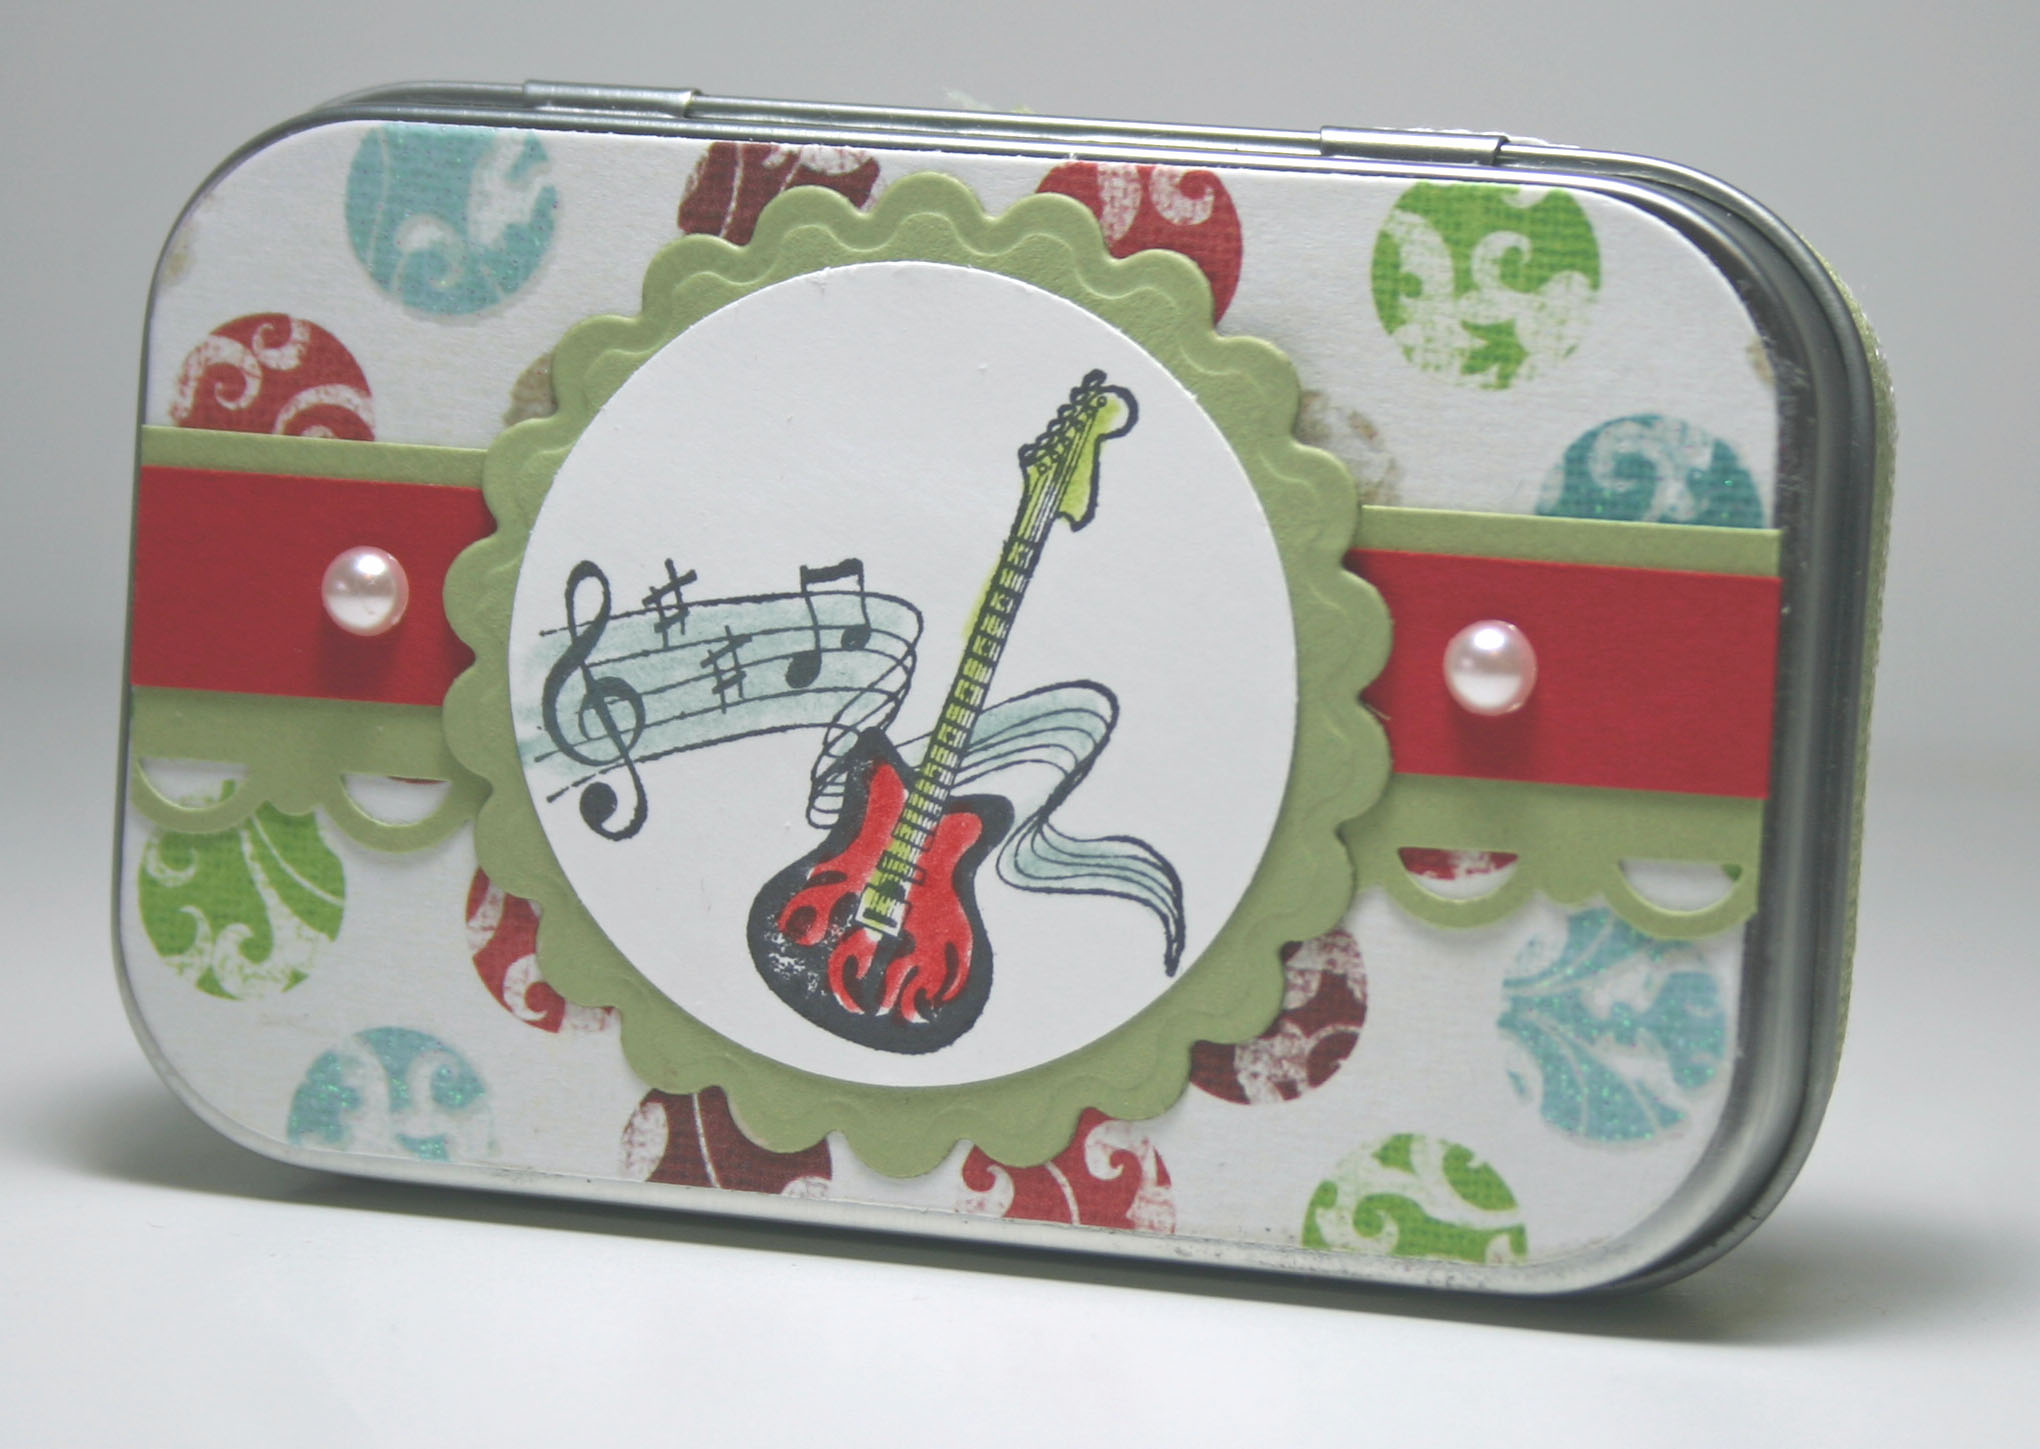
I previosuly shared a very similar tin that was decorated for a Starbuck’s card. This one holds an iTunes card. Enjoy has a bunch of images for lots of different types of gift cards year-round.
My third project is something I’ve wanted to do since last year. One of my customers e-mailed me some photos she had saved from blogs that showed this basic idea. I’m sorry I don’t know who to credit for it, but it was a fun little project using a Sizzix scalloped circle die and the tab punch.
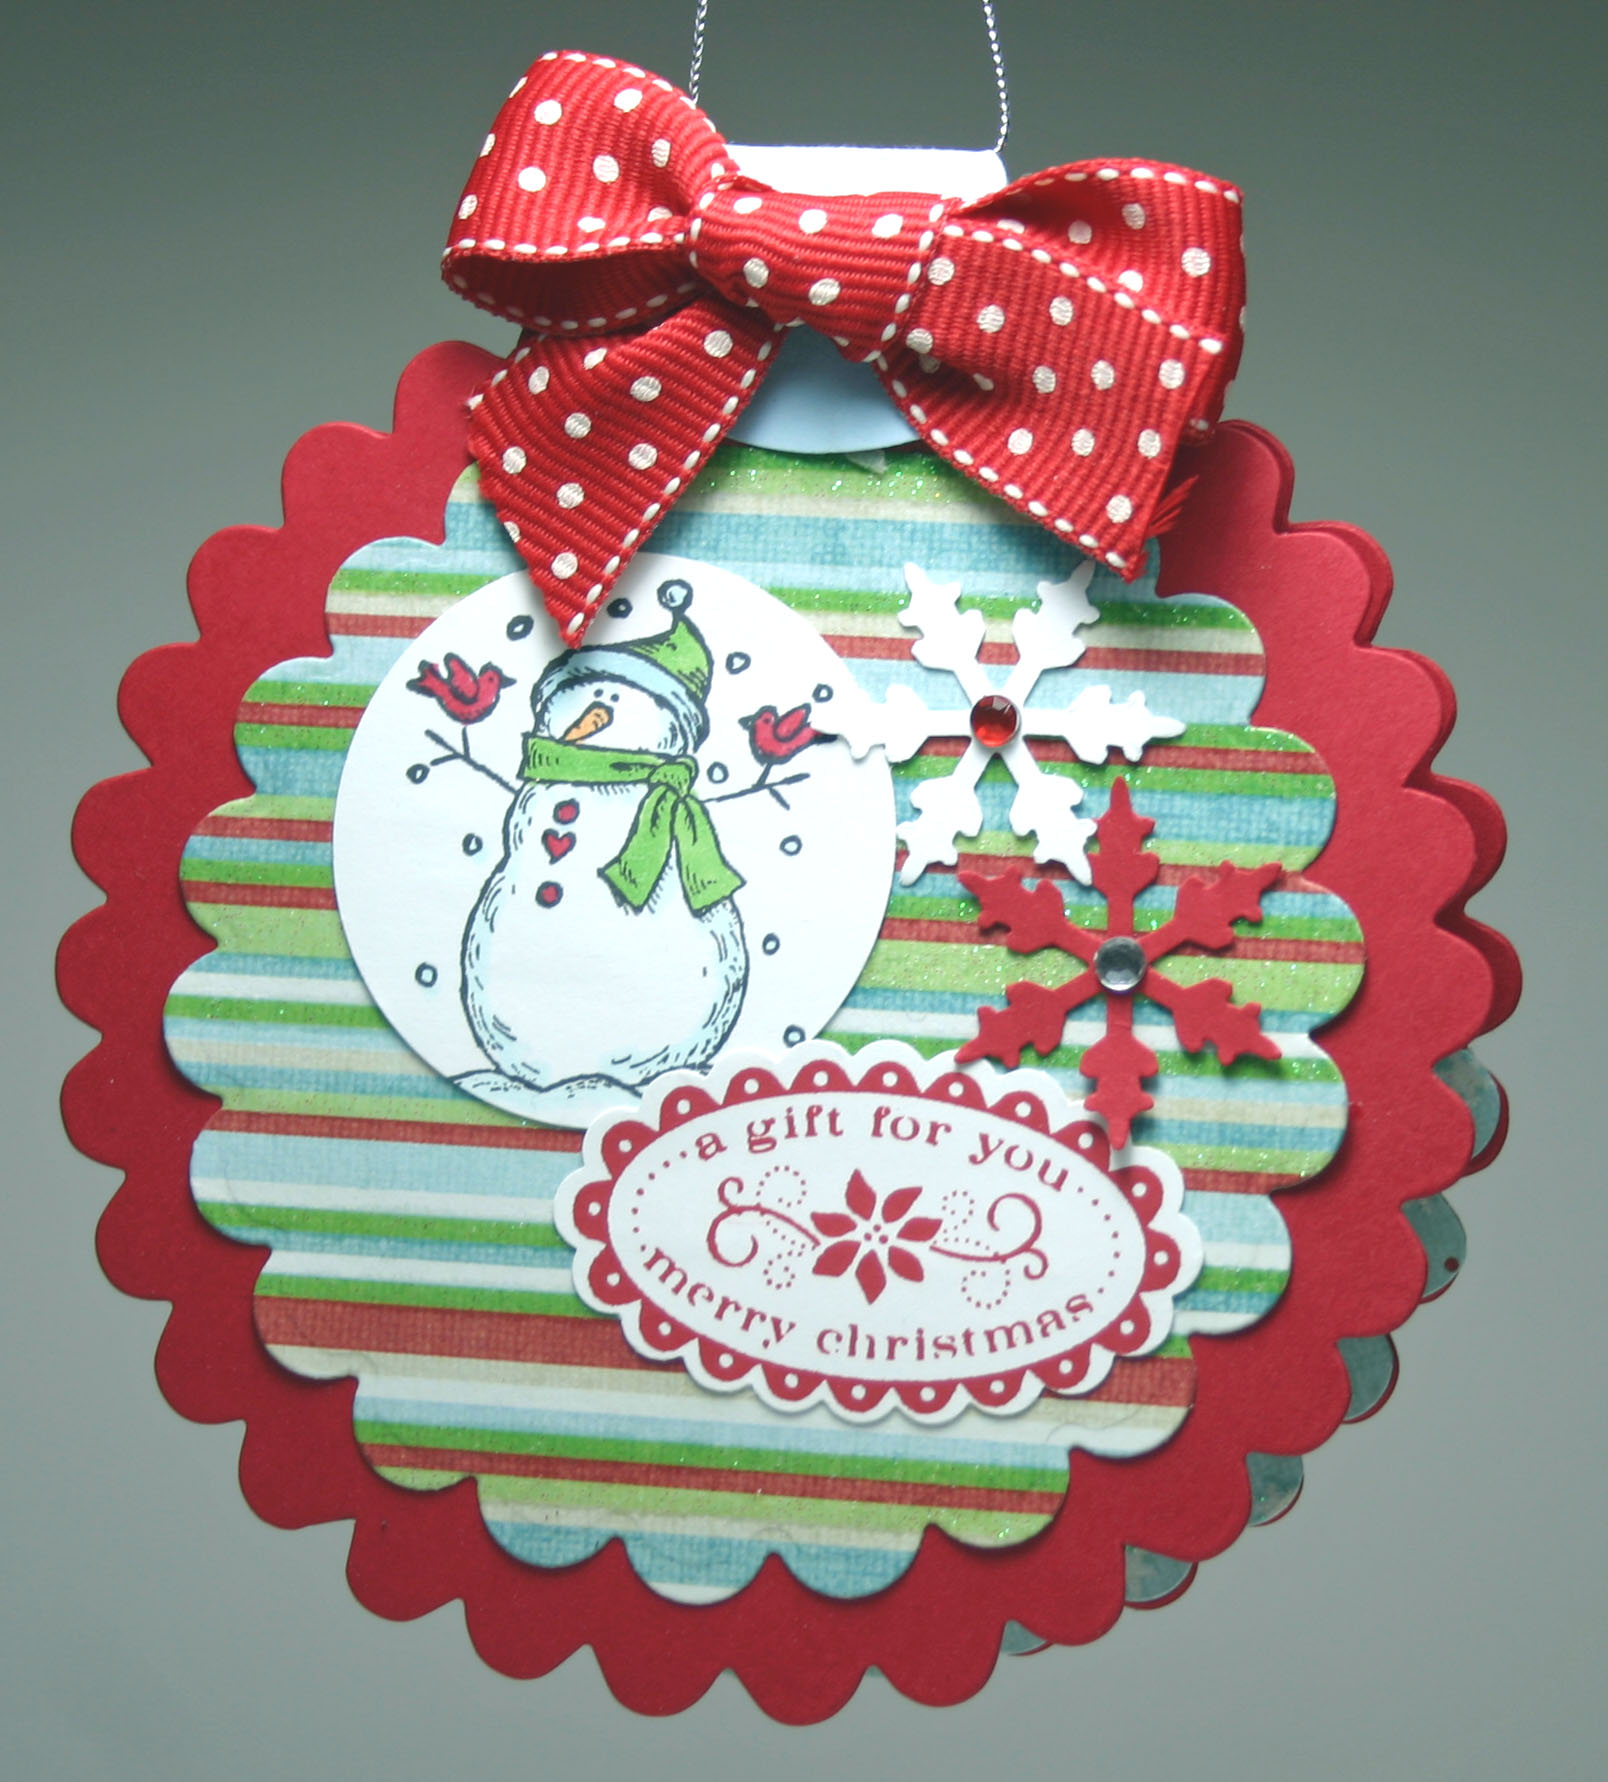
Images are retired SU and there is a cord at the top so this could actually hang on a tree branch if you like. Here’s the inside holding a gift card. Tag is from TE.
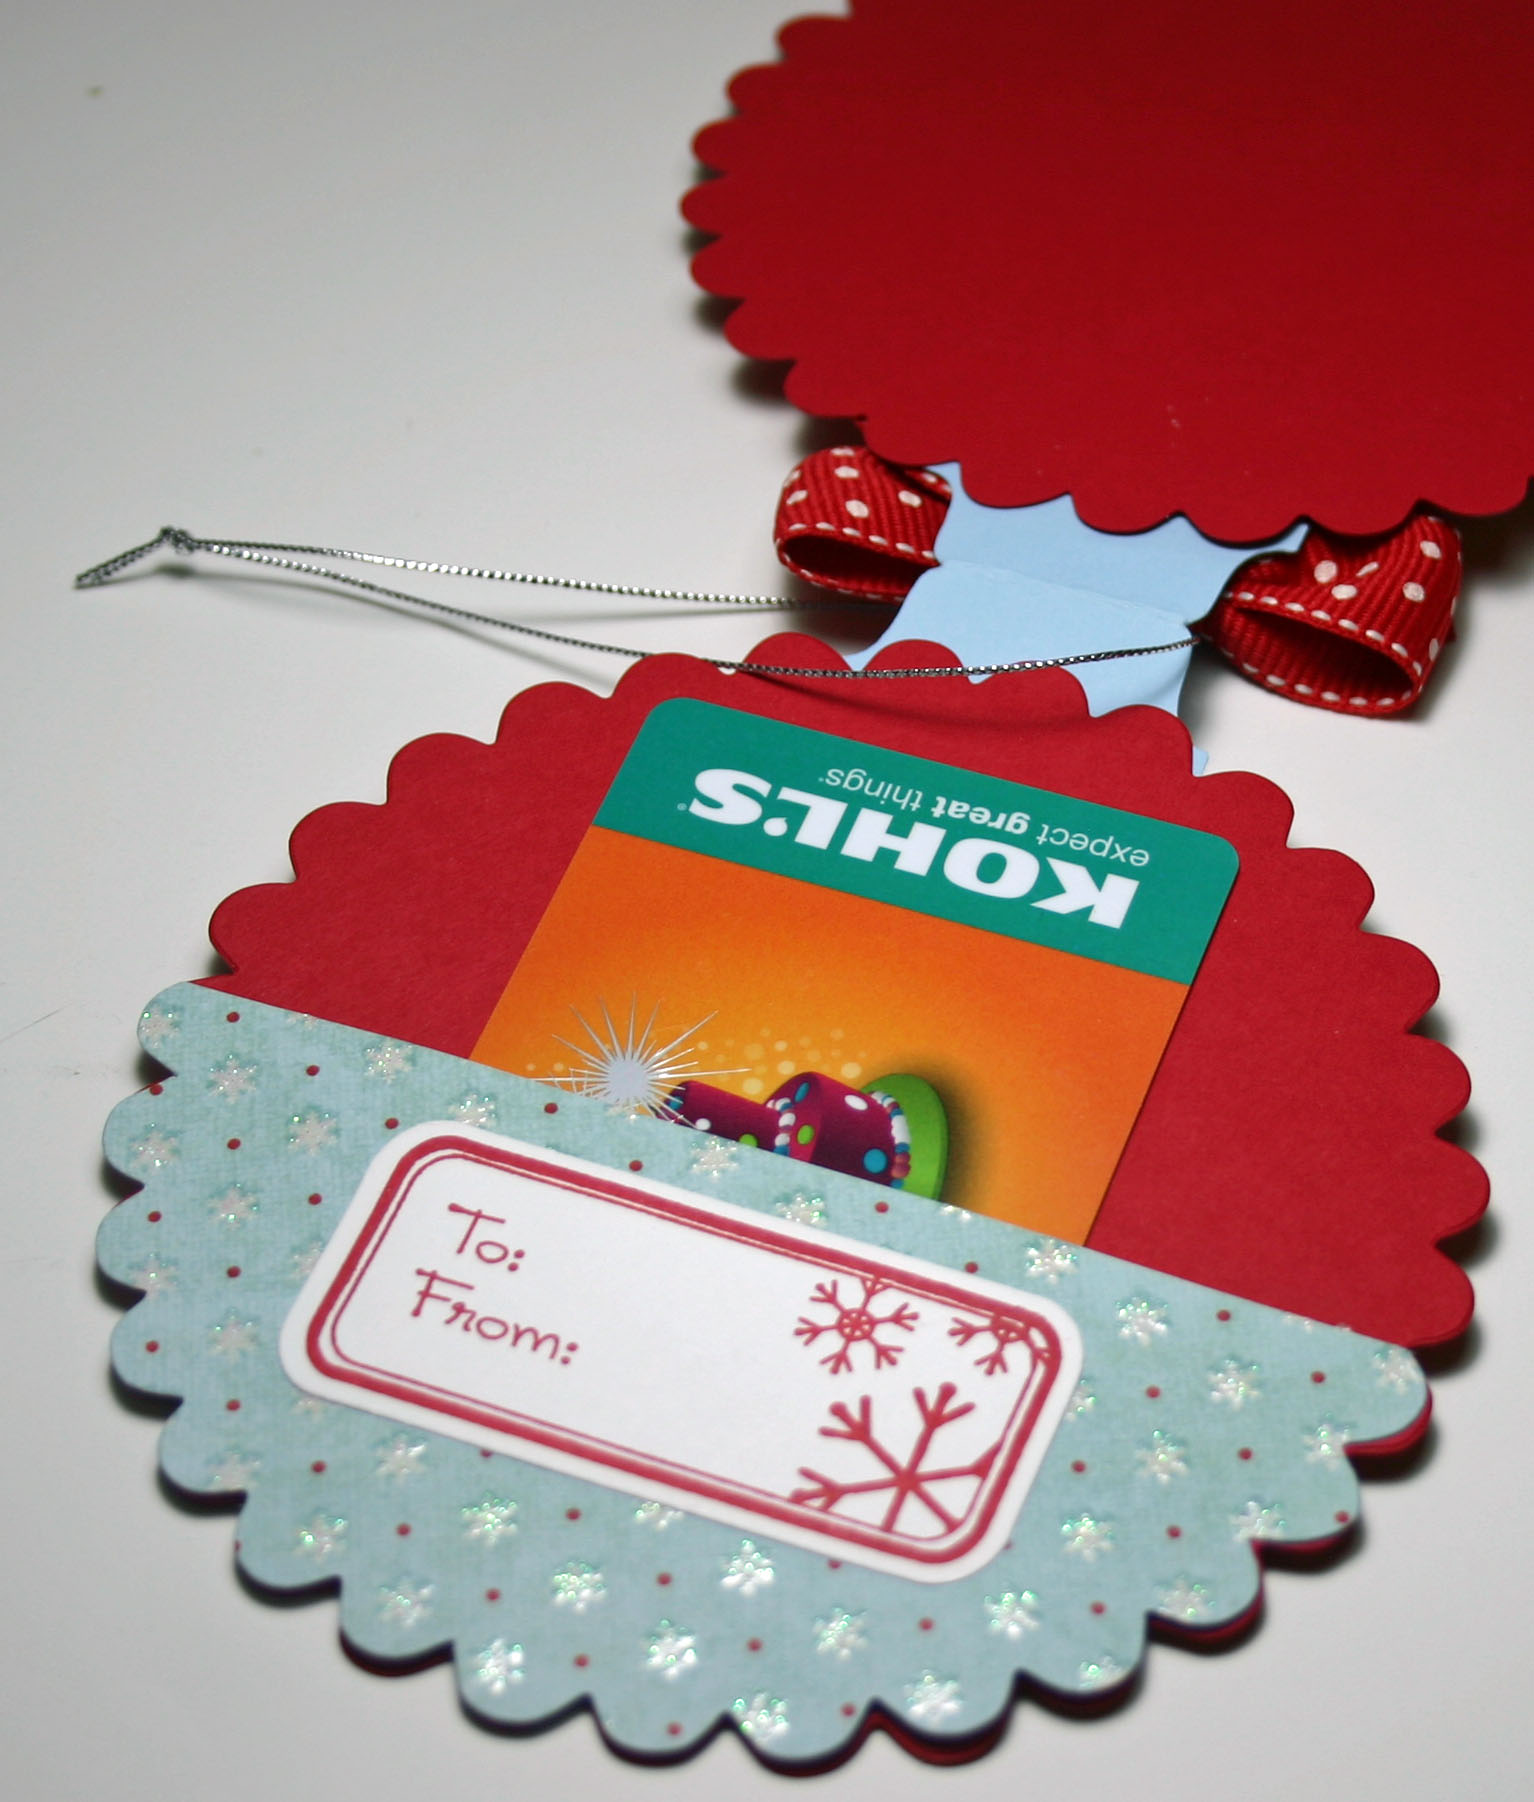
This was really a pretty simple project to make and there are so many possibilities for decorating these! I think all 3 of these projects make gift-giving more fun.
So how about you? Are you all ready for Christmas? I’m pretty sure I’ll be shopping or wrapping or crafting gifts right up until the last minute this year. And I haven’t even started working on the big birthday slide show I have planned for the party next week. I’m not sure how I got so behind, but I’ve tried to stop and take a few minutes every so often to just breathe and enjoy. I’ve missed you all and hope to be back to a more regular stamping and blogging schedule some time in January. I do have a couple more things photographed and ready to share. Just not sure if I’ll get them posted here before Christmas.
Thanks so much for stopping by and Merry Christmas (in case I don’t get back here before then.) If you have a minute leave me a little hello. I’d love to hear from you!
![]()
Taylored Expressions November Release Day
November 4th, 2010
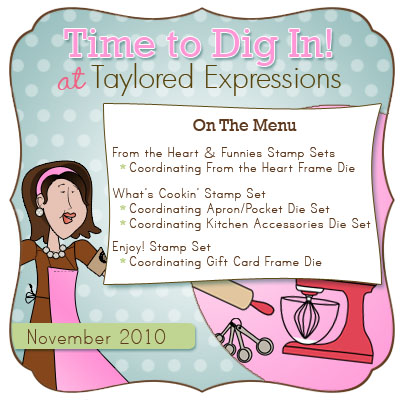
Taylored Expressions Store! It’s time to DIG IN!!! Be sure to check out the Fresh Out of the Oven Department for all the stamp sets and dies plus tons of other new products. I’m joining the Baker’s Dozen today in presenting even more shopping inspiration for you. *wink*
It’s Release Day at Taylored Expressions. Everything we’ve been showing you over the past several days in now available for purchase at the
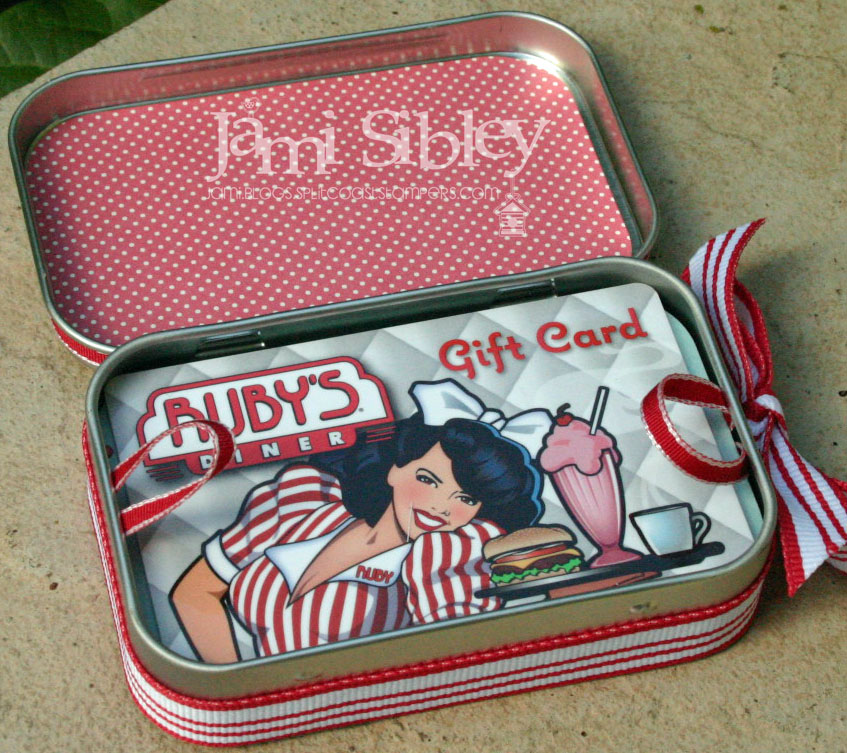
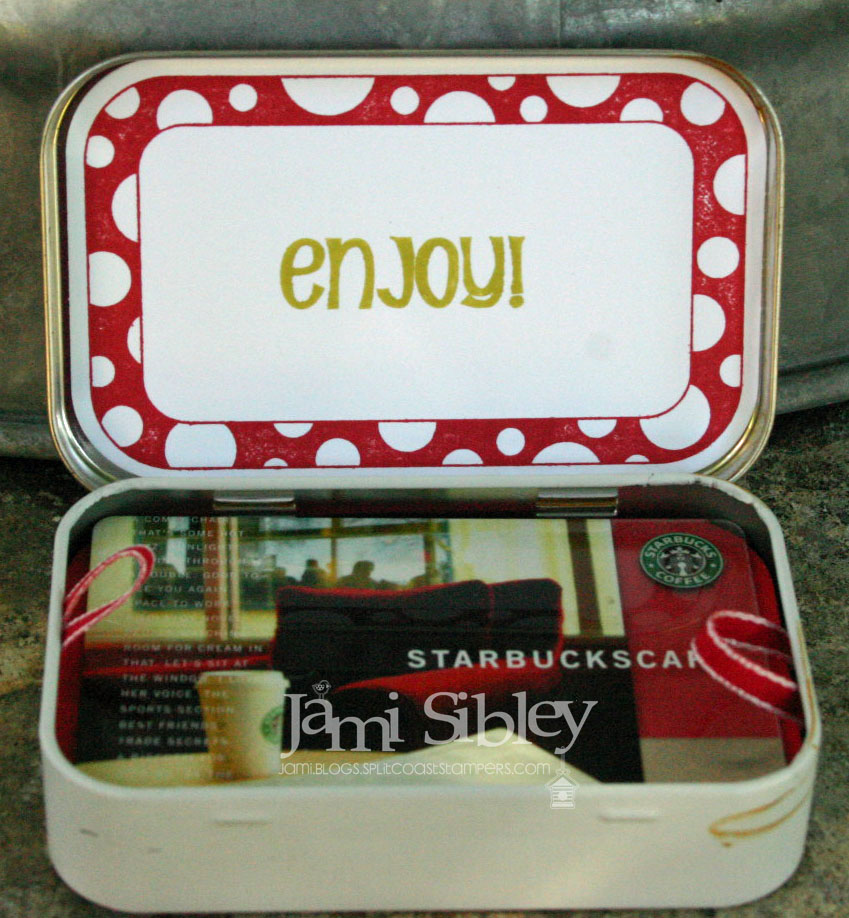
Today I have 2 gift card holders made with the new stamp set Enjoy!, the Gift Card Frame Die, and a couple of small hindged tins (or altoids tins). The frame image and die were designed to fit perfectly on or in these tins.

This first tin was made to coordinate with the card I showed you on Monday as part of a little thank you gift. I stamped the place setting image on Buttercream cardstock and colored it with Copics. Then I punched it out with a 1 3/4″ Circle Punch and trimmed it out with Taylor’s Tiny Twinkles. You can see the polka dot frame was cute with the Gift Card Frame Die and fits perfectly on top of this tin.

I trimmed the edges with ribbon adhered with Zip Dry. Inside is a gift card for Ruby’s Diner. YUMMMMM! Did you know that they have these gift cards at Costco here in SoCal? Only $40 for two $25 gift cards! Like I said…yum!
My second tin was created to hold a Starbuck’s card – still a super popular gift for all sorts of occasions!

This time I used dp from the Snow Day Project Pantry and put the frame image on the inside of the tin. This tin is super simple and it would be really quick to whip up several of these to have on hand. You could even leave off the image until you’re sure what type of gift card will go inside. Although this is Christmas paper, it will really work year-round.
You might notice that my cards are raised up on a platform in my tins and that I included little ribbon loops. I simply use a piece of 3×3 cardstock scored and 1/2″ on each side to create the platform. I’ve put together a video to share a few tips about creating these gift card tins. If you have a few minutes, take a look and let me know what you think. I’m going to ask you to please cut me a little slack as this is the first time I’ve made an over-the-shoulder video. There are several times when I thought I was holding something up to the camera for you to see close up, only to find that I was actually holding it out-of-frame! LOL! I promise to get better! I’d love to make more video tutorials!
[youtube]https://www.youtube.com/watch?v=ufhd1uP-7H8[/youtube]
Thanks so much for spending some time with me today. Let’s check out what the Baker’s Dozen has cooked up with all the new goodies…they will have samples of all the new sets…
- Charmaine Ikach
- Danielle Lounds
- Donna Baker
- Jackie Pedro
- Jodi Collins
- Karen Giron
- Karen Motz
- Melissa Sauls
- Mona Pendleton – Guest Designer
- Regina Mangum
- Sankari Wegman
- Taylor VanBruggen
- Tori Wild
Happy Hopping and Happy Shopping! Have a great weekend!
![]()


