16 Years!
November 30th, 2007
Just a quick post to say Happy Anniversary to my hubby. We’ve been married 16 years today. 🙂
Here’s the card I made for him…
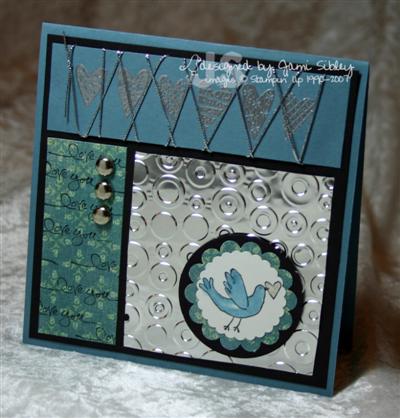
I have to be at hair appointment in just a few minutes so just a quick post. Card is 5.25″ square and base is Not Quite Navy. Hearts are embossed in silver and that piece is wrapped with silver cording. Metal sheeting (available from Sencie – click on her blog from my sidebar) run through the Cuttlebug. Sorry the pic is a little dark. I got one shot and the camera batter died.
Busy weekend – we’ll go out for dinner tonight. Tomorrow I am attending a Christmas tea in the morning and then I have a stamping date in the afternoon/evening with my SoCal stamping buddies. Hope you all have a fantastic weekend. Thanks for stopping by!
Hmmm…I think I’ll set the timer for this to post in a few hours so Curt doesn’t see his card before I give it to him! *wink*
Magic Cabinet
November 30th, 2007
I’ve been telling everyone for months that I was having a magic cabinet made that would solve ALL my problems. Of course that was said in partially in jest and partially because I was a little worried that my expectations were a tad too high.
And WooHoo!!! We finally got my new cabinet moved into my stamp room last night! I’m in heaven! This has been many months in the making. Like most of you I’m sure, I have limited storage space. I’m very fortunate to be able to claim our second bedroom as my stamp room, but I do share that room with 2 very large macaw cages. (We alternate between calling it the “bird room” and my “stamp room”.) And since we only have 2 modest size closets in the house including the one in that room, the closet is filled with clothes with minimal room for any crafting supplies. All this to say that I need to make the most of every bit of space. The cabinet I had just wasn’t using the space to it’s potential and stamp sets were stored in Iris carts and plastic bins and often on the floor.
So I dreamed up this cabinet and went out shopping. Ummm….that’s rarely a good idea, but something I do often. When I’m shopping for something it’s common for Curt to ask me “Honey does this thing actually exist?” and I answer “well of course it does…it’s right up here in my head!” After several frustrating shopping trips Curt insisted I call John the cabinet maker to get an estimate. He built a banquette and a little desk in our kitchen several years ago and he does awesome work. Before I called him I measured and pondered and sketched and came up with what I thought would be perfect. John came out and measured and looked at my drawing and gave us a price. Of course it was much more than I had hoped, but Curt – wonderful husband that he is – without hesitation said we should get it made! And now something that only existed in my mind six months ago is a real piece of furniture in my stamp room and it looks exactly as I envisioned it. WooHoo I’m a furniture designer now!
It was hard to get good photos of it last night in the room because I could only get so far away from it. Here it is empty.
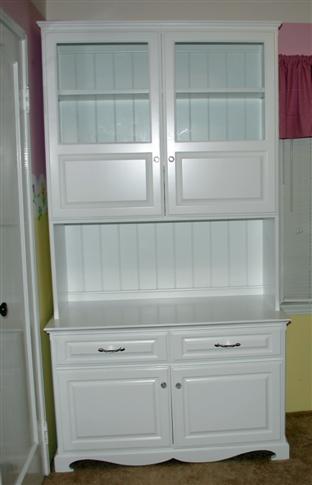
Isn’t it gorgeous? It’s 44″ wide, 22″ deep, and 85″ high – made just to fit in that spot. (Guess I should have taken a pic of me standing next to it so you could really see how big it is.) The top section is for stamp sets and I wanted the bottom 1/3 of those upper doors to be solid so you can’t see the plastic drawer units I wanted to put there housing loose and misc. stamps.
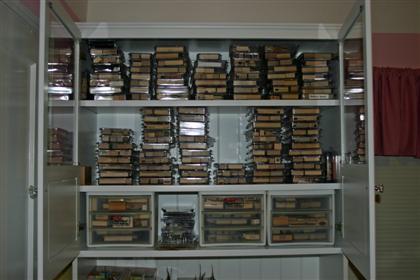
I will need to play with stuff a lot more to figure out the best way to store everything, but this pic was taken after just stacking up all my stamp sets. I’ve decided to add one more shelf and try the stamp sets on their sides before I decide which way I like best. The cabinet is quite tall and that works fine for me since I’m 5’9″.
My 12×12 designer papers are in vertical Cropper Hopper holders and they will sit on the open shelf with room behind them for photo storage boxes full of cards. Half of those Cropper Hoppers had been on the floor under my desk.
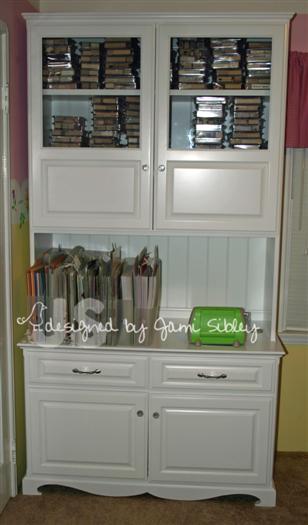
The drawers are very sturdy and deep enough for even my Giga Marvy punches. I moved all my punches to the drawers today (forgot to take a picture before the birds went to bed) and I still have about a half a drawer for all the new punches in the January SU catty. *wink* I have a lot more organizing to do before I completely decide what will go in the bottom section, but at the moment I’m thinking/hoping ot get a lot of alterables down there. It’s taking some time because really it involves re-organizing most of my room. It’s like one of those little tile puzzles we did as kids – where you have to move the tiles around in a frame where there is just one empty space – you have to move a bunch of stuff to get one thing in the right spot! It’s funny, even though this cabinet is much bigger than the old one, the room feels more open because the old cabinet had solid wood doors in a natural finish. I love the look of the crisp white! Oh and I think we’re going to try etching the glass panels at some point.
Anyway I am beyond thrilled and wanted to share with y’all! 🙂 Now I just need to get everything I pulled out into the living room back into the stamp room before it’s time to get our Christmas tree! Just have to work that puzzle one piece at a time. LOL!
While I’m here I might as well share a card I made for the Sketch Challenge at SCS – started it yesterday and finished it today.

The stamp is by Stampendous – Tier of Treats – and it’s available at eclectic Paperie. The sentiment is from a retired SU set. I colored the image with Prisma pencils and blended with Gamsol and stumps, then added some stickles. The stitching are rub-ons by Doodlebug. I realize the embellishment treatment at the top of the card is really too heavy for the look of the card overall, but it was a fun new thing to try. My friend Lisa inspired me to try putting rhinestone brads inside jumbo eyelets. It’s a really fun look, I just wish they had been at the bottom instead of the top. Cardstock used is So Saffron, Basic Black, White, SU Designer Prints Rose Red and Basic Grey Perhaps.
Thanks for stopping by. I’m off to organize in my dreams. Good night.
Wintergreen Wednesday
November 28th, 2007
I’m on pins and needles as my custom stamp cabinet will finally be moved into the house in about 2 hours! I’ve emptied everything out of the old cabinet and cleared the way to my stamp room and I can’t seem to concentrate enough to sit down and pay bills or do anything else very productive, so I thought maybe I could manage a blog entry. LOL!
I’ll tell you more about the cabinet when I get it inside and get some photos of it. For now let’s just say it’s been several months in the making!
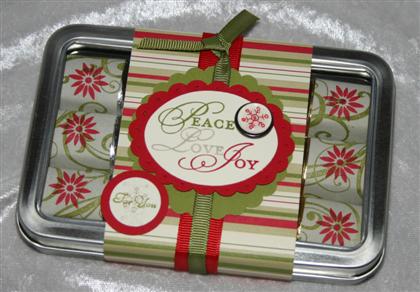
While I’m waiting I thought I would share the sweet little gift card holders I made for my stamp club members. I like to give them each a little something in December to show my appreciation for them and to say Merry Christmas.
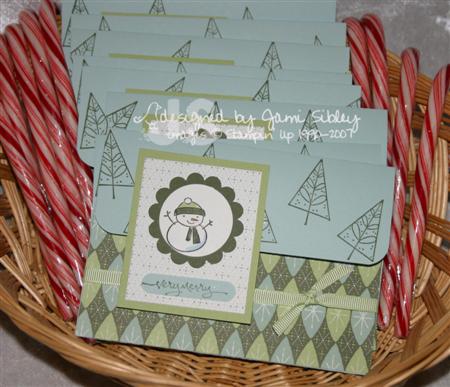
Only my Fantastic Club Members know what’s inside. *wink*
These cards are based on Sharon Johnson’s instructions on her blog here. Essentially a half sheet scored at 2″ and 6″ with a velcro closure under the image panel. Sharon’s post was a lifesaver for me when I realized I hadn’t made my gifts yet and some of my girls would be coming to pick up their orders in a couple of hours. I was able to whip up 9 of these fairly quickly and I think they turned out really cute. Paper is Wintergreen dp along with Soft Sky and Celery cardstock and the stamp set is Merry & Bright. Like I said before, if you don’t have this set hurry up and order it before the end of the week! You NEED it! And how did we get along before SU came out with the scallop circle punch? I swear I use it for everything. There’s almost no point in putting it away. I can hardly wait to see what new punches will be in the new catty in January. I can’t believe how addicted I am to punches.
Oh and I want to say CONGRATULATIONS TO HELIO AND JULIANNE!!!! What an awesome season of Dancing With The Stars! I’m very happy they won! As many of you know, I taught for and managed an Arthur Murray Dance Studio for 7 years (teaching ballroom, latin, country, etc dancing to adults) way back when, so that show is very close to my heart. If you’ve ever thought about taking lessons, I say DO IT!
Thanks for stopping by. I’m off before I start rambling about a bunch more topics…I ramble when I’m excited. Hopfully I’ll have some pictures tomorrow.
More Metal
November 26th, 2007
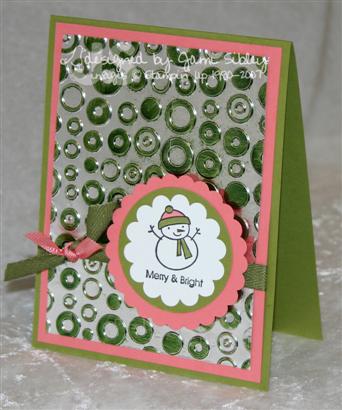
I’ve been playing with some more of those metal sheets I got from my friend Sencie. On this first card I ran it through the Cuttlebug and then rubbed an Olive Stazon pad over it. The ink kind of strayed a bit…it actually looks messier in the photo than IRL. I think because of the shininess of the metal in person the stray ink isn’t as obvious. This is a super simple card, but I liked the unusual color combo of Cameo Coral and Old Olive for a Christmas card. I had some olive twill in my stash and also some coral grosgrain. Image is from the SU set Merry & Bright. You know the Holiday Mini is only good through Friday. If you haven’t ordered this set you really need to. I can’t believe how much I’ve used this little set!
This next card took me almost a week to complete. I had an idea in my head, and I got the card partially done, but just couldn’t get it right. I almost scrapped it entirely, but ended up coming back to it after several days and now I really like it. The igloo is from Whipper Snapper and the little penguin is from Savvy Stamps.
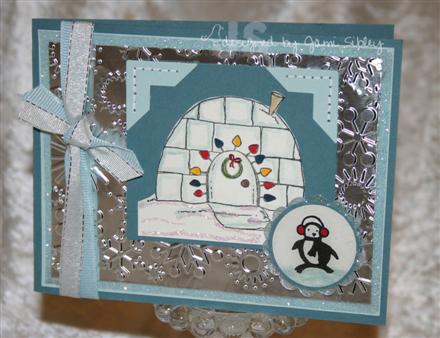
Card base is Blue Bayou layered with Soft Sky. I lined the edges of the Soft Sky piece with Scotch double stick tape and covered that with Ultra Fine Pastel Blue Glitter and then attached the embossed metal sheet. The igloo was stamped on shimmer white cardstock and cut out and attached to a piece of Blue Bayou. A little watercolor shading, markers for the lights and stickles for the snow were added. The penguin was punched with a circle punch and then covered with an A Muse scallop circle sticker and then pastel blue glitter was applied where the scallops hung over the image. It gives a really cool icy effect! The penguin piece is mounted with double thick foam tape. Some photo corners with faux stitching along with some silver and blue ribbon are the finishing touches.
If you want to give a little special touch to a card try using double stick tape around the edges like I did here and covering with a colored glitter or even just Dazzling Diamonds. You can also create cool stripes of glitter. The MORE sparkle the better baby!!!
If you’d like to get some of the metal sheeting to play with go see Sencie here. Not only can you emboss it with the Cuttlebug, but you can color it with Stazon or with alcohol inks or paint it with dabbers. You can also cut out shapes with the Cuttlebug – Sencie has a sample on her blog of letters cut out of the metal. It’s very thin and easy to work with. Try it out!
Don’t forget the SU Paper Party Special (buy 3 packs of designer paper and get 1 free) ends this Friday – don’t miss out. Contact your Demonstrator today! And have you seen the new special? Might as well put everything on one order this week. *wink*
Thanks for stopping by. I’m off to cozy up on the couch and watch the finale of Dancing With the Stars on dvr. It’s just about my favorite show ever! 🙂
Texan Snowmen
November 25th, 2007
I didn’t think I’d get a chance to stamp today, but when I saw the Featured Stamper Challenge on SCS today I just knew I had to find time. Today’s Featured Stamper is Bev Gerard, better known as Tex. You can see her SCS gallery here and her blog here. She is an absolute sweetheart and a fabulous stamper to boot! I’m so glad that she is my friend! The idea of the FS Challenge is to CASE (copy) a card from the Featured Stamper’s gallery and just change 2 or 3 things about the card to make it your own. Here is the card I chose to copy. I love that Ronnie image she used, but when I went looking for something to use in that layout I ended up going with the group of snowmen from Flaky Friends. Here’s my version –
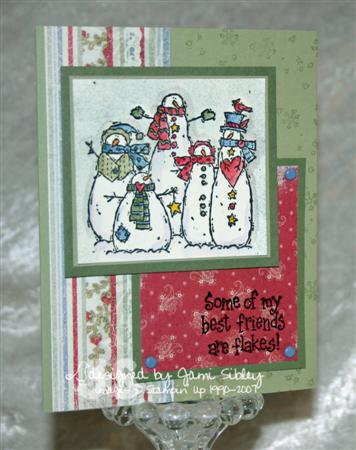
Once I had my main image selected I started looking through my stash of patterned papers and decided on two from the daisyd Snowflakes & Holly 6×6 pad I purchased from eclectic Paperie. The rest was just fun stamping! I did something I hadn’t done in a long time – I colored with blender pens and ink from pads. Once I got addicted to my aquapainter I stopped using blender pens almost entirely, but somehow this image just seemed to call for them. I used Mellow Moss, Always Artichoke, both Real and Rose Reds, Brocade Blue and a little Summer Sun. Cardstock used is Mellow Moss and Always Artichoke and the snowmen are stamped on Confetti White – an old favorite I haven’t used much lately because of my recent attachment to shimmer white. Brocade brads are the finishing touch.
I really like the way Tex had the sentiment on the card base itself at the bottom, but I couldn’t make mine fit that way and had to adapt a little. The sentiment is embossed with black craft ink and clear ep. It was fun to get this old set out and play with it again – I still really like it. And I’m very happy with how this card turned out. Thanks Tex for the wonderful inspiration!
Do y’all realize we have exactly one month till Christmas? Four full weekends. I don’t think it’s sunk in for me yet. I better start making lists – to do lists – gifts to buy lists – gifts to make lists – my Santa wishlist – cards to mail lists – etc etc etc. *deep breath* *in* *out*. I think the holiday season has officially started…so Happy Holidays!
Just a Little Thanks
November 24th, 2007
Last night I hosted a little Open House to encourage people to come and get their Pampered Chef and Stampin’ Up! orders from me. I made Paula Deen’s Double Chocolate Gooey Butter Cake (click here for the recipe) and it was a big hit! Thanks Jess for pointing me to that!
I wanted to include a little thank you note in the Pampered Chef orders and here’s what I came up with.
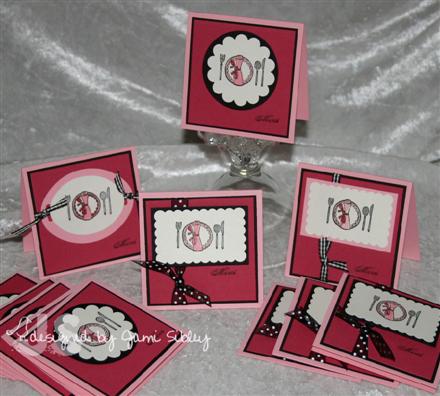
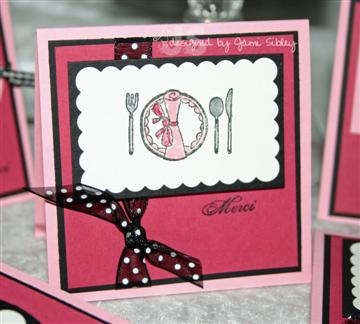
I started with Pretty in Pink 3×3 love notes and layered them with Basic Black and Rose Red cardstock. The place setting is an A Muse image and it was stamped on shimmer white and colored with SU markers. The “merci” is from Carte Postale. I needed 16 notes so I made a variety of designs since I don’t enjoy making multiples of anything really.
I think this one is probably my favorite of the bunch. I used a Marvy scallop rectangle punch and some polka dot organdy ribbon from Fabric Barn.
Today I completed a batch of 25 Christmas cards that I’ve been working on for what seems like forever! I’m so glad to have at least one batch done and am looking forward to getting together with friends next weekend to complete a bunch more “in progress” cards. How are you doing on your Christmas cards?
Hope you’re having a fantastic long weekend! Thanks for stopping by. 🙂
I’ve been elfed!!!
November 21st, 2007
How fun is this? I got this sweet package in the mail!
Isn’t it gorgeous? I mean it’s incredibly gorgeous! I’d love to thank my elf, but it’s all a secret. The “elf” program was cooked up by Leona over at Splitcoast and you can play too – check out the info here. You just pick out 2 SCSers you’d like to send surprise goodies to and PM one of the coordinators. The coordinator will then get you the addresses and add your people to the “elfed” list. You can send out whatever you want. I’m getting my packages ready to go next week. What a fun way to spread a little holiday cheer! It sure put a big smile on my face!
I’m up to my eyeballs in Pampered Chef and Stampin’ Up! orders! I have some people coming today and hopefully a lot of people coming Friday evening to get their stuff. It’s taken over my kitchen completely and I’m not sure what I’m going to do with all of it tomorrow morning when we have my parents over for breakfast…hmmm I wonder how much of it will fit in the bath tub?
Thanks for stopping by and Happy Thanksgiving in case I don’t get a post up tomorrow.


