Taylored Expressions June Sneak Peeks Day 1
May 31st, 2011

June Release At a Glance
- We have sneak peeks to share Tuesday, Wednesday and Thursday. All of the new products will be available for purchase on Friday, June 3rd at 8 am PST. You’ll find it all in the Fresh out of the Oven Department in the Taylored Expressions Store.
- Join us as a fan on Facebook for an early peek at the stamp sets on Thursday night beginning at approximately 6 pm PST.
- Special Early Bird Offer on Release Day for the first 15 orders over $100. It’s TOTALLY SWEET!
- Mystery Baker’s Dozen Blog Giveaway: Each day one lucky blog commenter will be chosen by random draw to win a $10 TE Gift Certificate. Winners will be chosen from a different Baker’s Dozen blog each day and all will be announced on Taylor’s blog on Release Day! Be sure to hop around to see all the sneak peeks and leave comments on each and every blog for more chances to win. Limit one comment per blog per day, please. Comments close Thursday 6/2 at 7pm PST for the drawings.
I’m excited to play along today and I have 2 samples to share with you. First I have a card featuring A Day in Paradise. This is a beautiful “Cape Cod” style beach set that includes both some open line images as well as solid silhouette images. This set was illustrated by Nancy McKinney as part of the Whimsical Wishes collection. It’s going to give you lots of options for Summer cards and scrapbook pages, as well as retirement wishes and some great masculine cards. I made this card to be a Father’s Day card.
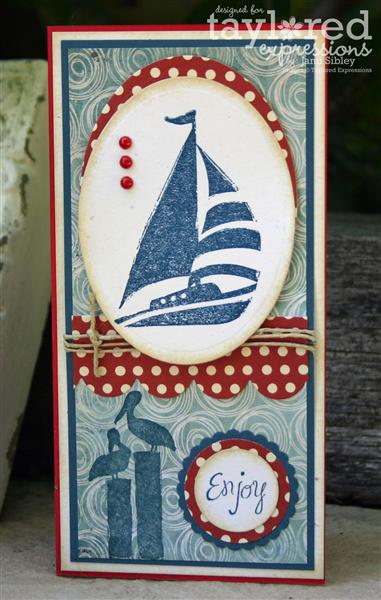
Finished card size is 6.5 x 3.25 (a 6.5 square folded in half) – a mini tall card. The boat was stamped with Not Quite Navy ink on confetti white cardstock and die cut with a Spellbinder oval. The pelicans were stamped directly on the designer paper. Papers are from MME Stella & Rose Hattie 6×6 pad as well as the Webster’s Pages Spring Market-Yacht Club-Country Estate 6×6 Petite Pack. I think both of these paper collections are great choices for all the stamps and dies we are previewing today.
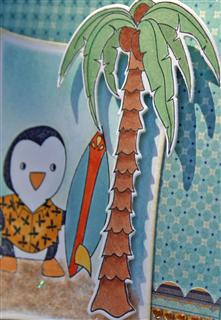
My next card features The new Surf’s Up Penguin Petite along with the palm tree from Hangin’ Out at the Beach and….are you ready?….the brand new coordinating Palm Tree Taylored Die!!!! I have been begging for this palm tree die ever since Taylor released that stamp set last year. I love love love that image, but I am not fond of cutting it out by hand. I cannot even tell you how excited I was when Taylor told me she had the die in production. *huge grin* I know you are going to love it too!
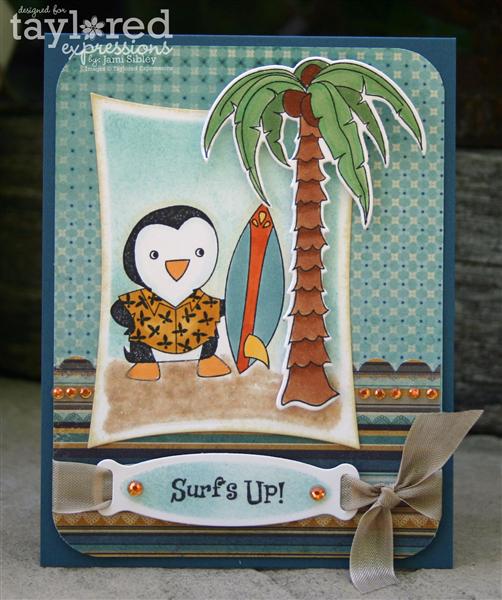
Isn’t that little surfer dude so cute? He’s standing on Brown Sugar Sparkly Fluff “sand” and he was die cut with Wonky Rectangles. The sentiment was die cut with a Ribbon Tag Trio die. Paper is from the same MME pad as above and I added Kaisercraft rhinestones and SU Crumb Cake seam binding. The corners were rounded with my trusty Corner Chomper. The palm tree is up on small foam squares.
So, what do you think? Cute stuff coming on Friday, huh? There are 2 more Petite sets and another die that I didn’t show. Let’s check out what the Baker’s Dozen has cooked up today.
Don’t forget to leave comments along the way to be entered into a drawing for a TE gift certificate. There will be a separate drawing each day of sneak peeks! Thanks for stopping by!
![]()
Tessa Turns 4!!!
May 28th, 2011
Today we are celebrating Tessa’s birthday. She came to us as a stray found in the neighborhood on the Saturday of Memorial Day Weekend 2 years ago. The vet estimated her age at that time to be 2 or 2 1/2 years old, so we are calling today her 4th birthday. We took her with us to Old Towne Orange to have a wonderful outdoor lunch at Bruxie (they brought her a dog treat, but she held out for a bite of waffle) and to walk around and enjoy the stores. People constantly commented how cute she is and of course I was a proud and happy mama. I thought I would share some of my favorite photos of Tessa over the past couple of years. If you’re a regular reader then you’ve probably seen most of these before.
Two years ago today we didn’t have a dog. We had our two macaws and had decided just months earlier that trying to integrate a dog into the flock would just be too difficult. It was Saturday and Curt was in charge of a car show at church the next day – his first one. He had lots and lots of details to attend to and he was a tad stressed. A knock came on our kitchen door. A lady asked if we knew anyone who might be missing a small dog – maybe a long-haired chihuahua. I said I didn’t. Her son was playing in a soccer tournament being held at the school a few doors down and they were from out of town. Everyone they were with was from out of town and they had found this dog and didn’t want to take it out of the area. Without a thought (or a word to my husband) I said I would take the dog and find the owner. This wouldn’t be the first time I had put signs up all over the neighborhood and found a missing family. Off I went.

I came home with this sweet, pitiful little thing. Curt was none too happy – especially since she nipped at him when he reached out to try to pet her. She was clearly frightened. We stopped everything we were doing to make signs and drive around to tape them up all over the neighborhood.

She finally warmed up to Curt around Monday. He had the week off work for a staycation to work on the backyard and we had a BBQ scheduled the following Saturday. She “helped” him in the yard all week. By Thursday or Friday we were smitten and began hope to that no one would call for her. Friday night we went and bought her a leash, a bed, and her first toy.

No one ever did call and she became part of our family. A happy happy addition indeed. I often say that I don’t think she had former owners. I think the Lord had angels drop her from heaven just for us. We didn’t even know we needed a dog!


Hot Dog for Halloween ’09

Our Christmas card ’09
May 2010 – first time we took her for a professional grooming. Loved the bandannas she gets there!

One of my all-time fave photos!

June 2010

July 2010

July 2010

The classic chicken photo! Halloween 2010

Christmas 2010 with her Nordstrom bowl from Grandma. 🙂
![]()
April 2011
![]()
May 2011

Today 🙂
Waitin’ for waffles!
If you’ve hung in with me through all these photos – thanks! I’m one of those silly people who loves my pup like crazy – OBVIOUSLY! I hope you are having a great weekend!
![]()
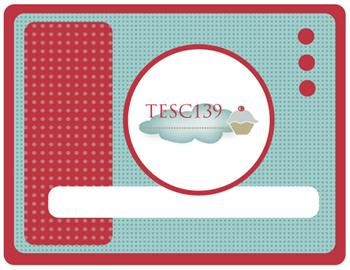
TESC139 Shake Shake Shake!
May 27th, 2011
Happy Friday! It’s time for a new Taylored Expressions Sketch Challenge! New sketches are offered on the 2nd and 4th Fridays of each month.
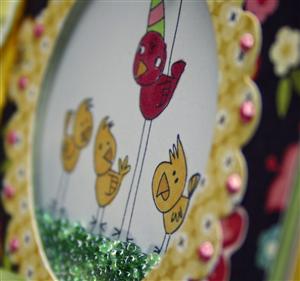
This is a fun one. I started out to create a recessed window card with a nested frame, but as I got going I realized I could go just one step further and make it a shaker! So why not? (BTW – the perfect foam tape for shakers is the double thick 1/8″ roll at TE.) Click on the photos to see them larger.
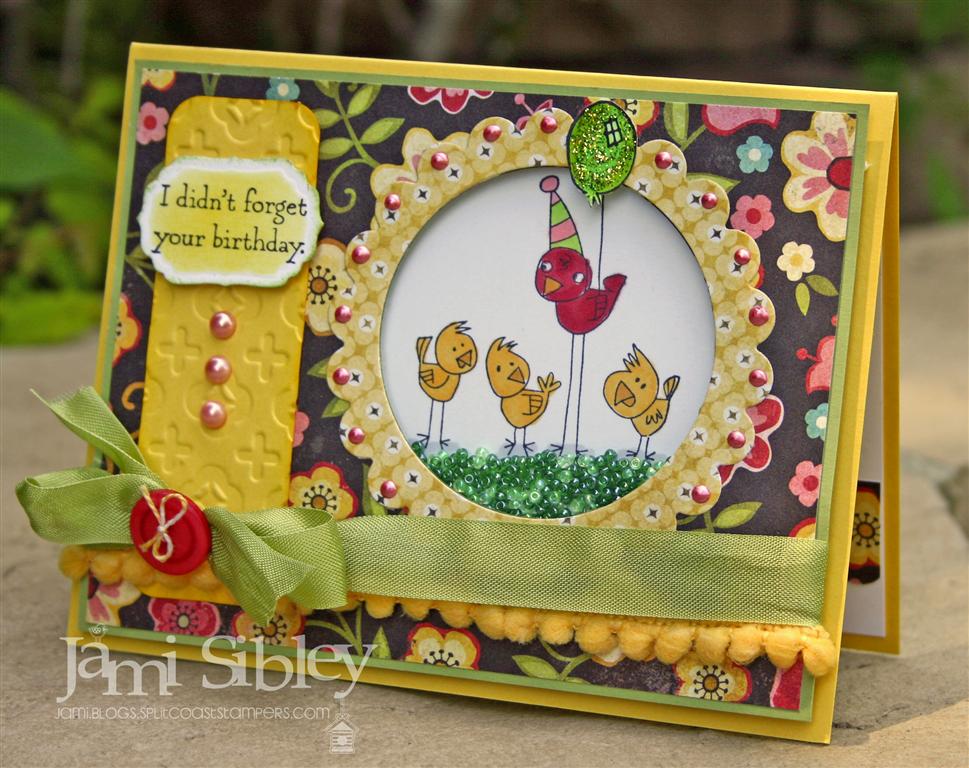
I used my favorite TE Belated Birthday A la Carte – Stand Out along with MME papers from the Stella & Rose Gertie 6×6 pad. I stamped an extra balloon so it could be outside the shaker and I covered it with stickles. The really fun thing about the whole collection of Belated Birthday A la Cartes is the combo of inside and outside sentiments. AND you get a large image plus the 2 sentiments for just $6.95!! This one says “I didn’t forget your birthday” on the front. And on the inside…
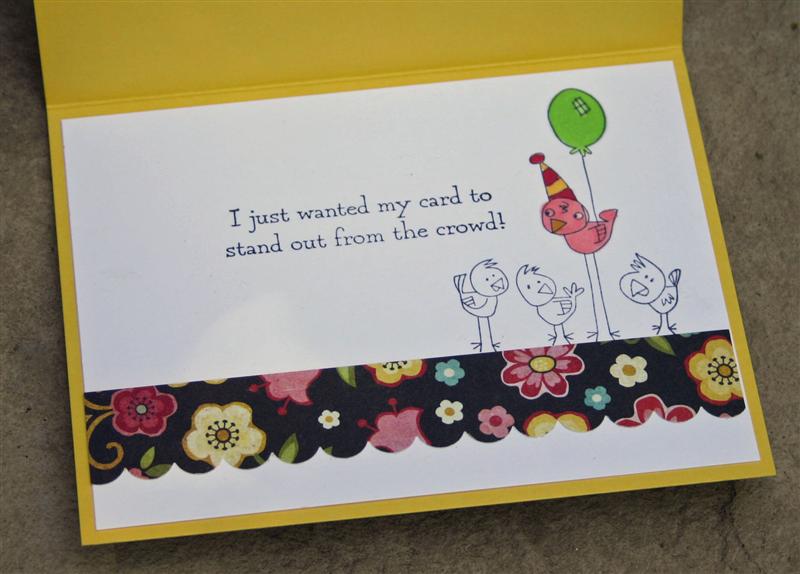
“I just wanted my card to stand out from the crowd!” I hate that I can never seem to get birthday cards out on time, but at least this way I have a cute reason to send them late. 😉
I hope you’ll play along with TESC139. You have 2 weeks to play and you will be entered to win a TE Store gift certificate. TE stamps are NOT reqquired. Get all the deets in the TE Forum on SCS. And now lets’ see what the rest of the Sketch Crew has in store:
- Dawn Easton
- Jami Sibley <— you are here
- Lisa Hjulberg
- Lori Craig
- Melissa Sauls
- Monika Davis
- Rachel Sztonyk
- Taylor VanBruggen
- Tracy Clemente
- Guest Designers: Rosemary Dennis, Kelli Hull
What do you have planned for the long weekend? We didn’t make plans since we were supposed to be on vacation last weekend. We need to think of something fun to do! I hope you enjoy whatever you do!
![]()
Nestie Frame Two Ways
May 26th, 2011
Oh. My. Word. What a week! The Rocket Scientist and I were scheduled to go on a fun RV weekend down to San Diego last week. We had a spot reserved right on the bay. We were excited. Tessa was excited. On Wednesday I shopped for groceries and got the trailer mostly packed so we could finish up and leave Thursday sometime before noon. When TRS arrived home from work Wednesday night, he was feeling a little “off” and we both thought the trip would do him good. But then…Wednesday night/Thursday morning he was struck by a NASTY stomach virus. The worst of it lasted 2 full days and our trip was obviously OFF.
I did quite a bit of stamping, as I considered it still “vacation” of sorts and completely put aside my regular to-do list. By Sunday morning, TRS was feeling up to going to church and I was feeling relieved that I had not succumb to the ugly illness. Uh…yeah…then Sunday afternoon I started feeling nauseous as I struggled to put the finishing touches on a card. YEP…by Sunday evening it was clear that it was my turn. UGH! It’s Thursday and while I am over all the bad stuff, I still just don’t feel 100%.
WHAT. A. WEEK.
I do have 2 cards to share with you today. These are the last 2 cards we created in my class a couple of weeks ago. The first card was used to teach how to make a nested frame with Spellbinders dies and it was the jumping off point for the much fancier version I made for Lori’s birthday. Everyone had a choice of 2 different sentiment combos all from TE stamp sets. We also used the TE butterfly die. Paper is MME Mary Mary. I love how the one sheet has a scalloped edge!
We used 2 sizes of the same Nestie set. First the larger size was centered into the striped dp panel and secured with temporary tape and die cut. This leaves you with the large frame pice you see here and the smaller shaped pice which we used inside the card. Then BOTH dies were centered into the other patterned piece (bright pink) and secured with temporary tape and die cut. That second die cut leaves you with 3 peices – 1. the bright pink frame you see here, 2. the center which we used to die cut the butterfly (you see the opposite side of the paper here), and 3. the large frame piece you will see in the next card. This is an easy way to make a WOW card that is still flat for mailing. And of course you can frame and feature a sentiment or an image.
I had only planned to do 3 cards in class, but when I got done with this card I had this beatiful piece of designer paper left over already cut into a frame. The sage colored side would be wonderful for a masculine card so I decided to see what I could come up with.

I adhered the frame panel to an Early Espresso cardbase. Then I stamped this retired SU lighthouse image with Sage Shadow ink on vanilla cardstock and die cut it with the smaller nestie. I sponged Espresso ink aorund the edges to fill in where the image did’t quite fill the shape. That was adhered to the card and I added some twine and called it done. I think this will make a great Father’s Day card! Isn’t it amazing how two such different cards could come from the same piece of designer paper?
Yesterday all I managed to accomplish was a few loads of laundry. Today I absolutely must get groceries and hope to cross a few more things off my almost-forgotten to-do list. Tomorrow I’ll be back with a fun sample (already done – YEA!) for the new Taylored Expressions Sketch Challenge. I hope you’ll come check it out.
Thanks for stopping by. Have a great day!
![]()
Happy Birthday, Lori!!!
May 18th, 2011
Today my wonderful friend Lori Craig celebrates her birthday (an important one *wink*) and, although I can’t be in Missouri to give her a big birthday hug, I will cyber-celebrate with her right here! I have a feeling that blog-land will be filled with wishes for Lori since she is such a special girl and such a sweet friend to so many!
I never imagined when I joined SCS almost 7 years ago that it would be possible to make real friends on the internet. But I can tell you that I have made some incredible, long-lasting true friends and I am still amazed by it. Lori is one of those true friendships! I still remember the first time I heard Lori’s voice. It was on my answering machine in 2006. Lori called to congratulate me on becoming a part of the Dirty Dozen Design Team. I barely knew Lori then. We had been on the SCS Moderator team together for about 4 months at that time (and certainly around SCS for longer than that), but here she was squealing with genuine excitement for me on my answering machine. Boy did that ever touch my heart! Then in the Spring of 2007 Lori decided to come out to SoCal for StampMania along with several other awesome *cyber-friends* from around the country. That weekend together sealed the deal! I’ve been fortunate to count her as a real friend ever since! {Hmmmm…after typing this, I wonder if Lori remembers the scenario the same or differently?}
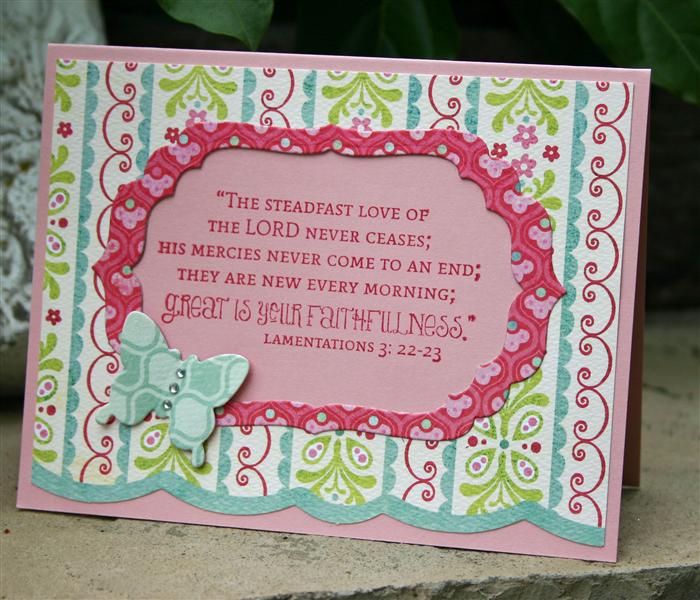
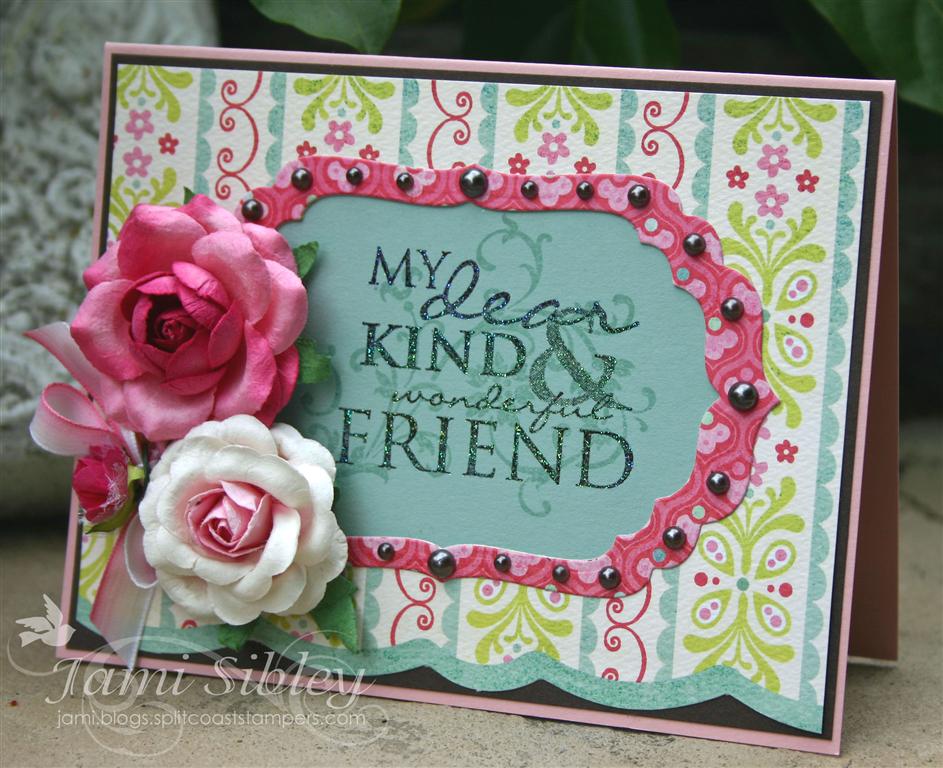
Lori, this card should arrive in your mailbox today *fingers crosssed*. Sorry to reveal it early, but you know they are always so much prettier in person anyway. When I sat down to make a card for you, I just kept thinking of this sentiment stamp “My dear, kind & wonderful FRIEND”. You are a blessing and an inspiration to me and I am so so very proud of all you have accomplished in this past year. I believe this next year will be the best yet and I pray for the Lord’s richest blessings on your life! Happy Birthday, friend!
Please hop over to Lori’s blog and leave your birthday wishes for her.![]()
CAS Thinking of You
May 17th, 2011
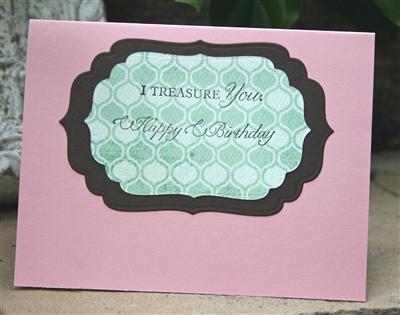
Happy Tuesday! While working on what I wanted to do with the Faux Framing Technique for my class last week, I created this Clean and Simple card that also features TE Discover Your Wings, as did the card we made in class. You can see that card in this post – fun to see how the same set and the same technique can be used to create cards with very different feelings to them.
This card is made with Early Espresso, Marina Mist, Crumb Cake (Kraft for pete’s sake!) cardstock, plus Espresso and Marina inks. The faux frame was created with Spellbinders Labels 10 cut into a pice of copy paper to create the reverse mask. Lace trim is from SU and the button is from my stash.
Thanks for stopping by!
![]()
Inspired by JulieHRR
May 16th, 2011
Happy Monday! I hope you had a great weekend. Mine started out with my stamp class on Friday evening and ended with a fun tradition at our church of celebrating Jesus’ resurrection with a fish taco supper last night. YUM! I’m here today to share one of the cards we created in my class Friday night. The theme of class was It’s a Frame Up! We explored different ways to frame images and sentiments on our cards such as Faux Framing (you can see that card in this post), Nestie Frames (to be shared later this week), and Recessed Windows.
It was serendipity when my friend JulieHRR posted this adorable Recessed Window on her blog last week. Initially I planned to just take loose inspiration from it, but as I sat down to work I found myself CASEing it fairly closely. I mean, really…who am I to mess with the perfection that is Her Royal Rubberness?!? Well, ok, I did add a celery base and that large flower embellishment…’cause you know me…can’t leave well-enough alone. *snort*
So here’s my version:
My card features the Taylored Expressions Stamp Set Garden Party Blooms (Plus Garden Party Critters for the sentiment.) The large blue flower was die cut with the coordinating Taylored Die set. The scallop border is the TE Medium Scallop Border die. Colors used are Real Red, Bashful Blue, Certainly Celery, Basic Black, Whisper White. It’s hard to tell in the photo, but the white panel is up on foam tape, so the sentiment is recessed in the punched window. For a how-to, I refer you to Julie’s awesome quick video. It’s really an easy technique that packs a punch!
Thanks for stopping by!
![]()


