Taylored Expressions Christmas – Products Now Available!
October 4th, 2018
Today is release day at Taylored Expressions and all the products you’ve been seeing this week are now available. Whatever your Christmas style might be, I think there’s something for just about everyone.
I have two more cards to share with you today. The first one just speaks to my heart.
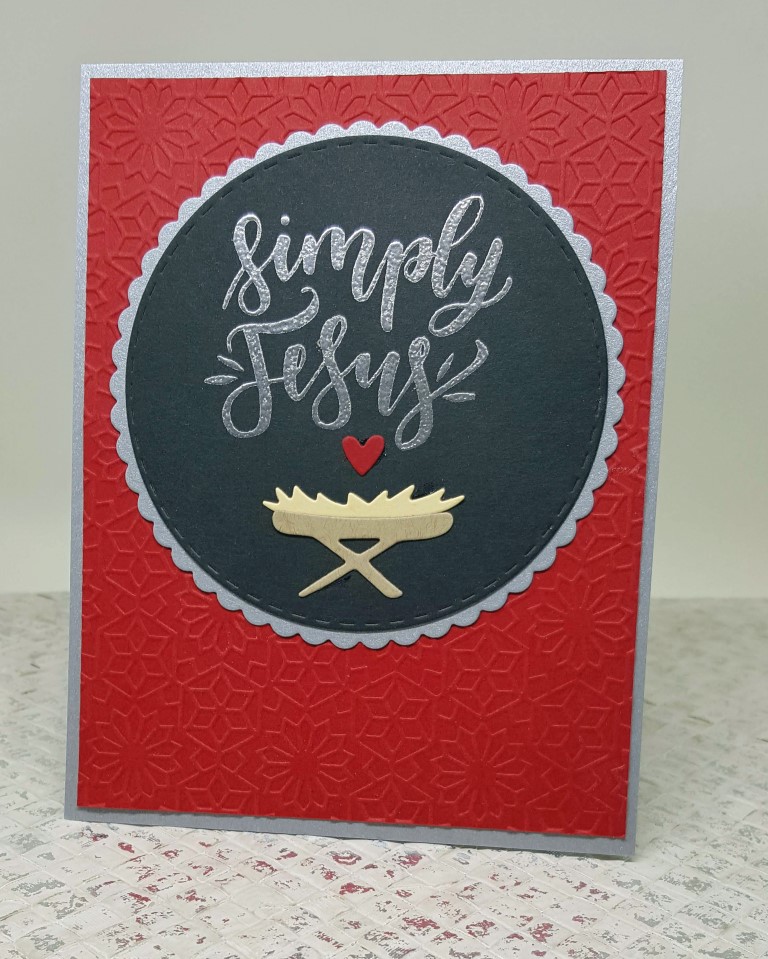
This one features the new stamp set Handlettered Holiday along with the Little Bits Manger die set and the Petite Scallop Circle Stacklets dies.
The card base is silver as is the scallop circle. The sentiment is heat embossed in silver also. I wanted to keep the design simple, so I just added some texture tot he Red Chili panel with the Kaleidoscope Embossing Folder.
And the sentiment inside from Inside Scoop – Christmas Blessing:
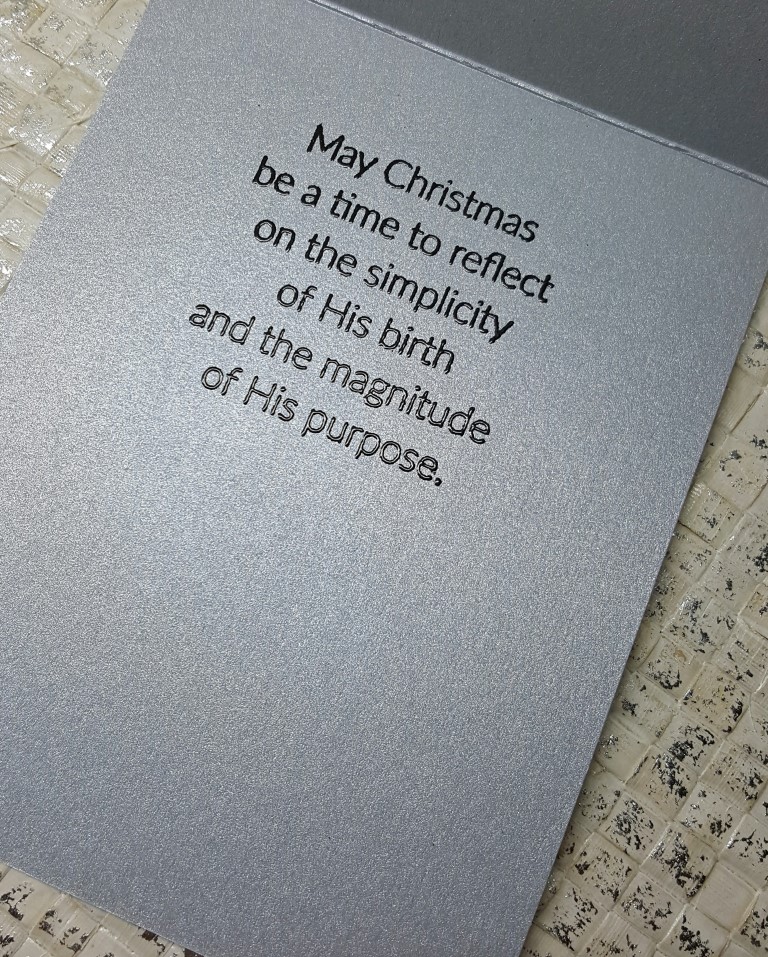
This just brings home what Christmas is truly about!
And now for something a little non-traditional and simply cute.

I have always loved pink and mint green for Christmas, so I decided to go that direction on this card featuring Cutting Edge Trees stamp and die combo along with the new Build-a-Scene Snow Drifts die set. I edged the snow drifts in some Nuvo Glimmer Paste and popped them up on foam tape. The trees were colored with Copics.

In the sky, I added the On Dasher, On Dancer die for a little extra whimsy. The background paper is from the TE 6×6 paper pack Playful Patterns – Holiday.
And the sentiment inside – again from Inside Scoop – Christmas Blessings:
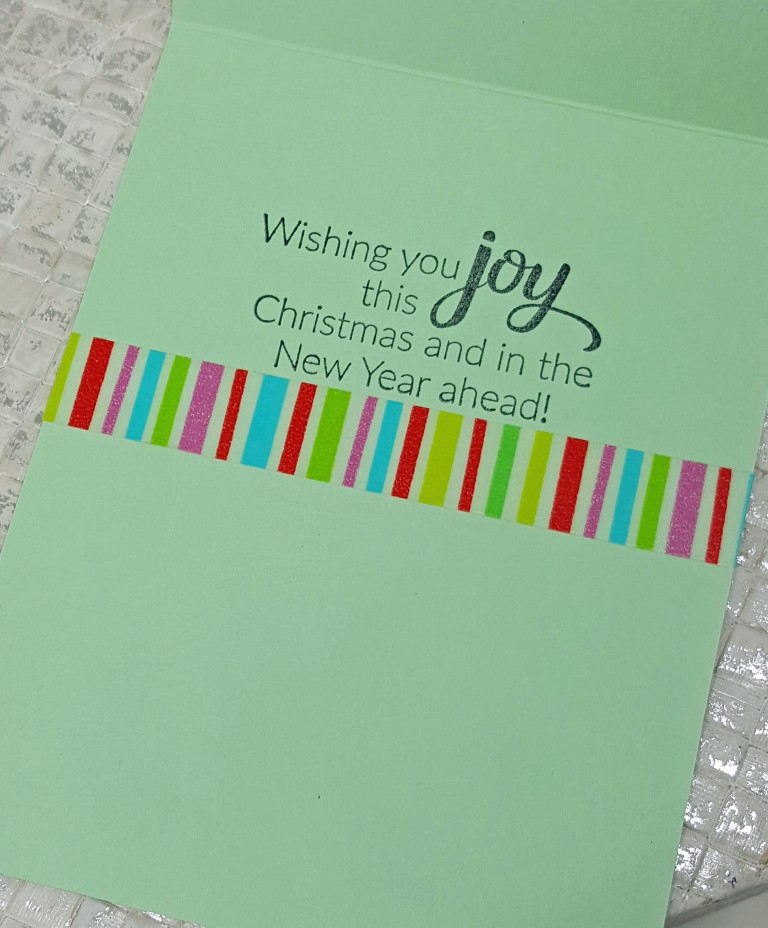
I adore the sentiment set Inside Scoop – Christmas Blessings! I’ve been able to find a sentiment to use for every style of Christmas card I’ve made with this release. I really think it’s a must-have!
Thanks so much for stopping by today. Please be sure to get all the links to designers with goodies to share today from the Taylored Expressions blog! I can honestly say this is one of my all-time-favorite TE releases!

It’s a TE Christmas! New Backgrounds!
October 3rd, 2018
October Sneak Peeks are in full swing at Taylored Expressions, with all the new products being released tomorrow morning, Thursday, October 4th! This is the TE Christmas release and I haven’t had so much fun stamping in years! Seriously! I LOVE this release!
TE has FOUR new background stamps this month and I adore them all. Today I’m sharing cards made with three of them, including an easy-peasy set for mass production. But first, one of my favorite cards.
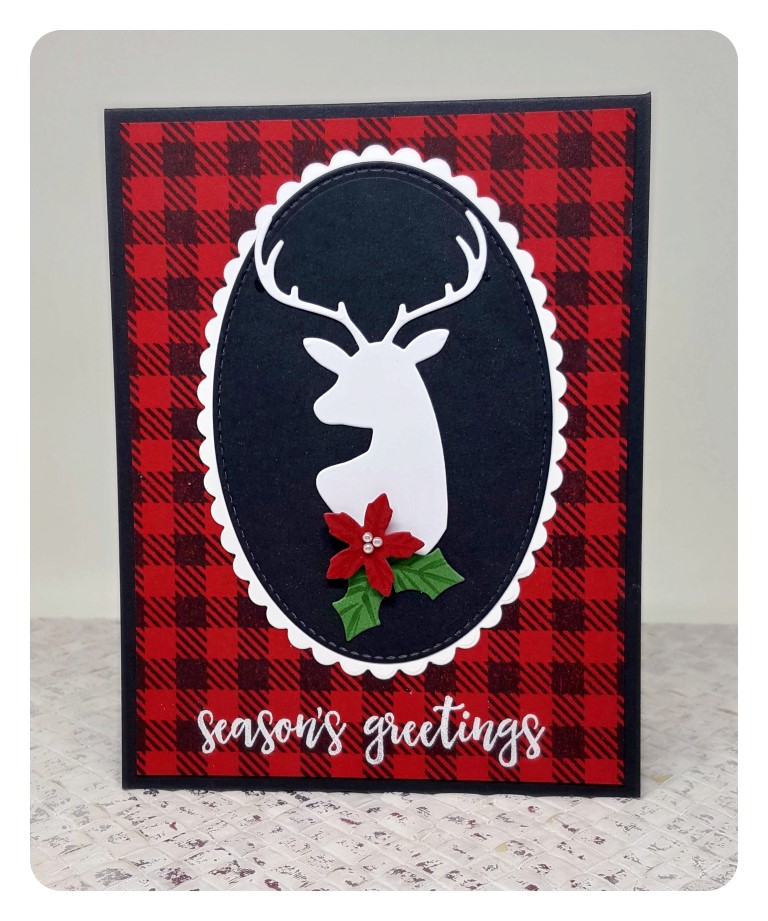
This card features several new products including the Buffalo Plaid Background (stamped with Oreo ink on to Red Pepper cardstock), The Scallop Oval Stacklets, Woodland Silhouettes 1 (die set), Little Bits Holiday Bloomers (die set), and the sentiment is from the Cutting Edge Trees stamp set (embossed in white.) The really funny thing is that, when this release was in development, I really couldn’t picture myself using these animal silhouettes much, but when everything came I couldn’t wait to make this card and it turned out to be one of my favorites!
Now for a set of cards that is super simple to mass produce. I don’t know about you, but mass production is not my favorite way to stamp. That being said, when I send Christmas cards, I usually try to make 3 or 4 designs and make 25-30 of each design. This Scandinavian Christmas Background along with the Simply Said Christmas stamp set makes that really easy!
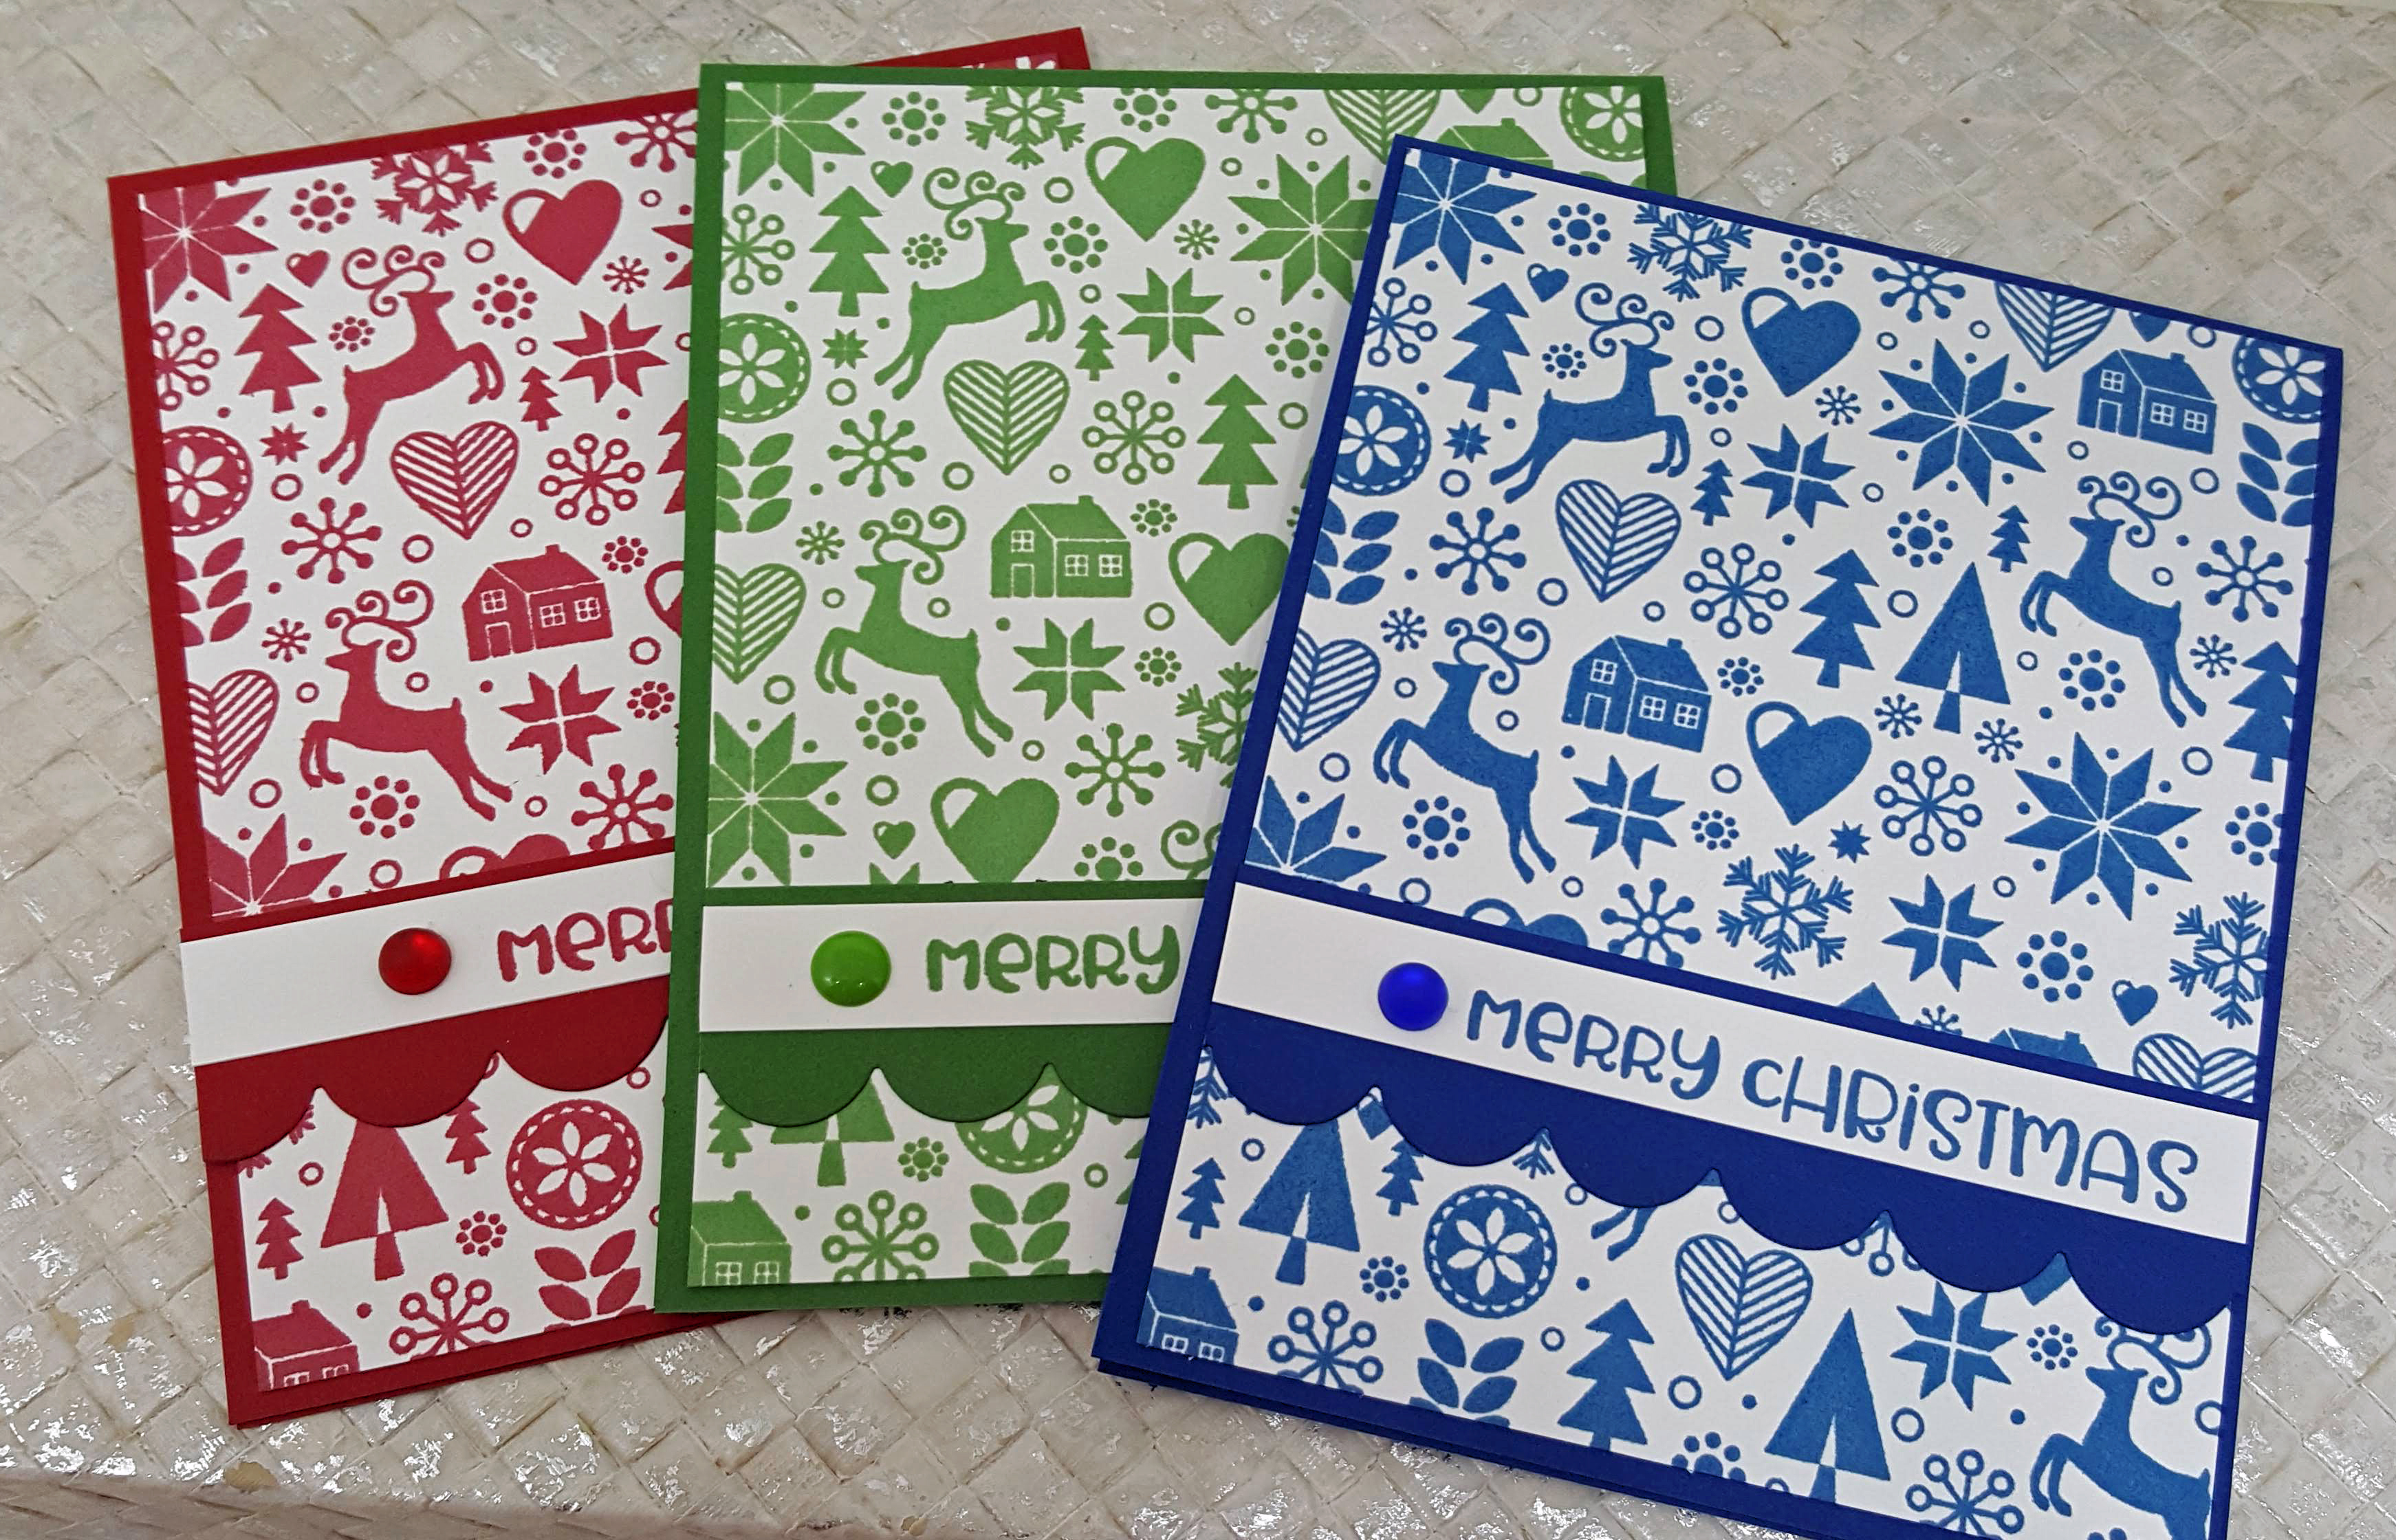
For these three cards, I’ve stamped the background in three different colors – Cherry Pop, and the new TE colors Blueberry and Cilantro and mounted them onto matching cardstock bases. If I were mass producing 25-30, honestly I would have just done them all the same color, but I wanted to see how this would look in varying colors. This card just couldn’t be more simple, but the detailed background still makes it striking.
Next I decided to do one simple step-up by adding some black (one of my all-time favorite tricks.)

It might be a little hard to see in the photo, but for each card, I added a layer of black cardstock which makes the design pop a bit more. I also switched out the scallop border from matching colored cardstock to black.
Then I decided to try one more step-up.
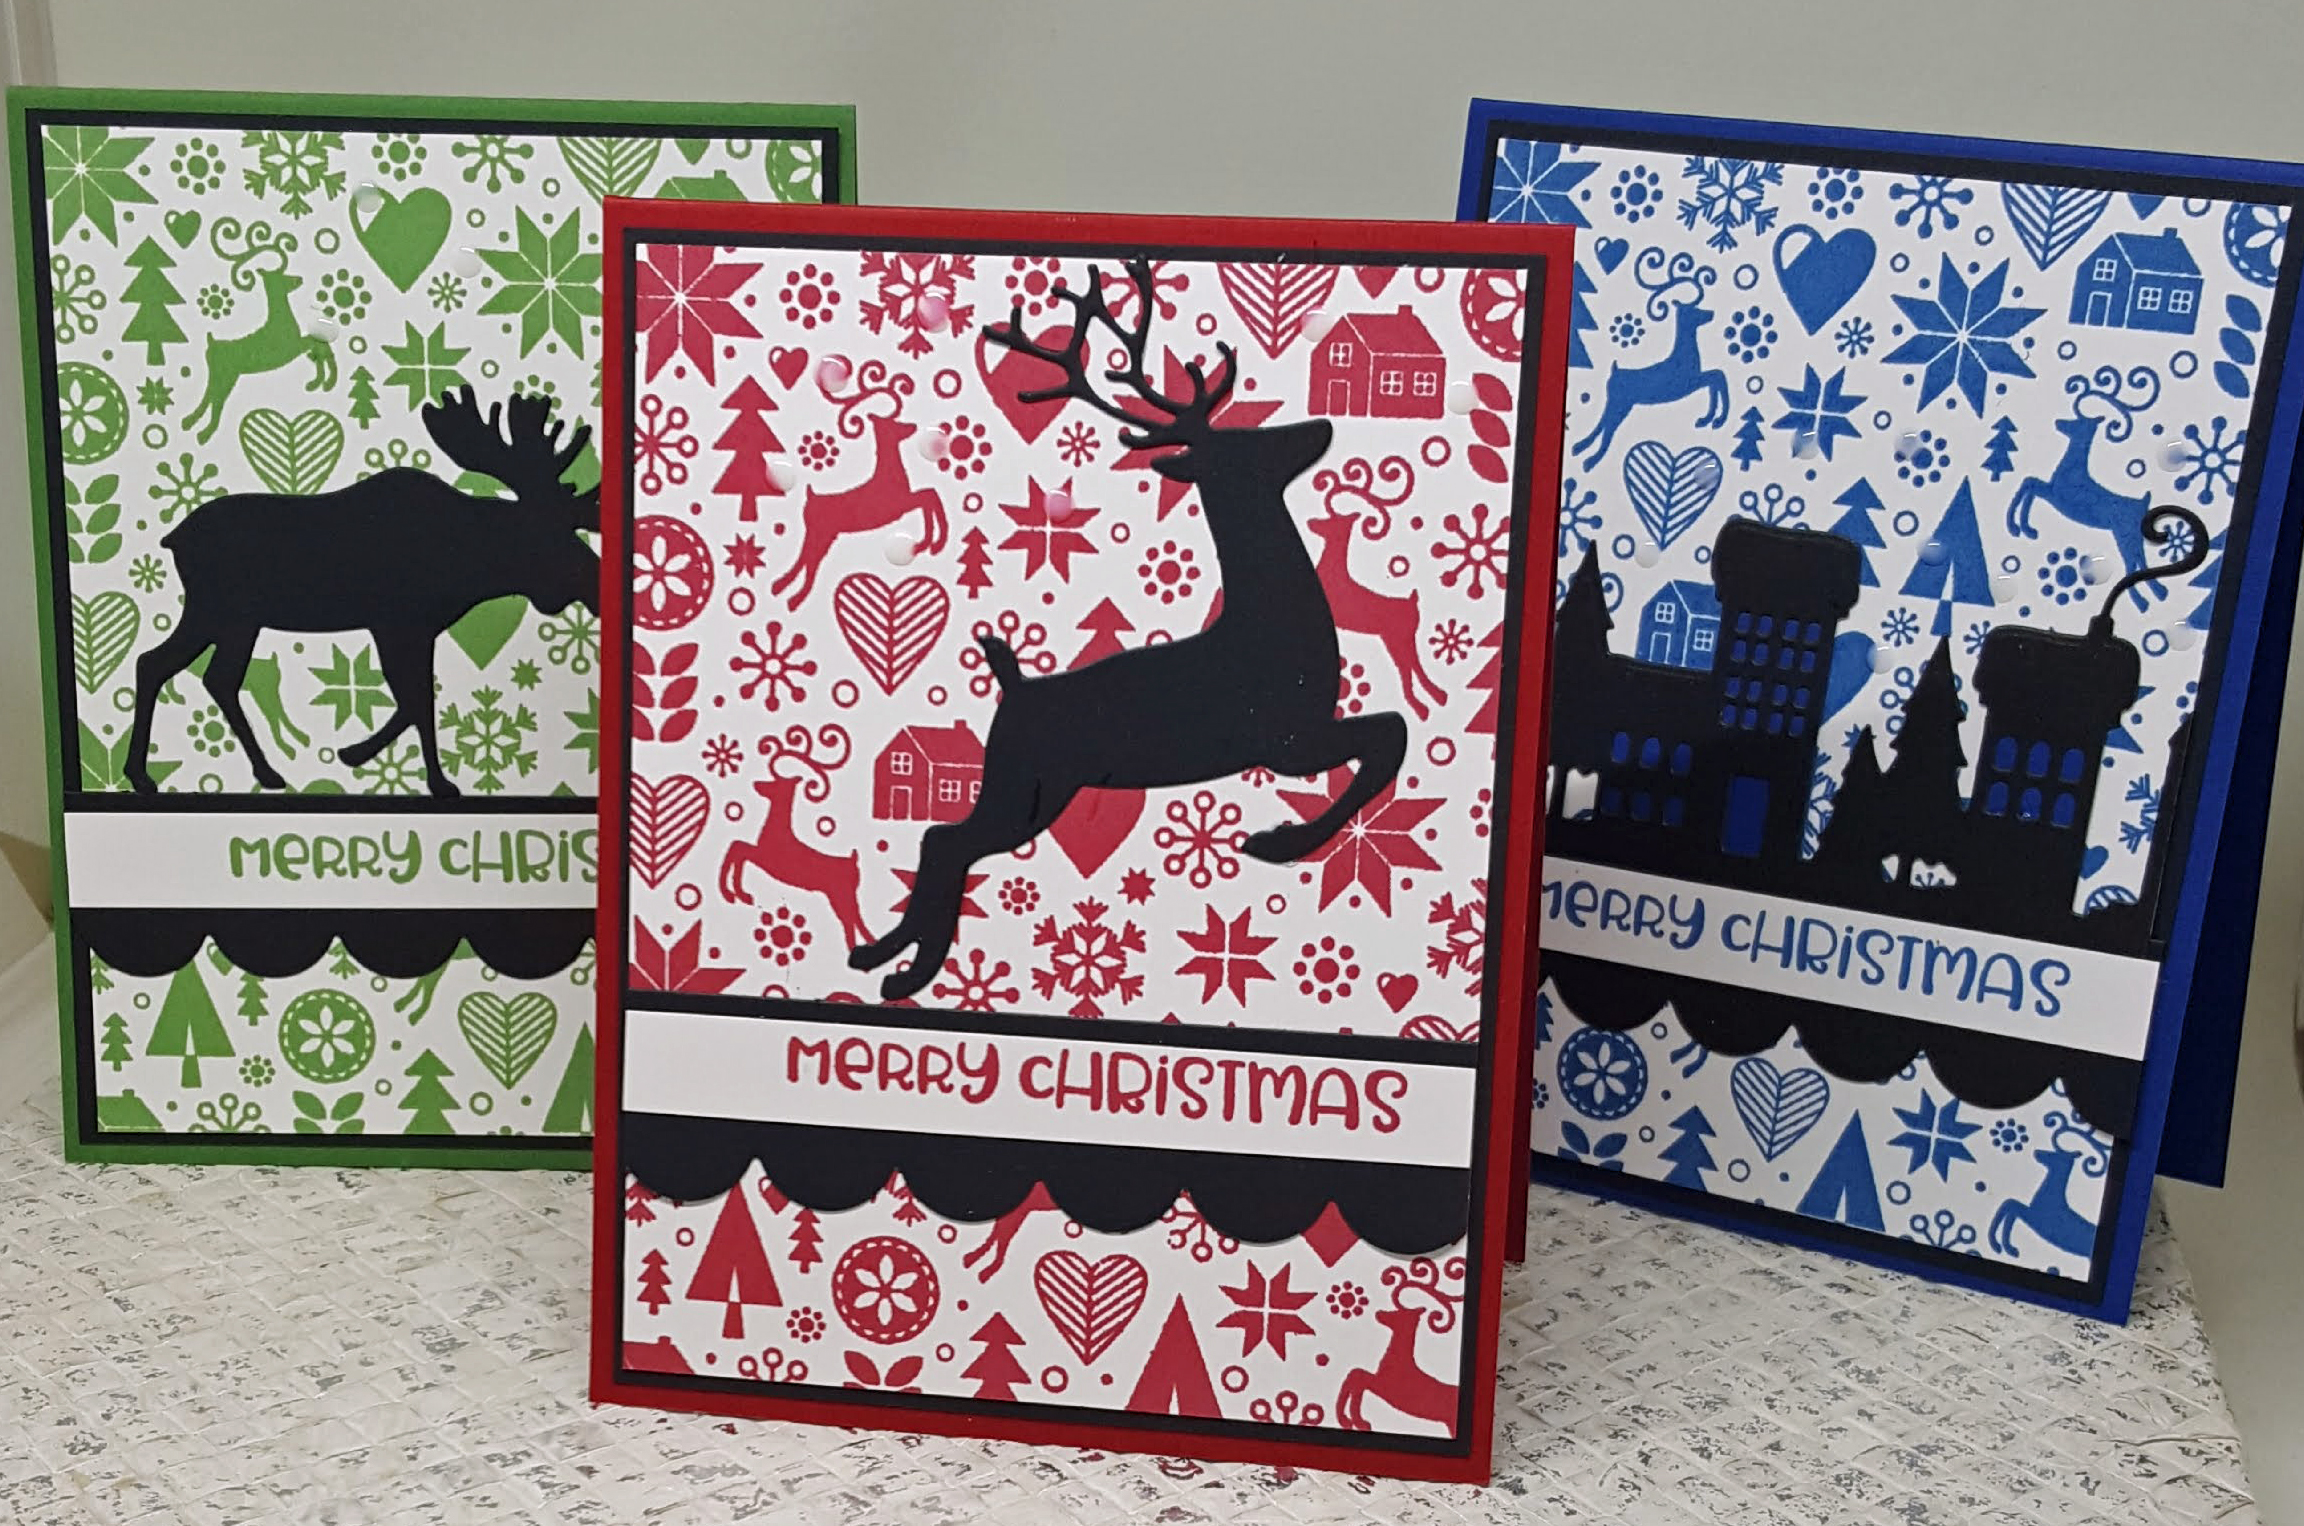
So easy! I just added black silhouettes die cut from Woodland Silhouettes 1 and Woodland Silhouettes 2 and the previously released Eventful Night Before Christmas dies.
And now the card I created with the Pine Bough Background. This one is cool because it’s not a full background, but rather covers about a third of the card. It could be stamped twice – top and bottom to create a frame, or there is a companion die to cut it out and pop it up. I took the simple approach on this one.

I used TE Watercolor cardstock for this one along with Ranger Distress ink cubes in several shades of green. I started by spritzing the cardstock with water so it would be just damp. Then I dabbed the ink cubes onto the stamp creating a variation in color and stamped onto the damp watercolor paper. Once it was dry, I sponged the edges with ink. I used the Merry Backer die to cut through the watercolor paper and then backed that panel with TE Basil cardstock. Then the Merry Script die was cut from Basil cardstock 4 times and layered with the top layer being gold cardstock. To finish off this card I went old-school with some green Kaisercraft rhinestones.
I’m telling you, these new backgrounds are AMAZING! And not just for Christmas. The buffalo plaid will make a great gingham in the spring and the Twiggy Background can really work year round. Think about using the Pine Bough Background on camping related cards and scrapbook pages!
For a limited time, you can earn DOUBLE CRAFTY POINTS on the Big Background Bundle! Just create an account at the TE webstore and you’re automatically enrolled to begin earning crafty points with every purchase. You’ll receive 120 Crafty Points when you purchase our Holiday Big Background bundle! Offer valid on qualifying purchases made between 9am CDT on Thursday, October 4, 2018 and 11:59 pm CDT on Sunday, October 7, 2018. Crafty Points are only available on purchases made at www.tayloredexpressions.com.

Thanks so much for stopping by. If you didn’t arrive from the TE Blog, please be sure to head over there for links to all the designers sharing projects today! I feel so blessed to be included!
Celebrating Christmas with Taylored Expressions
October 3rd, 2017
Happy Tuesday. I’m jumping in to play along with the TE creative Team today to show some sneak peeks of the upcoming release of brand new Christmas products from Taylored Expressions coming your way Thursday morning. I have such a hard time resisting pretty Christmas items! Today I have samples featuring two of my favorites from this release. Both of these products will be great for quick and simple Christmas cards that are still really special!
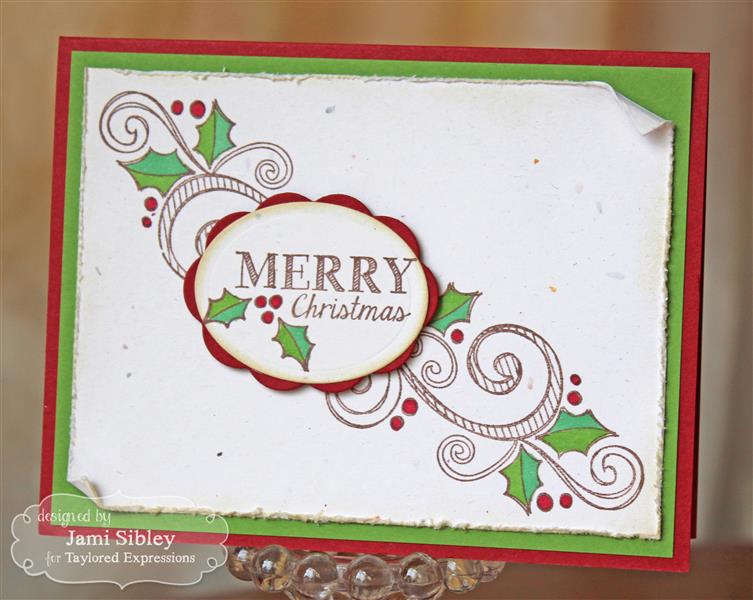
My first card features the new Nativity Cutting Plate. I prefer to send Christmas cards that focus on the true meaning of the season. It just doesn’t get any easier or prettier than this!
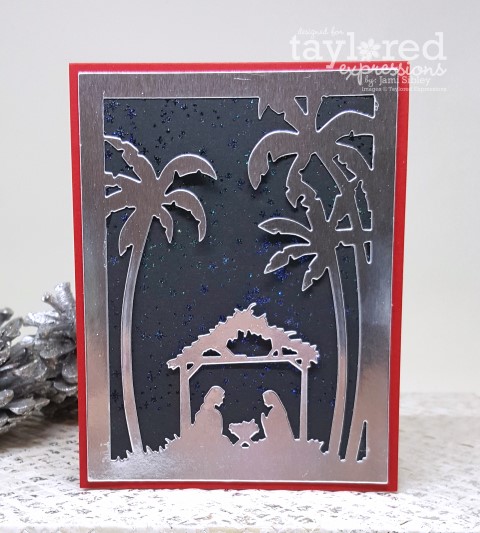
I used the new silver cardstock TE will have available on Thursday to die cut the Nativity Cutting Plate. Behind the nativity I stamped Oreo Cardstock with the Twinkle Twinkle Background stamp in Versamark and embossed with Kaleidoscope embossing powder. It is amazingly sparkly in real life. That was attached to a red card base. So super simple!!!

My next sample features the new Little Bits – Dove. I paired it up with an image from the previously released Laurels and a sentiment from the new Sleigh Bouquet.
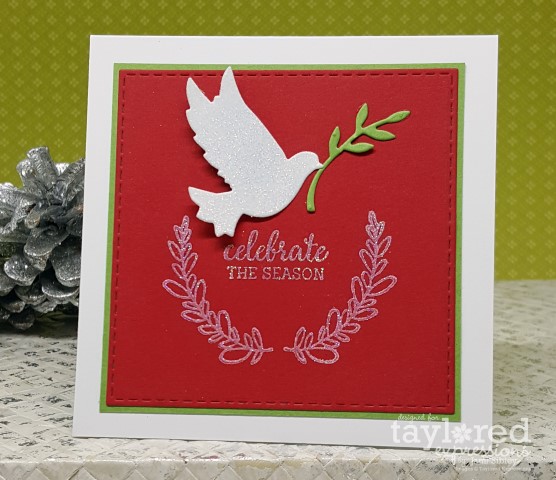
This is a 4″ square card. Stamping was done in Sugar Cube Ink and then heat embossed with the same Kaleidoscope powder I used on the first card (it’s my favorite embossing powder!) I also covered the white dove with Versamark and heat embossed it with the same sparkly powder. The red panel was die cut with the Stitched Square Stacklets. Again, super simple!
Can’t wait to see what the rest of the team has to share today. Thank you so much for stopping by today!
Taylored Expressions Holiday Release – It’s here!
October 6th, 2016
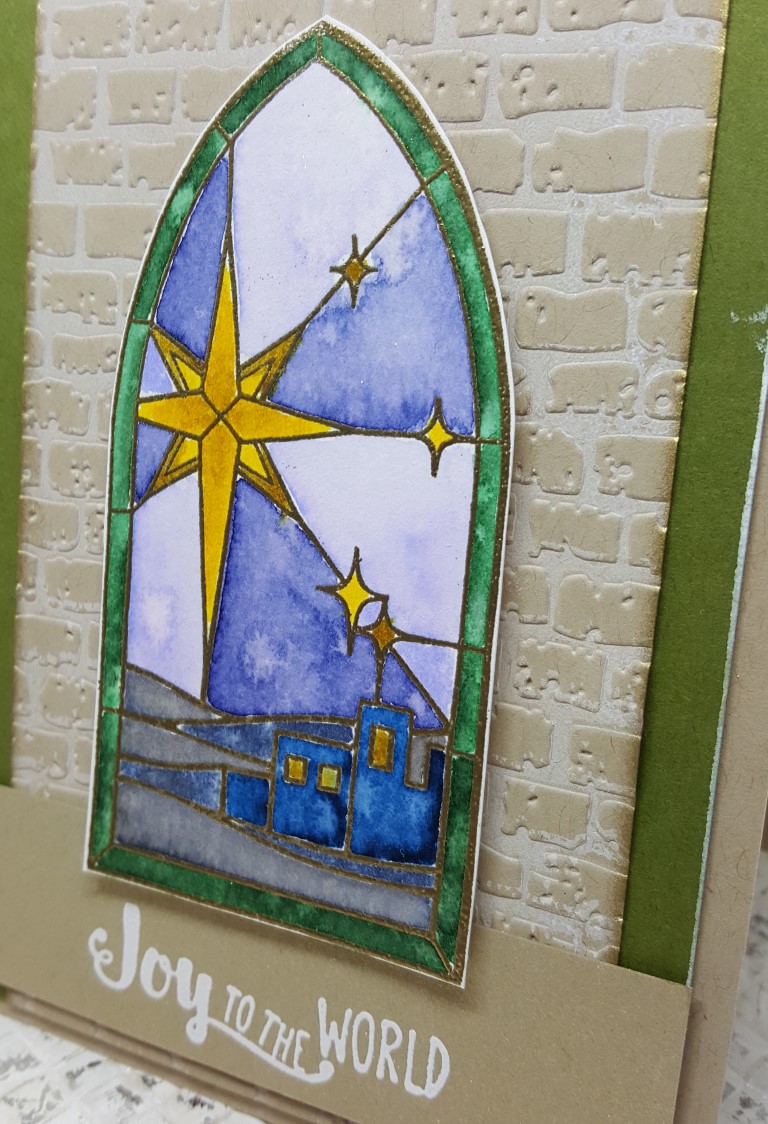
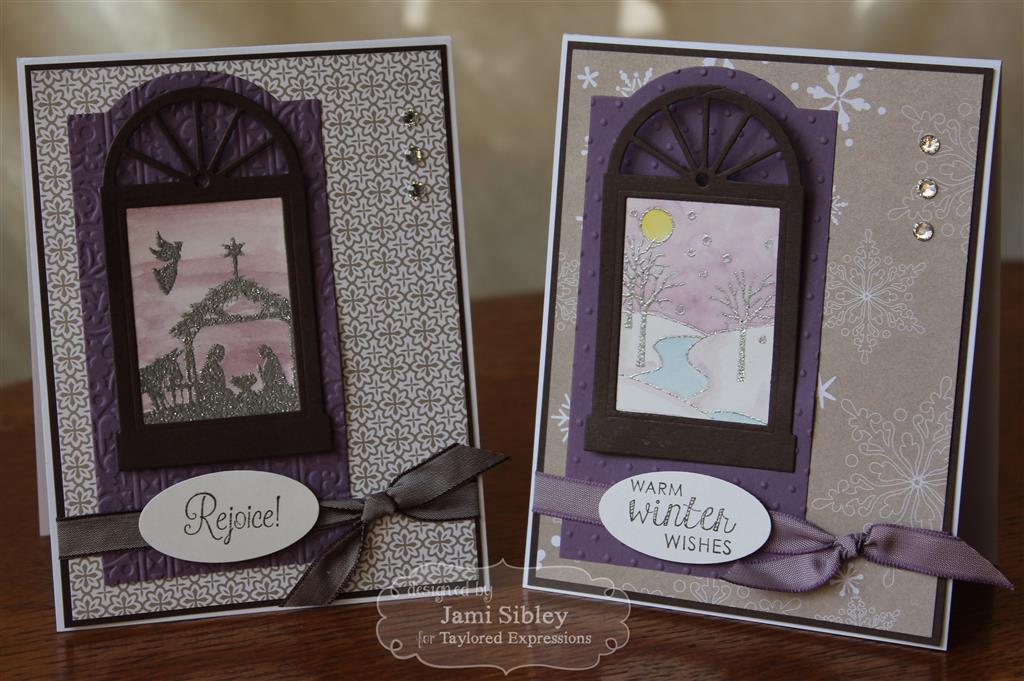
Happy Thursday! It’s release day at Taylored Expressions, so all the incredible holiday goodies are now available! I have one more quick card to share that was created with the beautiful new stamp set O Holy Night! This set includes two gorgeous stained glass windows and several sentiments.
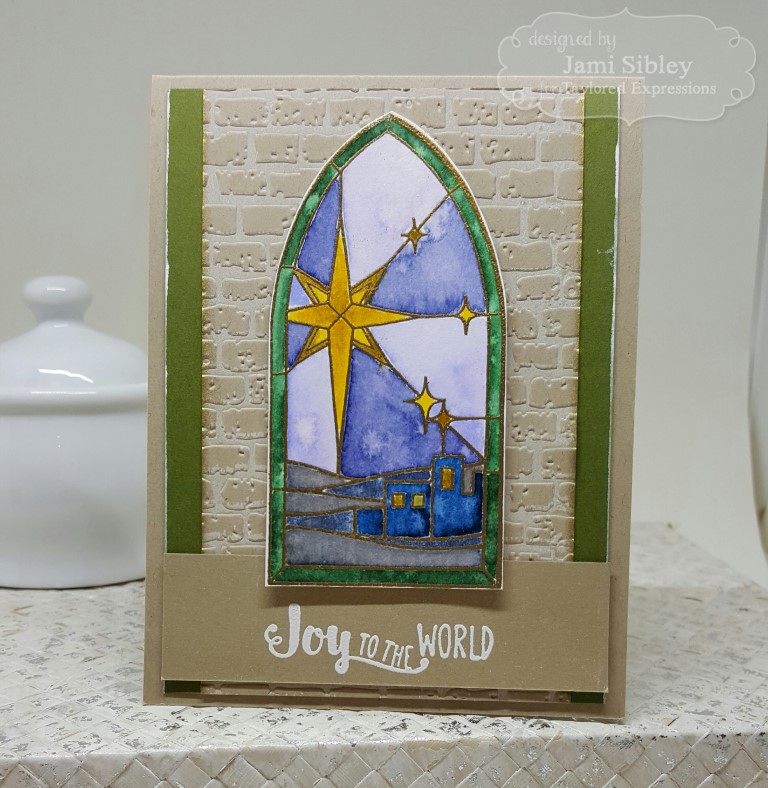
I heat embossed the window image with Versamark and gold embossing powder onto watercolor cardstock. Then I watercolored using Zig Real Color markers. The TE Brick Embossing Folder (which was inked with white ink before embossing the Toffee cs) gives some simple texture. The sentiment was heat embossed with white ink and white powder. I used gold ink and white ink to edge the panels and then decided to keep the card design very simple without embellishment.
Be sure to hop over to the TE Blog for all the links to designers showing amazing samples today. Then head on over to the TE Webstore! How can you resist?
Thanks for stopping by!
Taylored Expressions October Sneak Peeks – Lots and Lots of Wreaths!
October 4th, 2016
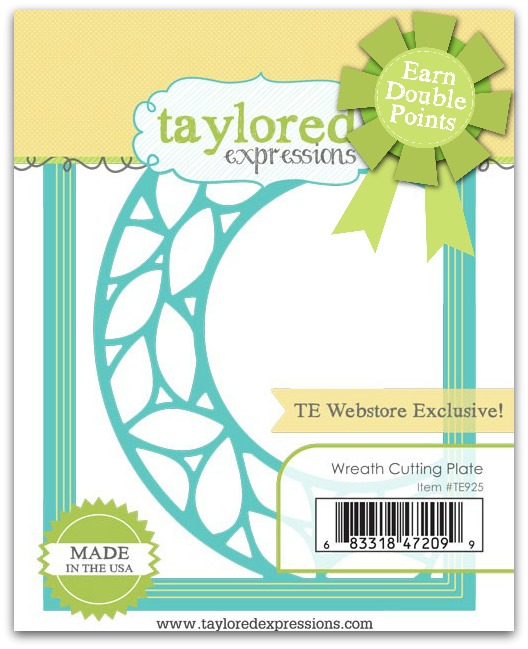
Hey everybody! I’m excited (as always) to play along with the Taylored Expressions Sneak Peeks this weeks. The Christmas release is always my favorite, and while there are a myriad of awesome new products, I got totally stuck on just one! The first thing I started to play with right out of the box was the new Wreath Cutting Plate and I seriously could not put it down. Seriously. As in…I have EIGHT cards to show you today! And it was really only a lack of time that stopped me from having even more! There are just so many things you can do with this cutting plate as you can go from super quick and simple to as fussy and detailed as you might like!
Plus this product is a TE Webstore Exclusive – meaning you can’t buy it anywhere else. And TE is running a limited time promotion on it, where you can earn double points!
For a limited time, earn DOUBLE CRAFTY POINTS on our Wreath Cutting Plate! Not a Crafty Points member? It’s free and easy to join: Visit THIS PAGE and earn 48 Crafty Points on the purchase of this TE Web Store exclusive! Release Day is Thursday, October 6 at 7am PST!
Offer valid on qualifying purchases made between 7am PST on Thursday, October 6 and 11:59 pm CST on Sunday, October 9, 2016 only while supplies last. Only available to purchases made via our retail site www.tayloredexpressions.com.
Now, let’s get to the cards! The very first thing I wanted to do was to play with some watercolor smoosh backgrounds, so I created these:
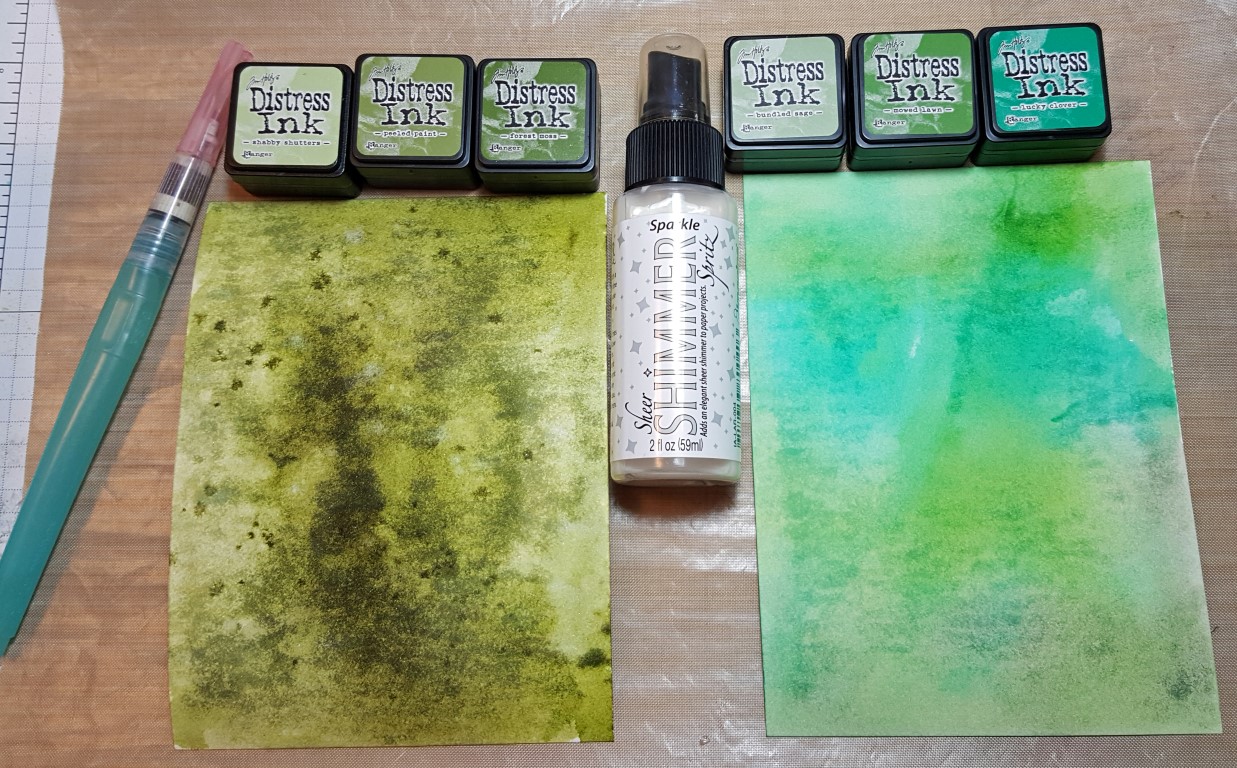
I used Tim Holtz watercolor panels and starting by spritzing them with a generous amount of water. Then I smooshed the Distress ink colors pictured on a large acrylic block and smooshed them onto the paper. I added more ink as needed and used a waterbrush to move and mix colors. On the darker panel I also sprayed a Sparkle Shimmer spray. I took those two panels and combined them to create these two cards:
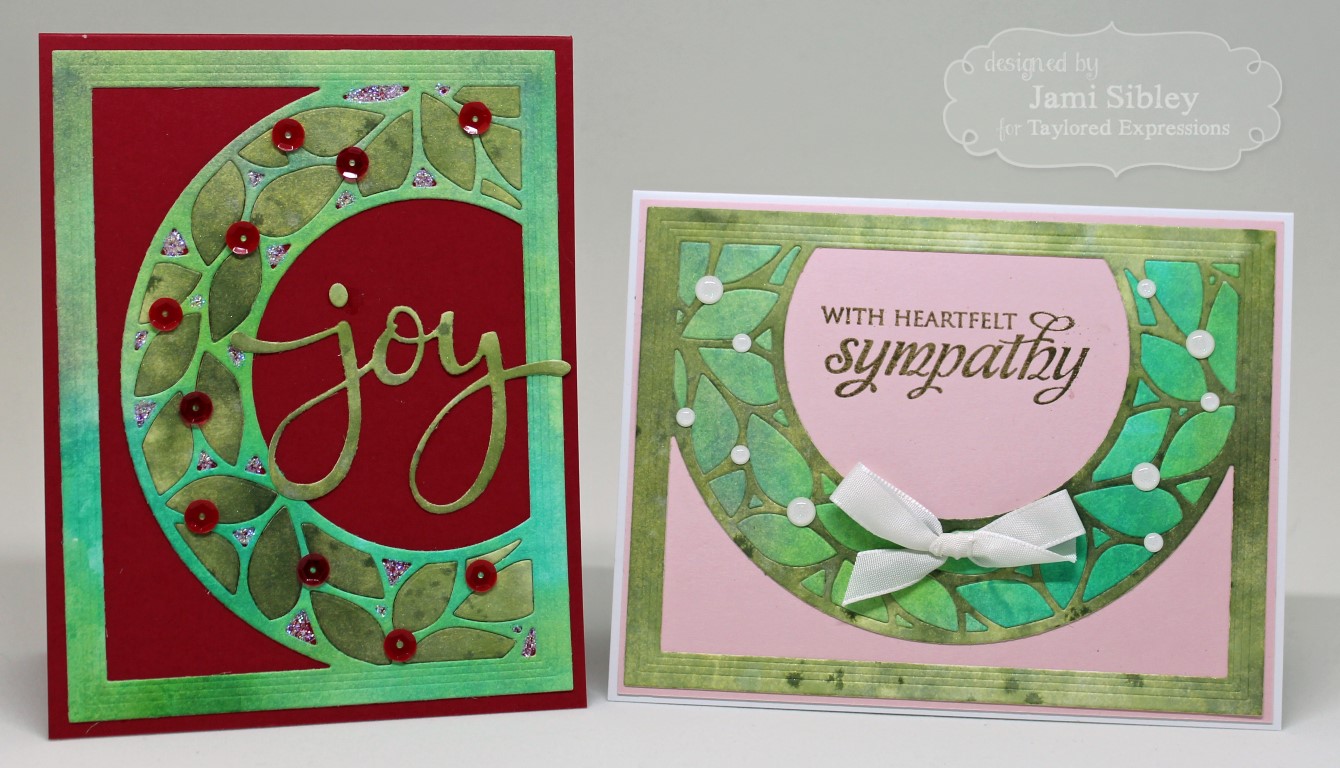
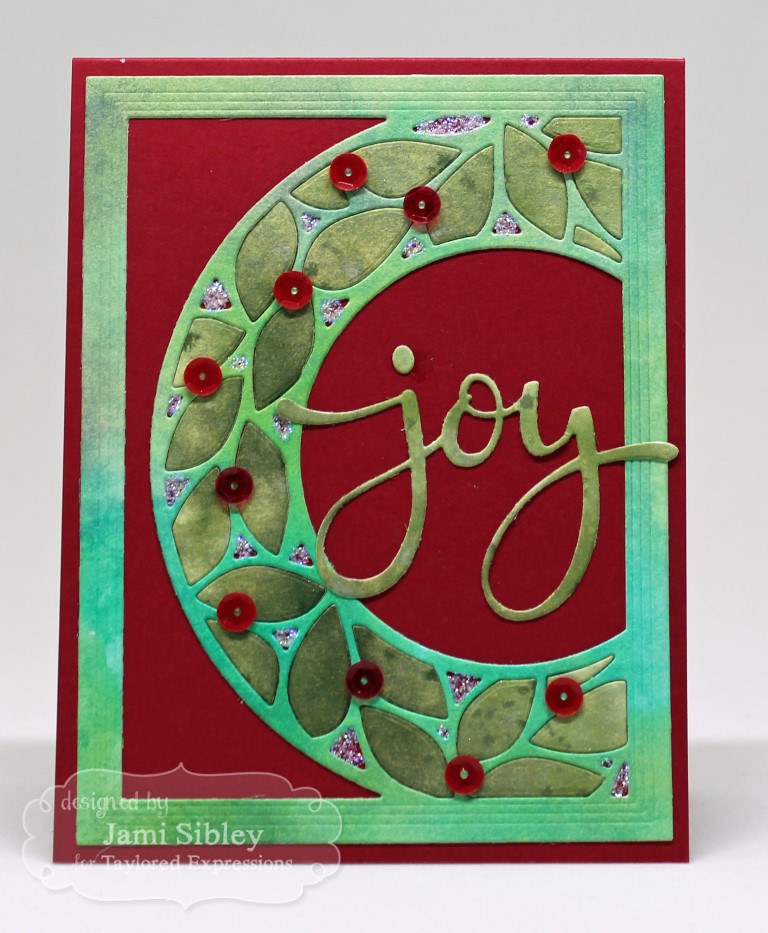
I inlaid the leaves cut from one panel into the other and visa versa. The “joy” is a new die – Joy Script. I added some stickles and some red sequins. Piecing in the leaves is a little fussy, but I actually enjoyed doing it.
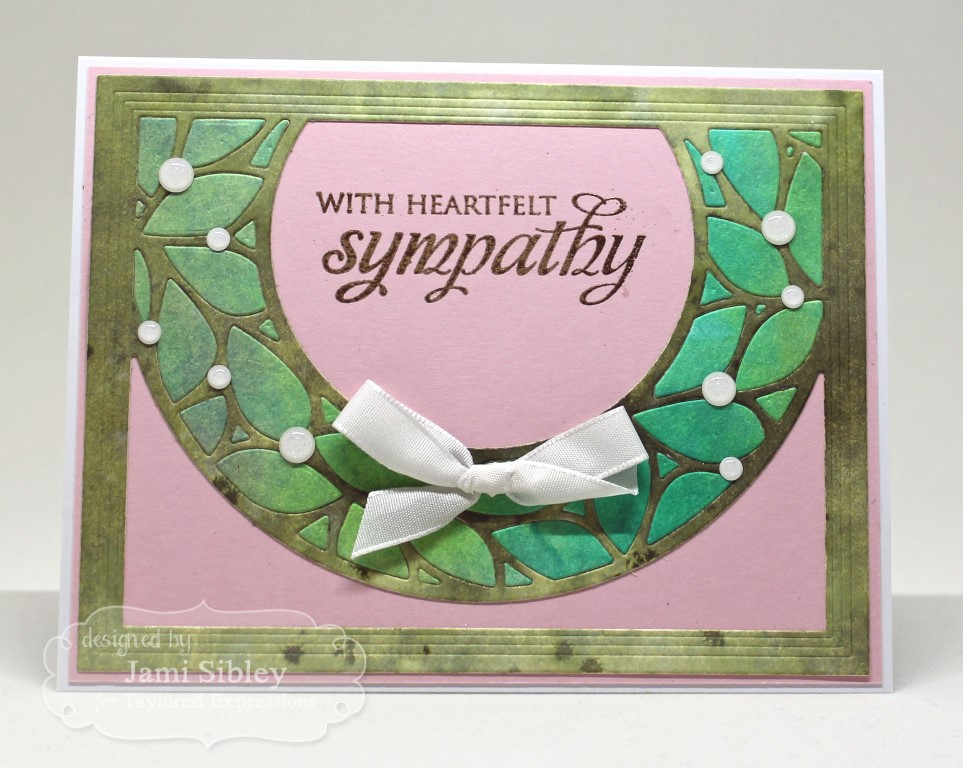
Next, I wanted to turn the wreath onto a horizontal card. I love that this wreath works in all four directions. Here I went with a soft pink for a sympathy card. The sentiment from Care & Comfort II was stamped with Versamark and heat embossed with gold embossing powder.
Here’s a trio of Christmas cards and these showcase a much simpler method.

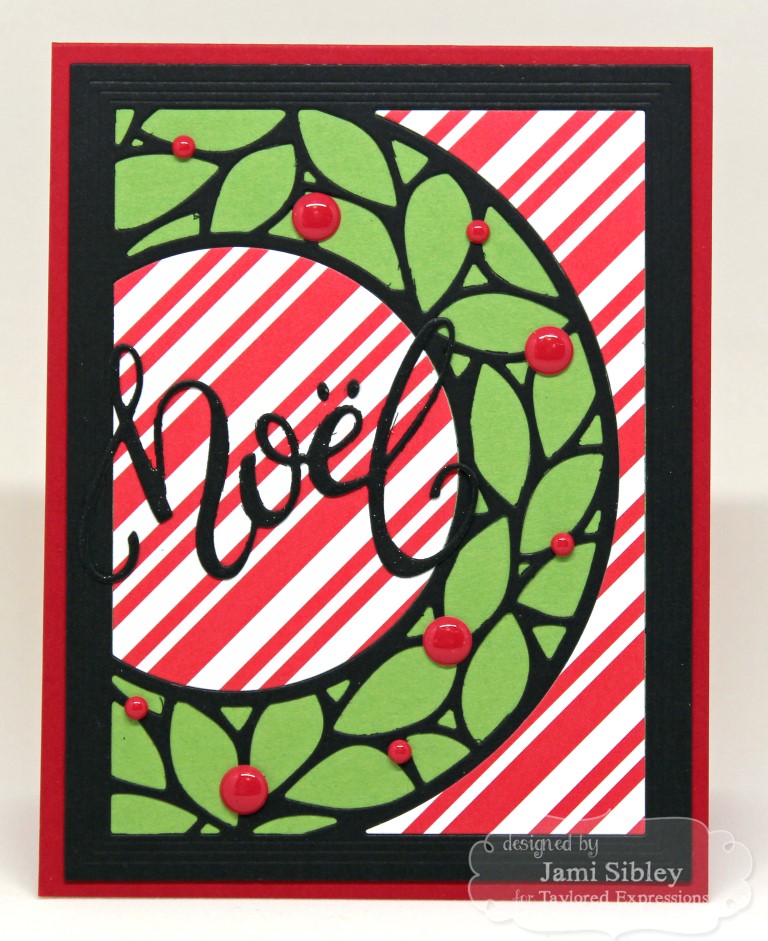
For this card, I cut the plate from the striped patterned paper and simply attached it to a panel of the green polka dot paper. No need to piece in the leaves – they just show through the holes. Then I cut the plate from black cardstock and just adhered the two pieces you see here over the green polka dots. The whole thing was then adhered to a white card base. Sentiment is from the previously released In & Out Christmas. Easy peasy!

For this one, the plate was first cut from white cardstock. I was careful to keep the leaves in and adhered the whole thing to a red cardfront. I then colored the leaves with Copic markers. Sentiment is from another new stamp set, Ornamental.

The third card in this group uses the striped pieces left over from the card above. The plate was cut from black cardstock and adhered over a green panel. Then those striped pieces, which I already had, were added. And actually, the black here and the black pieces in the card above are all from the same pass through with the die. Once you start with these, it’s kind of self-perpetuating! Ha! Again I have another new script die – Noel Script. Super super easy!
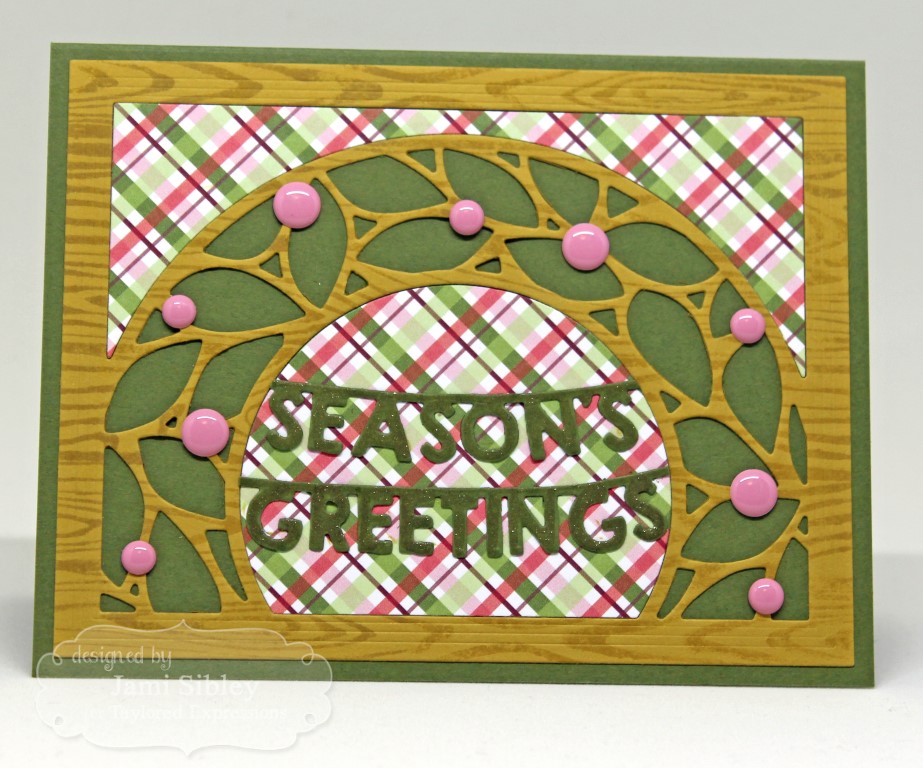
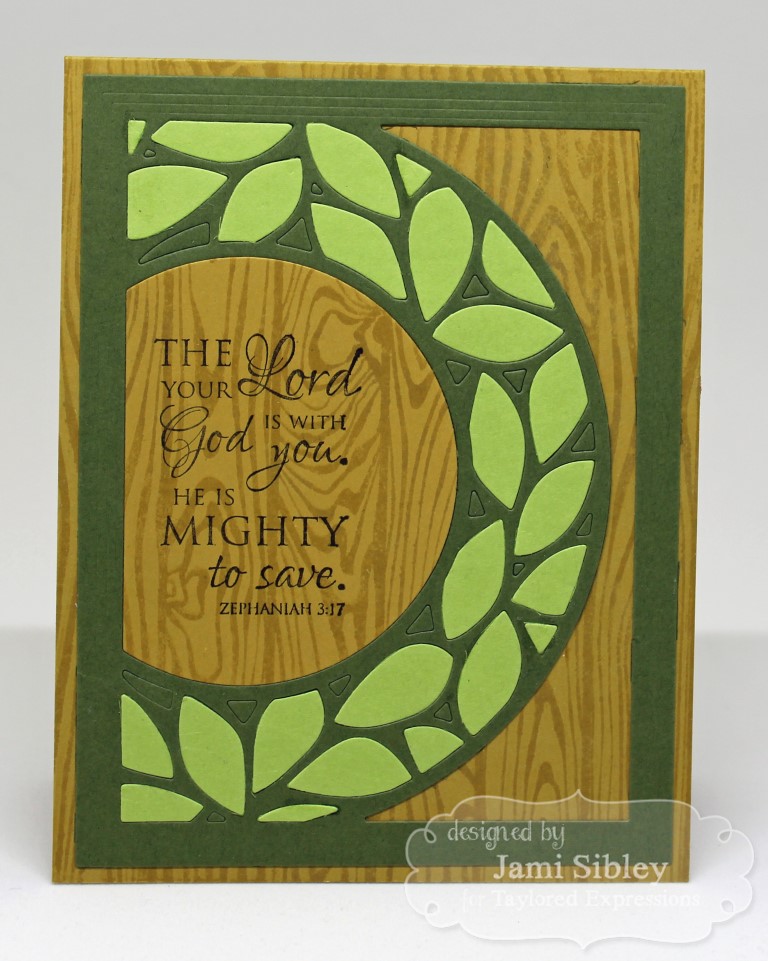
For this pair of cards, I wanted to play with the new Woodgrain background stamp.
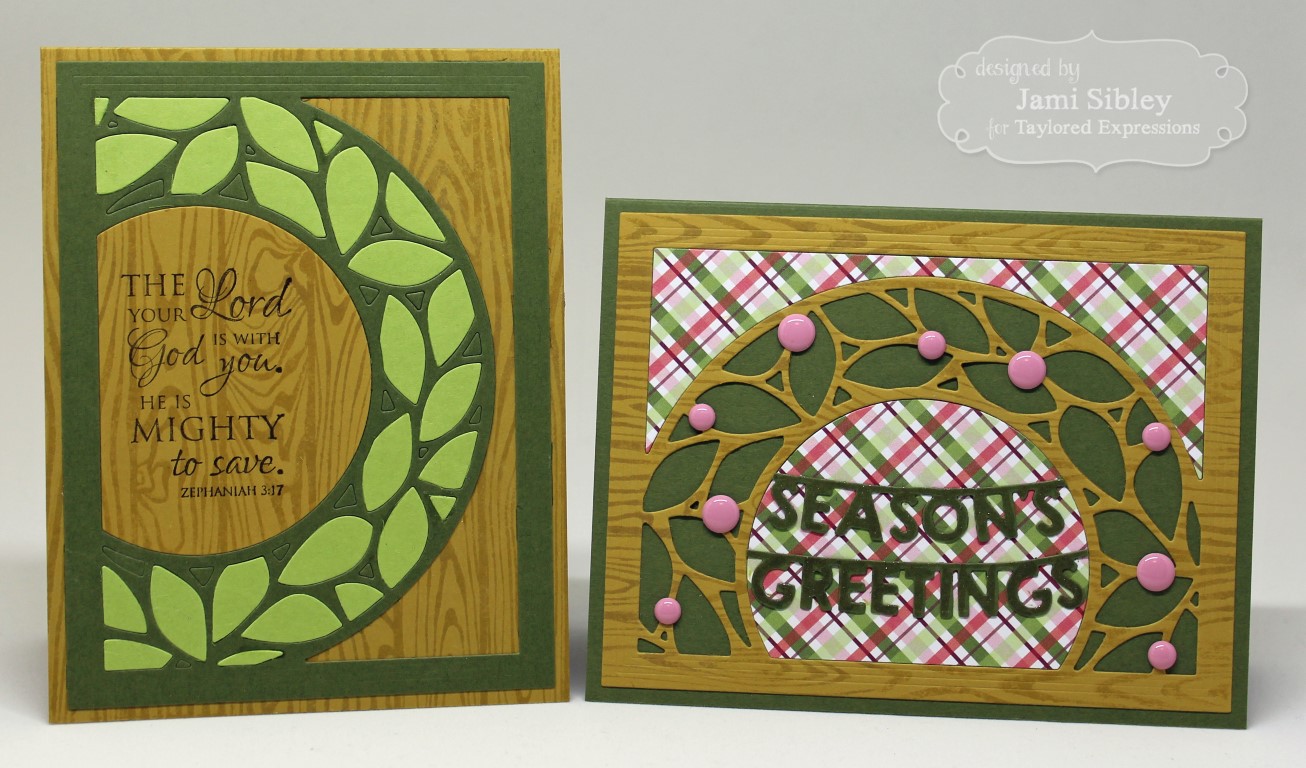
First a simple Christmas card using the Seasons’ Greetings Banner. Again, once the plate was cut from a piece of cs that had been stamped with the Woodgrain, the die cut piece was adhered directly to a cardfront.
This rustic card features a sentiment from the stamp set In the Word. I actually did inlay the leaves on this one. The two greens pair up with the springtime card below. Told you…self perpetuating!
And finally this springtime card featuring a sentiment from Happy Heart might be my favorite!
All supplies used – cardstock. patterned paper, ink, embellishments, etc are found at Taylored Expressions.
There were so many cards to show that I didn’t want to get too detailed with my descriptions. If you have any questions, please feel free to post them in the comments. I hope you’ve seen the fun and versatility of this year-round cutting plate! Which card is your favorite?
Be sure to head over to the TE Blog for a list of designers with sneak peeks today as well as a chance to comment to win a prize! Thanks so much for stopping by!
November Stamp Class
November 18th, 2013
Happy Monday! First I want to thank everyone for the comments and e-mails after my last post. The love and encouragement shown to me by so many has truly meant the world to me! Thank you from the bottom of my heart!
It’s been over a week since I held my November Stamp Class, and I know my girls always like to have the projects posted up here on my blog for reference, so I thought I better get caught up. This was my Christmas class and we created four projects all featuring Taylored Expressions stamps and dies. First up is this adorable little penguin bag/box/sack made with the Sack It Die set and the Sack It Penguin add-on die set.

While this project is super simple, I have to say that I wouldn’t recommend it for a class of 10 or more people. I’m afraid that all the die cutting of so many pieces (along with the next project I have to show you) was a bit too much for a class setting. I always want my classes to be fun and relaxing and I think I may have stressed out some of the girls. SORRY!
The cute little penguin is attached to the front of a simple little die cut sack that can be used for party favors or any small gift. I think he’s DARLING!!
The next project was a Santa gift card holder. This was created with the Santa dies that come with the Sack It Die and the addition of the medium scallop border die (with white felt). Instead of layering the Santa pieces onto the sack, we used the Tag Pocket Die to create a gift card holder.
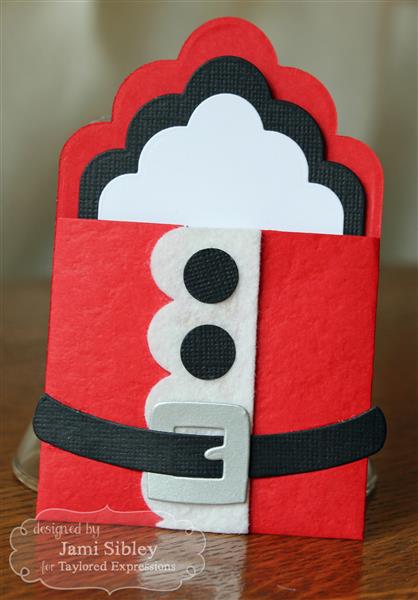
Everyone uses gift card holders at Christmas, right? We also created a little tag to go inside and then the gift card slides in behind the tag.

The sentiment on the tag is Stampin’ Up!
Next up is a card I CASEd from my friend Wanda Guess. I pretty much LOVE everything she creates and as soon as I saw her card during the October Release, I knew we had to make it in class. It features the stamp set Christmas Doodles.
So quick and easy and so super cute!
The last project we created was a card featuring A Winter View. Each student had a choice between two versions of the card. The designer paper is from SU and you see the two sides of the same paper on the two cards. It’s hard to see in the photo, but the paper is shimmery. I love all the window dies and the stamp sets to coordinate with them! We heat embossed the image with silver embossing powder for a special holiday sparkle and watercolored over that. Unfortunately, the photo just doesn’t do these cards justice.
Of course you can click on any of the photos above to see them larger. Thanks so much for stopping by! Time for me to get ready for work. It’s the “busy season” with Thanksgiving and Christmas quickly approaching. It seems there is never a time when the church office isn’t busy, but I think this next 5-6 weeks might just be the busiest of all! Have a great day!!
![]()
Taylored Expressions October Sneak Peeks: Christmas
October 1st, 2013
Happy Tuesday! Today marks the first day of sneak peeks for the Taylored Expressions October Release. October is always my favorite release of the year because it’s when we do Christmas! Today I’m playing along to showcase a fun new Christmas stamp set as well as a set of dies that are super duper cute! Be sure to hop around (link list below), because the Baker’s Dozen has a ton more new products to show you!

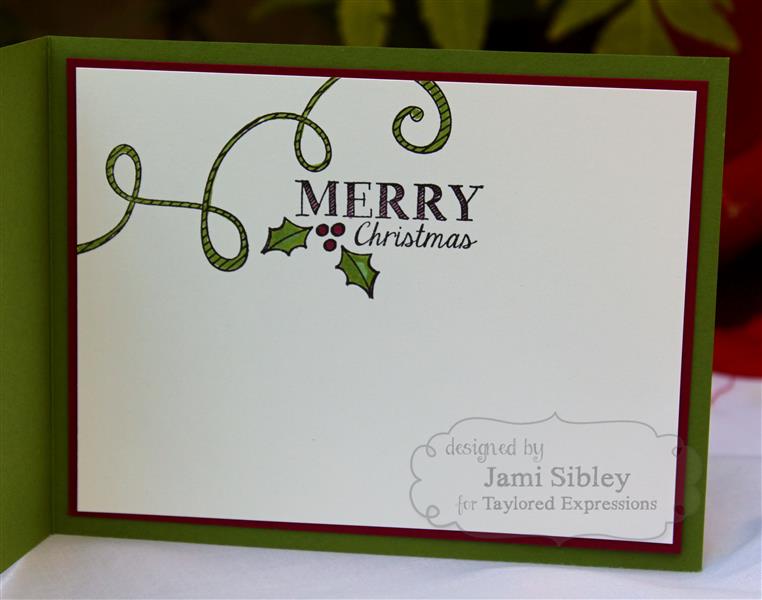
My first project is a card featuring the new stamp set Christmas Doodles illustrated by Nancy McKinney. This continues the theme from previous Doodles sets (Valentines, Easter, Halloween and the original Doodle Notes.) There are a bunch of super cute images in this set. For some reason I immediately gravitated to this long curly doodles image to use a branch for the ornaments. I kept this card super simple and just added some fun bling. Here’s the inside.
My second project is a set of tags featuring a new Taylored Dies set – Christmas Treat Toppers. After seeing all the adorable things the team did with the Birthday Treat Toppers last month, I just had to get my hands on the Christmas version. These will be perfect for all types of treats as well and as cards, and as you can see from my project – tags!

I used TE Label Stacklets 3 dies for the base of my tags and added some cute Doodlebug papers and the Christmas Treat Toppers. I used a 1 3/4″ punch for the layer right behind the tag – it’s a perfect fit. I had so much fun playing with these tags. I added a little stickles and liquid pearls to some of them for an extra special touch.
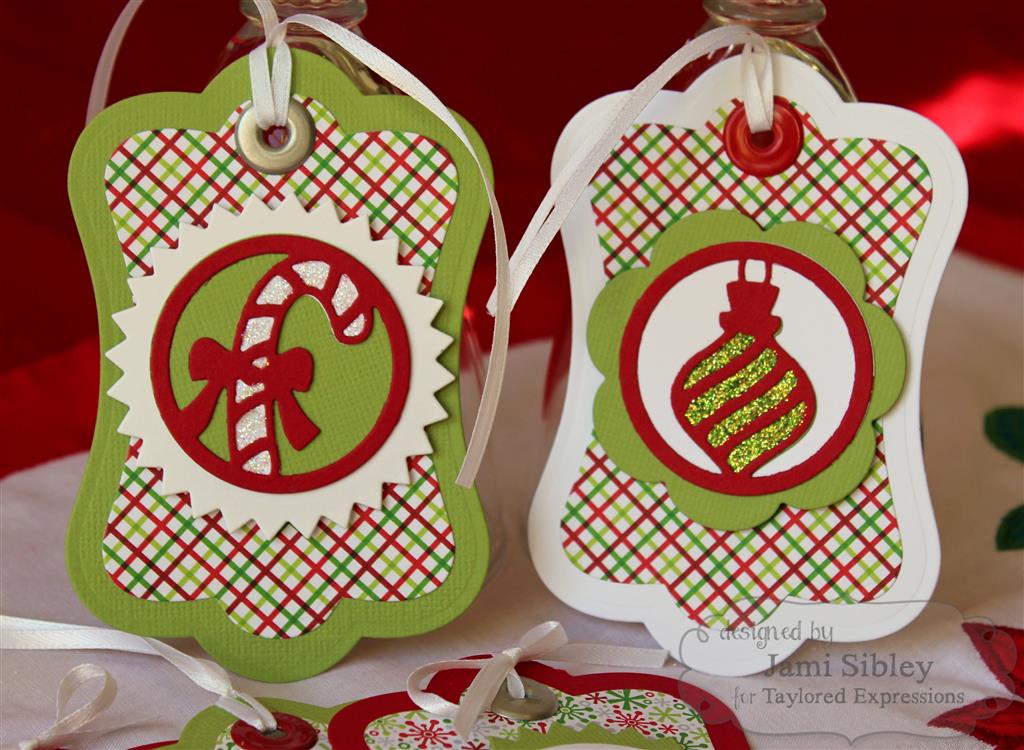
I think these would make a great early holiday gift or maybe a hostess gift. I might just need to play with some packaging ideas now. I can hardly wait to see what the Baker’s Dozen has cooked up for today. Let’s go hopping!
Pattie Goldman – Guest Designer
Thanks so much for stopping by!
![]()
Ornament Card Recipe:
Stamps: TE Doodle Christmas
Ink: Memento Tuxedo Black
Paper: TE Choice White, SU Gumball and Raspberry Ripple
Other: Copic Markers, Zig Painty Pen, Stickles, Queen & Co. Rhinestones and Sparklers
Christmas Tags:
Dies: Christmas Treat Toppers, Pinking Circle Stacklets, Bloomin’ Stacklets 1, Label Stacklets 3
Paper: Doodlebug Home for the Holidays 6×6, red, white, green cardstock
Other: Stickles, Liquid Pearls, wide eyelets, ribbon, foam tape
 |
 |
 |
 |
 |
 |
 |
 |


