SASI New Year – Sneak Peek Time!!!
December 31st, 2008
WooHoo! The time has finally come when we can share sneak peeks of the upcoming Stamp a Sweet Impression release. Friday January 2nd will mark the most extensive release in SASI history so strap on your seatbelts! My sneek peek project for today is from A Year of Sweets 2 (yes that means there’s more than 1 of these sets!) and it’s a page from the brand new perpetual calendar that will also be available at Taylored Expressions. I’m especially excited about the perpetual calendar because I helped to design it. *bouncin’ in my chair*
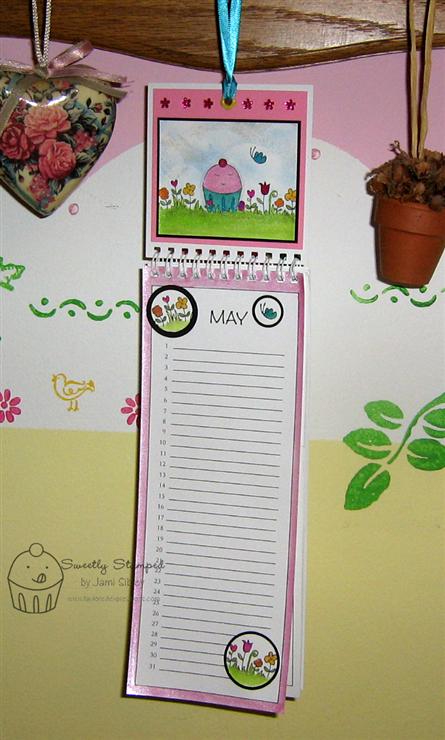
There is a blank panel that can be decorated for each individual month on the calendar and that panel folds down to reveal a new one as the month changes. The thing that had always bothered me about other blank perpetual calendars I have seen was that it tends to be difficult to design for a long skinny panel. I wondered for a long time why someone didn’t make one with a smaller, easier to decorate panel on top…and now here it is!! Can I get a *WOO HOO*?
The scenes in the A Year of Sweets series are designed to fit nicely on this calendar as well being the perfect size for cardmaking. You could easily stamp the scene image directly onto the calendar panel, but I chose to do just a little bit of layering this time. There is a hole already punched in the top of each panel and you could simply hang the calendar on a nail through that hole, but I added a flower eyelet (retired SU) as well as some ribbon so the calendar could hang from a knob. That’s my stamp room wall in the backround. I apologize for the picture quality as our Canon Rebel is on the fritz and I’m using our point and shoot which I’m not as familiar with.
Perpetual calendars make great gifts any time of year since everyone has birthdays, anniversaries and other important family rememberances to keep track of. You’re going to want to pick up several of these when they become available on Friday.
When I started this project I thought about what I could do that might be fun and different. I’ve been using Copics so much lately, that I thought maybe I should try watercolor instead…and then it hit me…why not drag out my Twinkling H2O’s that I haven’t used in ages? 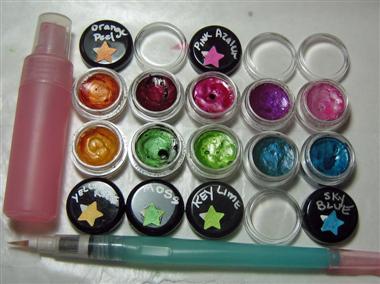 I love Twinkling H2O’s and I just wish you could really see the shimmer – there’s just no way to capture it in a photo. If you’ve never used them, they are little cakes of super shimmery/twinkly watercolors. You simply take off the lids and place the little pots onto a tray or sheet of wax paper and mist them with water. Wait a couple of minutes to let them soften up and then paint with them using a watercolor brush. You can also mix colors on a palette or a CD.
I stamped the image on Taylor’s brand new awesome Choice cardstock with Memento Tuxedo Black ink and colored with the Twinking H2O’s. I stamped the image a 2nd time and colored just the flowers and butterfly and punched them out with circle punches to be added to the bottom portion of the calendar. I also painted with Twinkling H2O Cherry Sorbet around the entire outside edge of the bottom portion of the calendar using Eclipse masking tape for a clean line. The cuppie was also masked with Eclipse so I could sponge the sky with my SU cloud template and Bashful Blue ink. Then I also sponged on a bit of TH2O’s.
Here’s a close up of the scene.

Here are the layering measurments for your reference in case you want to decorate one of these calendars in a simlar fashion –
Image layer – 3-1/4 x 2-5/8
Black layer – 3-3/8 x 2-3/4
Pink Layer – 3-5/8 x 3-1/2
Project Recipe:
Stamps – A Year of Sweets 2 (just one stamp is used here)
Cardstock – TE Choice White, Basic Black, Pink Prism from Christmas Key Ingredients
Ink – Memento Tuxedo Black and SU Bashful Blue
Other – yellow flower eyelet (SU retired), dark pink Kaiser Craft rhinestone flowers, SU cloud template (retired), circle punches, teal ribbon.
Twinking H2O colors – mystic blue, sky blue, key lime, moss, yellow rose, orange peel, ruby red, pink azalea, jasmine, cherry sorbet.
I can hardly wait to see the Sneak Peeks from the rest of the Bakers Dozen! Let’s hop over to Taylor’s blog to see what she has today and from there we can visit the rest of the BD team as well! I’ll be back tomorrow morning with another sneak peek so be sure to come back! And then the big release is January 2nd at midnight (which is Thursday at 9:00pm for those of us on the West Coast). So put us in your schedule now so you don’t miss a thing!

2 for 1 Sketch Cards
December 26th, 2008
 I hope you had a truly wonderful Christmas! Ours was great and we are exhausted! Today is our beloved Annual Pajama Day – the day where we eat a huge breakfast and read and watch movies all day and never get out of our PJ’s – so this is just a super quick post to share the card I made for Taylor’s sketch this week. (In fact I’m typing this up Thursday night as I do not expect to be awake yet when this post goes live!) If you’d like to play along click here to hop over to Taylor’s blog for all the details on TECC48.
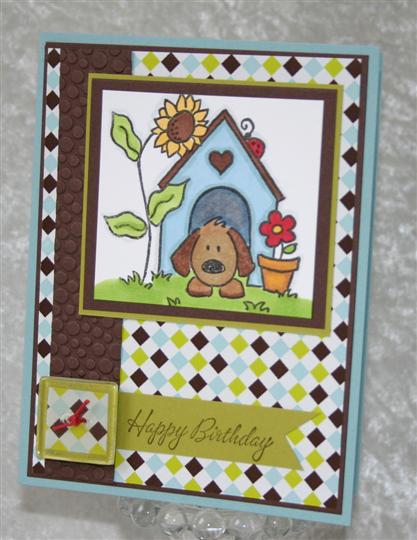
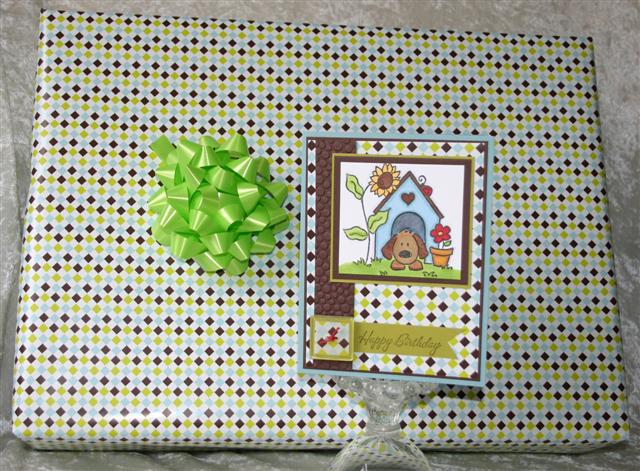
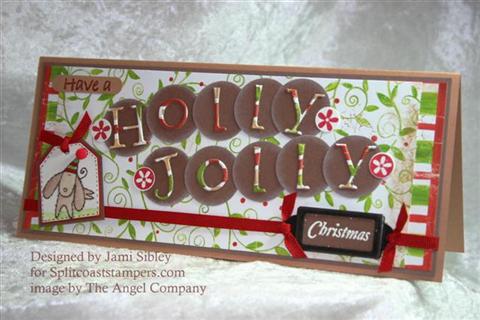
Both my Mom and my uncle have birthdays the week after Christmas and we usually do their gifts on Christmas Eve while we’re all together, so I needed birthday cards for both of them. Taylor’s sketch was just the jumping off point I needed for my uncle’s card. I had already wrapped my uncle’s gift in this geometric patterned wrapping paper and I thought it would be fun to make his card to match by using some of the paper instead of dp. The image is by Elzybells and I colored it with Copic markers. Cardstock colors are Baja, Chocolate and Kiwi. The chocolate strip was run through my cuttlebug and the button is a Stampin’ Up! clear button with paper adhered to it with Crystal Effects and some red hemp tied in a knot. I wanted to keep the embellishments to a minimum since this needed to remain masculine.
You can click the thumbnails to see them larger to see the cards and gifts together:

Since Taylor’s sketch worked so well for my uncle’s card I decided to use this week’s SCS Sketch Challenge for my mom’s card. Her gift was wrapped in this fun floral paper so I decided to use it on the card as well.
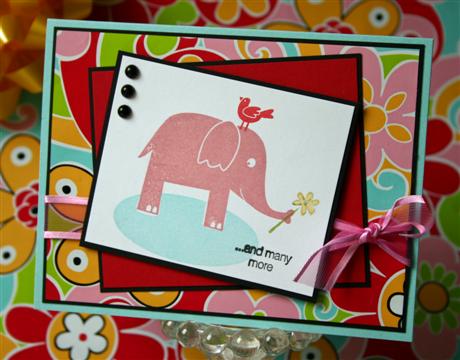
Stamps are SU Wild About You and Cute Converse plus an oval from Memory Box. I used Versamagic Chalk inks. Cardstock colors are Cool Caribbean, Real Red, Black. Ribbon is from my stash and 3 black Kaiser Craft pearls finish off the card.
Oh and just so you know – I had absolutely no intention of posting both of these cards today. I had this post all typed up and ready to go when I suddenly realized I had posted the WRONG SKETCH CARD…D’OH!…did I mention that I’m completely exhausted? Anyway rather than start from scratch I just added the correct card for Taylor’s sketch.
Let’s see what the rest of the Cupcake Crew has cooked up:
Have a fabulous Friday – thanks for stopping by.
Merry Christmas!
December 25th, 2008
This week has been crazy busy, but I wanted to be sure and wish you all a very Merry Christmas! I didn’t get a chance to photograph a new card to post today, but this is one of my favorites from December ’06 when I was in the SCS Dirty Dozen (wow can’t believe that was two years ago!) I so appreciate everyone who reads my blog and want to send out a huge Christmas Hug to each of you.
Merry Christmas my friends!
Felt Clip Favors
December 22nd, 2008
Today I had lunch with six girlfriends from church. I took Lori’s advice from this post after deciding there was no way I was going to be able to host the Cookie Exchange Party of my dreams. Instead I printed up the reading from Lori’s post along with a little note inviting some friends to join me at a favorite sandwich shop for lunch. Despite the busy time of year, they all accepted the invite so I was excited! I decided it would be fun to have a little party favor for each lady, but it would have to be something quick and easy since it’s Christmas crunch time. Here’s what I came up with.
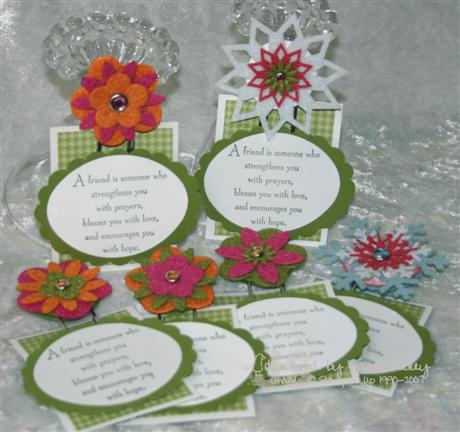
These are just the jumbo paper clips from Walmart with SU Felt Fusion flowers and Felt Flurries snowflakes attached to punched out cardstock circles with rhinestones brads. There’s another punched circle on the back and the paper clip is sandwiched between the circles with E-6000 adhesive.
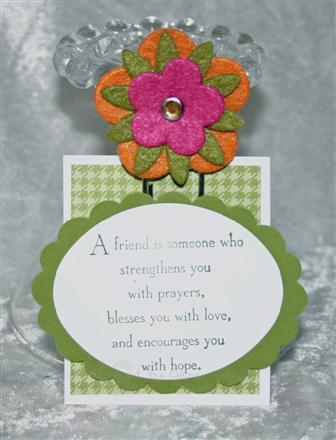 I put the 6 clips together last night in a very short amount of time, but of course this morning I decided they needed to be attached to *something*. In my frenzied haste I went through about three different ideas for stand up place cards that just didn’t work. I ended up with this little card – the clip slides through a hole punched with the slot punch and the oval is attched with foam tape to the front. The sentiment is from a retired SU set.
I arrived at the sandwich place a few minutes early and put some tables together and set out decorative napkins from my stash in the pantry along with these little clips. So even though we went out I got to play *hostess* just a bit. I do love playing hostess! So even if you don’t have the time or energy to cook a meal or clean your house or decorate for a party, you can still have time with friends. Just pick a time and a place and type up a heartfelt note to invite them!
Lunch was a great break from the last minute Christmas frenzy (which at the moment feels like it’s going to kill me). I still have just a few more gifts to shop for tomorrow as well as planning Christmas Eve dinner and going to the grocery store….aahhh and the wrapping, wrapping, wrapping. I’m off to bed with plans to get at it all first thing in the morning. Thanks for stopping by.
TECC47 Snowflake Wreath
December 19th, 2008
I’ve been itching to make something with some kraft cardstock and Taylor’s Friday sketch  (TECC47 Taylored Expressions Cupcake Challenge – cupcakes not required) was just the stamping *excuse* I needed to play! You are welecome to play along as well – you can get all the deets (plus see Taylor’s sample) by clicking here.
I started out by stamping snowflakes on the kraft panel with white and red Craft Ink. I decided I liked the color combo of kraft with Real Red and Mellow Moss (it’s funny how I’ve recently rediscovered both Mellow Moss and Sage Shadow, neither of which I had used in ages.) I was kind of working at this card backwards as I would normally choose my focal image first. My intention was to find a Christmas or Winter image I could stamp onto kraft and color with Prismas Pencils or Copics or something, but when I went looking through my stamps I just couldn’t find anything to fit what I had in mind….so I went another direction entirely.

Recently I’ve seen a couple of cards with wreaths made from punched flowers. Last year in one of my classes we created wreaths using snowflake stamps. So I combined the two ideas to try a wreath made with punched snowflakes. I have a Cuttlebug snowflake die that I had never opened so this was the perfect chance to try it out! (ooo..check it out – it’s on sale at eP!) I punched a bunch of snowflakes out of Mellow Moss cardstock and sponged them with Always Artichoke ink and glued them onto a white scallop circle created with a Marvy punch and also sponged with the Artichoke ink. I also had a brand new Nestabilities bird die and was so happy that the smallest bird in that set worked for the wreath I had created. I added a bow with some red & white ribbon from my stash and some Kaiser Craft red rhinestones. The horizontal panel is SU dp from the hostess Patterns pack and the wide moss grosgrain ribbon is from the TE store. The sentiment is a rub on fromt he SU Chit Chat set. Some faux stitching was the final touch. I’m super happy with how this turned out!
Now it’s time to check out what the rest of the Cupcake Crew has cooked up this week
And this week’s Featured Stamper is Karen Motz at the Paper Playhouse.
Also you’ll want to be sure to stop by the Stamp a Sweet Impression blog to see who won the Top Chef contest and meet Our Friday Friend. AND Taylor has just announced that the next SASI release is only two weeks away! You are going to flip over the new sets – believe me! It’s going to be a great way to kick off a whole new year of stamping! *grin*
Have an awesome weekend!
Monogram Gift Sets
December 18th, 2008
Tuesday night was Happy Turkey Dinner with my PACT group. PACT stands for Prayer Always Changes Things and it’s a small group of women who came together over 5 years ago to meet twice a month to support one another in prayer. I so love these ladies and am so thankful for them. Every year we get together for a potluck Christmas dinner and to exchange little Christmas gifts – it’s always one of my favorite nights of the year.
This year I made monogram note card sets for everyone. I had actually purchased some of the supplies (note card and envelope sets and the clear boxes all from PTI) last year, but just didn’t get the sets made. I was determined to finish them this year and I spent a good portion of last weekend on them. I dreaded getting started because I felt uninspired and it felt like a daunting task, but of course once I did get started I had a blast making them!
I began by going through my designer papers and choosing patterns I wanted to use. Then I got out all of my JustRite Stamper supplies (from Taylored Expressions) as well as SU Lovely Letters for the monograms and then I just designed and made one set at a time. I completed 6 sets. Each set has 6 cards and envelopes. Four of those sets were for PACT and I’ll show you those today. I still need to photograph the remaining two sets so I’ll show you those later.
Here is the set for Kathy.

The dp is from the SU hostess paper pack. Colors are Real Red and Tempting Turquoise.
Here is the set for Maggie.

The dp here is also SU and the colors are Rose Red and Black.
Here is the set for Darla.
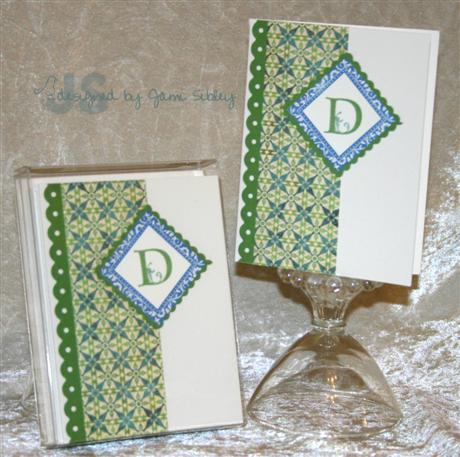
The dp here is from one of my 6×6 pads…I think it’s a Basic Gray pattern. The frame is an SU stamp set – Frames with a Flourish. Colors are Wild Wasabi and Brocade Blue.
Here’s the set for Nancy.
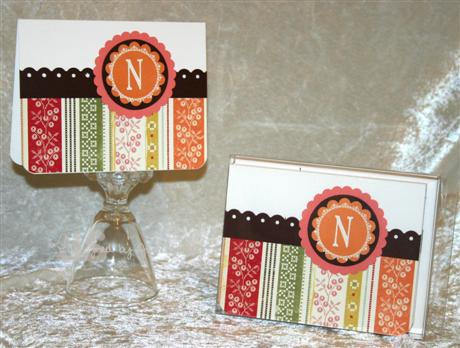
The do here is Cosmo Cricket Honey Pie and colors are Chocolate Chip and Cameo Coral. Monogram is heat embossed in white.
The photos aren’t the best since I had to take them late at night just before wrapping everything up to give. I sure wish I’d taken a group shot of all of them together, but I hope you get the idea here. Working with those PTI notecard sets was a dream – so quick and easy. And those plastic card boxes – wow! The sets looked so professional when I was finished! I had originally intended to add a belly band to each set, but they looked so nice just in the box that I didn’t want to add anything. I also stamped the matching monogram on the flap of the envelopes in a single coordinating color rather than two-toned as on most of the cards.
For most of the monograms I colored them with SU markers to get the two colors. I wanted to keep th ecards flat and easy to mail so I managed to make them without any ribbon (and shockingly my head did not explode as you may have expected!) I used Marvy and SU punches. I still think it’s so much faster and easier than having to use Nestie circles for a project like this. I’m still wanting a circle punch that is exactly the right size for the JR monograms! But I think these turned out great even using the punches I had on hand. I have to give a special thank you to my pal Sharon Harnist who bought the Threading Water punch at Hobby Lobby and shipped it to me after I insanely put it back on the shelf during my Hobby Lobby shopping trip in Texas. That punch came in so handy for these sets!
I’m feeling a little behind on all my holiday stuff as I had lots planned to accomplish yesterday, but ended up getting nothing done! I broke a tooth on Monday and had to go to the dentist yesterday for a crown prep. I love my dentist (been going to him for almost 35 years), but even so it was NOT a fun day. When I got home in the afternoon it was pouring down rain. Curt is home on vaction so we snuggled up on the couch and watched some shows we had on the dvr. I decided to just forget about my to-do list. Today is my last day to work before two weeks off and tonight we have a potluck with the church choir (where Curt sings…I can’t carry a tune in a bucket). So it will be tomorrow before I get back on track with that list!
I hope things are going smoothly for all your holiday prep! I’ll be back tomorrow with a sample for the Friday TECC. Thanks for stopping by!

Cocoa Cones
December 16th, 2008

Two parties in one day! I’m off to work and our office Christmas breakfast at Mimi’s. We’ll come back from breakfast and work for awhile and then have an appetizer potluck and a Grinch Gift Exchange.
Then as soon as I get home I need to put together a broccoli corn casserole and a sweet potato casserole and get them baked so I can take them to my prayer group annual Happy Turkey Dinner. This is always one of my very favorite nights of the Christmas season.
Before I’m out the door to work, I wanted to show you the little gifts I have for everyone in my office. I found these cocoa cones all made up complete with red satin bow at Costco.

I simply removed the tags that came on them and added some quick and cute tags made from elements of the TE Christmas Key Ingredients set along with the tags from TE and a sentiment from SASI Season’s Sweetings. The sentiment was punched out with my SU Key Tag punch. When I’m in a hurry I find that punching out sentiments is so much faster than getting them lined up straight directly on my project. Boy – those TE tags have come in so handy for so many things! I just used up the last of my supply. I’m going to need to get some more to have on hand for sure!
Yesterday I broke a tooth and I have an appointment tomorrow morning to get fitted for a crown. In the meantime I need to be really careful about chewing, so it’ll be a big bowl of oatmeal for me at Mimi’s this morning. Good thing I love oatmeal!
Thanks for stopping by. Have a great day!


