K-cup Madness
May 4th, 2012
A few weeks ago we bought a Keurig Coffee Maker. My first experience with a Keurig was when I visited my wonderful friend Sharon in Texas a few years ago. The Keurig was an amazing thing, a wonder to behold. However when I got home and told the Rocket Scientist about it, he was not convinced. To make matters worse, a year or so later we stayed at a B&B with a Keurig in the hallway and he had a bad experience with it (I won’t go into all the ugly details.) So it seemed a Keurig was not in my future.
At Christmas, we bought Keurigs as gifts for my parents and for our niece and her husband. I would live vicariously through them. I was quite sure that the Rocket Scientist was not going to budge on the Keurig issue, which was really kind of odd since he’s generally a pretty agreeable guy. But you know, you just don’t mess with a man’s coffee! Then I started working at church and found that Pastor Jeff has a Keurig in his office. And I was invited to use it any time I wanted…well, any time he did not have his door closed for sermon study. I began to take careful note of his schedule and study habits, so I could schedule coffee access around them. I discovered that it is best to arrive a couple of minutes early to staff meetings to avoid the Keurig traffic jam. And apparantly I began to talk at home about the Keurig…A LOT…because one day the Rocket Scientist uttered those six wonderful words, “Go ahead and get a Keurig.” *GRIN* We went straight to Costco the next day! (After I researched for the best deal of course. 😉 )
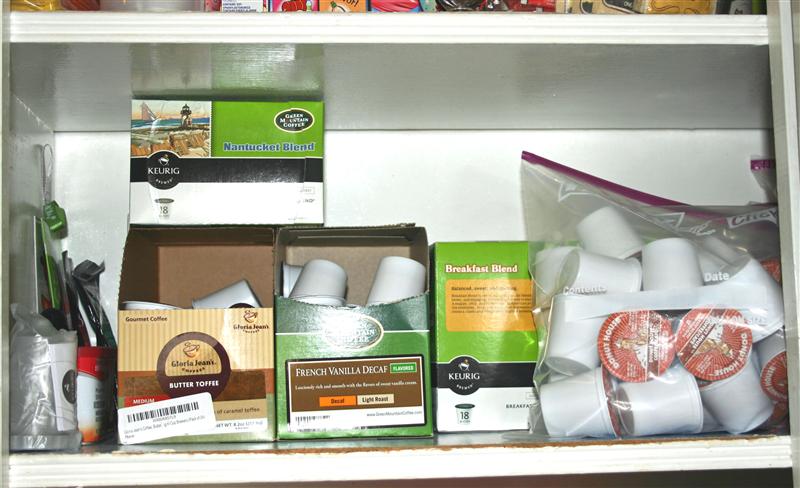
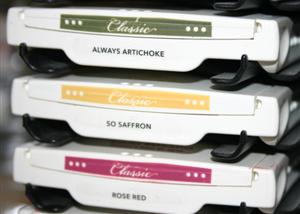
Well, as giddy as I was about my new incredible machine, the Keurig came with a new set of problems…storage problems. What on earth to do with all those little K-cups? There was the variety pack of 60 that came with the machine, then there was the huge box of Donut House we went back to Costco for (160 of them!), and the several boxes I ordered from Amazon of decafs and the boxes of 18 I got at Target of my two personal favorites – Green Mountain Nantucket Blend and Breakfast Blend. Acck the stuff was overtaking my laundry room!
The first order of business was to make room in the cabinet where my Yuban has always been kept. (And I do mean ALWAYS!) I stacked everything in there and it was ok, but I really wanted a better system.
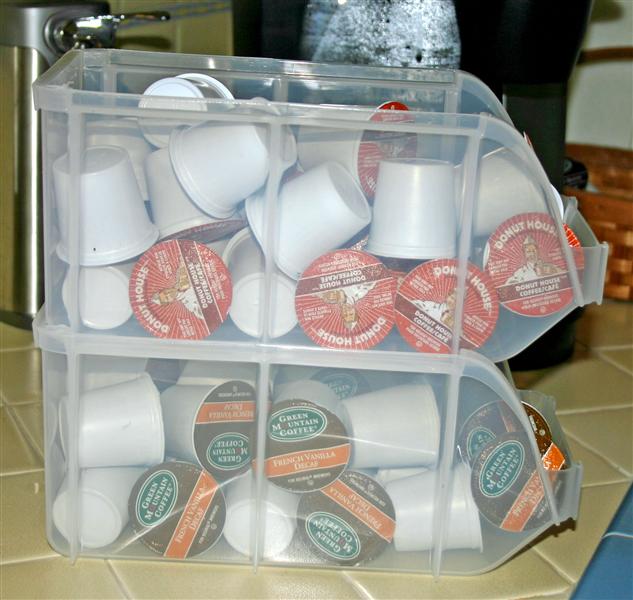
Next I headed to…where else?…Pinterest to get ideas on K-cup storage. I saw lots of things I liked (and I pinned and pinned and pinned), but most wouldn’t fit in my 1948 kitchen cupboards. Finally I came across the idea of using Medium Storage Bins from Staples which was originally posted on the blog Whistle While You Work. Turns out these are the perfect size for my cabinets. They come in black or clear and I opted for the clear. You can see the black in the original linked blog post.
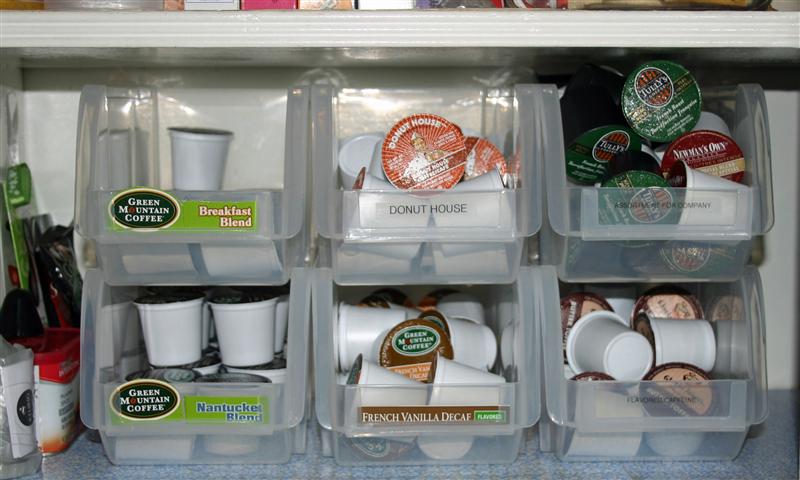
Ah! So much better! I discovered that one bin will hold about 26 K-cups if you put them in willy-nilly or 18 if you are really anal and want them stacked just so. The top bin will hold a little more. There’s a spot for a label on the front of each bin. For some of them I cut out the variety name from the box and for some I used my P-touch label maker. Here are a couple views of them on the counter, just so you can get a better picture of what they look like.

And a side view:
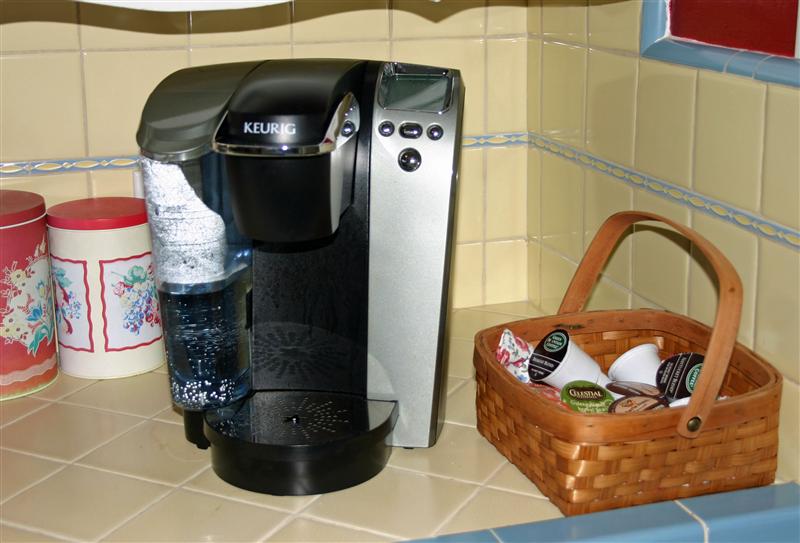
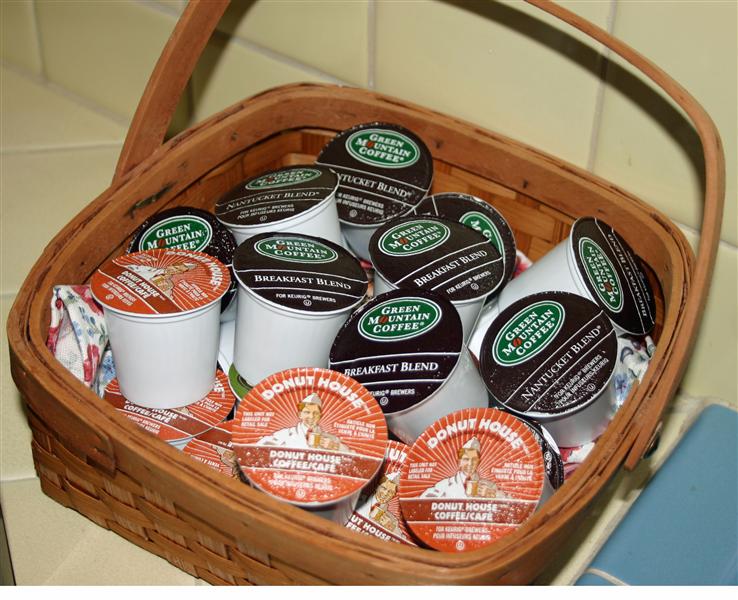
For easy access, we keep a basket right next to the Keurig filled with the varieties we use most for our morning coffee.
For now I have the majority of decaf K-Cups in a plastic lidded box on the top shelf of my cabinet. I haven’t decided if I want to get the Staples bins for those or not. We will mostly use those when we have company over in the evening, so I don’t feel like they need to be in easy reach. I do have French Vanilla Decaf in one of the bins, since it’s my favorite and the one I would most likely reach for in the evening.

One more tip on the bins – they are on-line only, not carried in the stores. We have a Staples very close to us and I excitedly ran over there to purchase the bins and was bummed out to not find them there. The employees are super helpful at that store and Steven looked up the item for me and told me he could have it delivered to the store the next day with NO shipping charge! The bins are $4.79 each, but just the right storage solution is priceless!
After my extensive search, I wanted to post this in case it might help someone else out there in the midst of a K-cup struggle! There are tons of options. If you’d like to see some different ideas check out my K-Cups Pinterest Board. Maybe you’ll find just the solution you need. 🙂
Thanks for stopping by.
![]()
Center of Attention Product Spotlight – Mini Binder Box
November 16th, 2009
 Today I have the opportunity to participate with half of the Baker’s Dozen in a Taylored Expressions Center of Attention Product Spotlight. When I say I *have the opportunity* I should say that I almost begged to be included since the product is something I absolutely LOVE! We’re focusing our attention today on the Mini Binder Boxes from the TE Store.
Before these boxes came along I was struggling with various methods of storing unmounted stamps – both clear and rubber. I just wasn’t completely happy with any of the methods I had tried. For me, the Mini Binder Box was the BEST universal solution for my unmounted stamps. Of course the TE stamps come on a full color panel ready to just slip into the box, but I was so happy that Taylor also has the plain panels available for purchase so I could easily store my other unmounted rubber AND my clear sets. I find that I can get 4 panels in a box storing rubber on thick EZ foam and 6 panels in a box storing clear stamps.
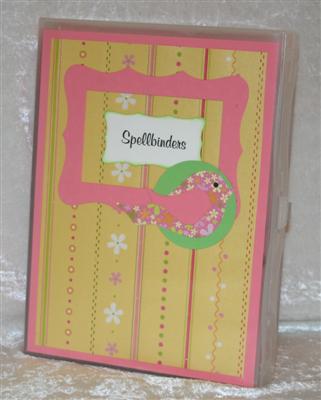
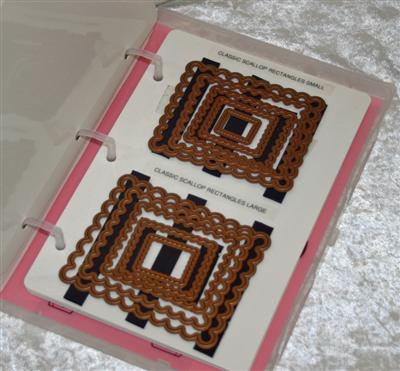
BUT WAIT – THERE’S MORE! The Mini Binder Box and plain storage panels are perfect for storing all shapes and sizes of Spellbinder’s dies! Above you see my MBB customized for my Spellbinders and below you can see a close up of one of the panels with strips of adhesive magnets (available in rolls at Michael’s) to hold the dies.. I know how difficult it is to get the full concept of these boxes just through photos, so my hubby helped me make my very first video. *GRIN* I hope you find it helpful. Please leave me a comment and let me know what you think about the video and feel free to ask any questions you might have about the Mini Binder Boxes.
[youtube]https://www.youtube.com/watch?v=8HVUxrJfhmk[/youtube]
ETA: And in honor of our Center of Attention product spotlight, the Mini Binder Box is an additional 15% off today and tomorrow (November 16-17) so don’t delay and pick yours up for just $8.46 each!
And now let’s check out what the rest of the girls have to say about the Mini Binder Box today:
And I want to wish a very Happy Birthday to Nancy McKinney! Huge HUGS to you, my UBER talented friend!!!
And Happy Monday to everyone! Thanks for stopping by!

Copic Matches to SU
September 2nd, 2008
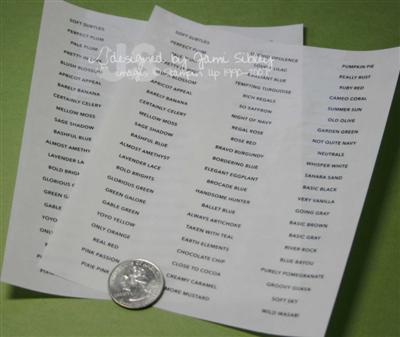
Quite some time ago my friend Leann and I sat down with Stampin’ Up! cardstock, a full chart of colored Copic swatches (thanks to Joy) and a couple of OTT Lites. That night we came up with a list of what we felt were the best matches of Copic markers to SU cardstocks. We used cardstock rather than ink or markers because we felt it was most likely we would color images and want to layer with cardstock or SU dp and not as likely we would actually have something stamped in SU ink that needed to be matched. Ever since we came up with these matches almost a year ago, I’ve wanted to make a chart where I could color in a box and attach a small piece of cardstock. I finally got my chart made and I want to share it with you. You’ll need to print it out on the cardstock you most often use for coloring with your Copics. It’s 5 pages. In the box next to the SU color name you can attach a little piece of that color of cardstock. Then in the next box you can color in with the Copic when you get it. I hope you find it helpful.
copic-matches-to-su-cardstock-by-jami-leann.pdf
If you’d like to share this chart I ask that you please direct people to this post on my blog and not post the chart itself on your blog, in any forum, or anywhere else without my express permission. If you find it helpful please leave me a comment and let me know! 🙂
I just have to share something fun with y’all. Look what came in my 3rd shipment of Nutrisystems food on Friday.
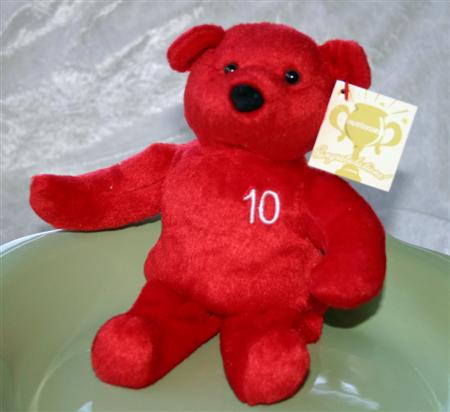
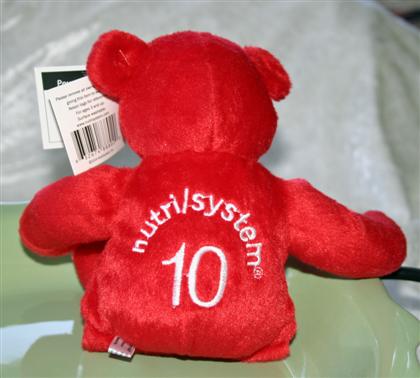
Curt had told me that if I would log my weight loss on the NS website they would send me a bear for every 10 pounds, but I never really looked to see what he was talking about. I kept thinking it would probably be some dumb sticker or picture of a bear, but no…this cute little guy came in my order! I know it’s silly, but I was totally EXCITED!!! His name is Pound!
Thanks for stopping by. Be sure to come by tomorrow for some excitement you don’t want to miss (or at least I don’t want you to miss – LOL)!

Magic Cabinet
November 30th, 2007
I’ve been telling everyone for months that I was having a magic cabinet made that would solve ALL my problems. Of course that was said in partially in jest and partially because I was a little worried that my expectations were a tad too high.
And WooHoo!!! We finally got my new cabinet moved into my stamp room last night! I’m in heaven! This has been many months in the making. Like most of you I’m sure, I have limited storage space. I’m very fortunate to be able to claim our second bedroom as my stamp room, but I do share that room with 2 very large macaw cages. (We alternate between calling it the “bird room” and my “stamp room”.) And since we only have 2 modest size closets in the house including the one in that room, the closet is filled with clothes with minimal room for any crafting supplies. All this to say that I need to make the most of every bit of space. The cabinet I had just wasn’t using the space to it’s potential and stamp sets were stored in Iris carts and plastic bins and often on the floor.
So I dreamed up this cabinet and went out shopping. Ummm….that’s rarely a good idea, but something I do often. When I’m shopping for something it’s common for Curt to ask me “Honey does this thing actually exist?” and I answer “well of course it does…it’s right up here in my head!” After several frustrating shopping trips Curt insisted I call John the cabinet maker to get an estimate. He built a banquette and a little desk in our kitchen several years ago and he does awesome work. Before I called him I measured and pondered and sketched and came up with what I thought would be perfect. John came out and measured and looked at my drawing and gave us a price. Of course it was much more than I had hoped, but Curt – wonderful husband that he is – without hesitation said we should get it made! And now something that only existed in my mind six months ago is a real piece of furniture in my stamp room and it looks exactly as I envisioned it. WooHoo I’m a furniture designer now!
It was hard to get good photos of it last night in the room because I could only get so far away from it. Here it is empty.
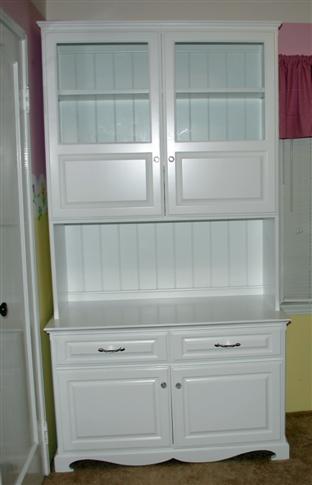
Isn’t it gorgeous? It’s 44″ wide, 22″ deep, and 85″ high – made just to fit in that spot. (Guess I should have taken a pic of me standing next to it so you could really see how big it is.) The top section is for stamp sets and I wanted the bottom 1/3 of those upper doors to be solid so you can’t see the plastic drawer units I wanted to put there housing loose and misc. stamps.
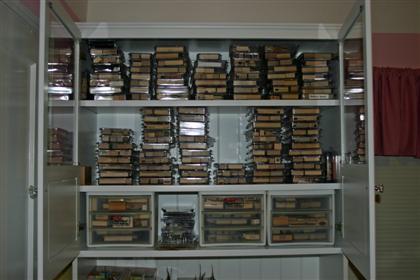
I will need to play with stuff a lot more to figure out the best way to store everything, but this pic was taken after just stacking up all my stamp sets. I’ve decided to add one more shelf and try the stamp sets on their sides before I decide which way I like best. The cabinet is quite tall and that works fine for me since I’m 5’9″.
My 12×12 designer papers are in vertical Cropper Hopper holders and they will sit on the open shelf with room behind them for photo storage boxes full of cards. Half of those Cropper Hoppers had been on the floor under my desk.
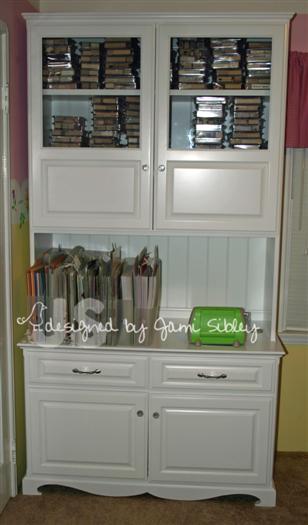
The drawers are very sturdy and deep enough for even my Giga Marvy punches. I moved all my punches to the drawers today (forgot to take a picture before the birds went to bed) and I still have about a half a drawer for all the new punches in the January SU catty. *wink* I have a lot more organizing to do before I completely decide what will go in the bottom section, but at the moment I’m thinking/hoping ot get a lot of alterables down there. It’s taking some time because really it involves re-organizing most of my room. It’s like one of those little tile puzzles we did as kids – where you have to move the tiles around in a frame where there is just one empty space – you have to move a bunch of stuff to get one thing in the right spot! It’s funny, even though this cabinet is much bigger than the old one, the room feels more open because the old cabinet had solid wood doors in a natural finish. I love the look of the crisp white! Oh and I think we’re going to try etching the glass panels at some point.
Anyway I am beyond thrilled and wanted to share with y’all! 🙂 Now I just need to get everything I pulled out into the living room back into the stamp room before it’s time to get our Christmas tree! Just have to work that puzzle one piece at a time. LOL!
While I’m here I might as well share a card I made for the Sketch Challenge at SCS – started it yesterday and finished it today.

The stamp is by Stampendous – Tier of Treats – and it’s available at eclectic Paperie. The sentiment is from a retired SU set. I colored the image with Prisma pencils and blended with Gamsol and stumps, then added some stickles. The stitching are rub-ons by Doodlebug. I realize the embellishment treatment at the top of the card is really too heavy for the look of the card overall, but it was a fun new thing to try. My friend Lisa inspired me to try putting rhinestone brads inside jumbo eyelets. It’s a really fun look, I just wish they had been at the bottom instead of the top. Cardstock used is So Saffron, Basic Black, White, SU Designer Prints Rose Red and Basic Grey Perhaps.
Thanks for stopping by. I’m off to organize in my dreams. Good night.
Closet Cleaning and Kraft Cardstock
September 17th, 2007
What a productive day! After over a year on my to-do list I finally tackled the chore of cleaning out my clothes closet today. I have to thank several of my friends over at Splitcoast who cheered me on and assured me I could do it. That was just the push I needed to finally get started and it actually took less time than I anticipated. I had clothes in 4 sizes and the few clothes that I can currently wear would not fit into the closet making it a constant struggle to get dressed – especially on the days I work. The hallway is now lined with neat piles of folded clothes all sorted by type and size. I’m getting rid of a ton of stuff! I still have lots more sorting to do – drawers, shoes, the other closet where my dresses are – but I am so happy to have all the hanging stuff in this closet finally cleaned out!
Just before I started this morning I happened to read a very relevant litle blurb in the Editor’s intro in the new Fall 2007 issue of Renovation magazine. In part it read
“It’s not the letting go that hurts, it’s the holding on. I’ve learned that ‘letting go’ often refers to the guilt of expensive purchases I shouldn’t have made or of projects I’ll never get done. Holding on only creates a bigger clutter pile of unfinished business. Now I simply take a deep breath and rate clutter items on a scale of 1-10. Anything that gets a value of 8 or higher stays. Anything lower goes. It’s a little exercise that rewards me with all the breathing room I need.” -Luann Brandsen
That was the perfect message to get me in just the right frame of mind. Out out out it goes!!! Try it! It’s very freeing! My advice – if you are over 15 pounds away from your “skinny clothes” and it’s been more than a year since you’ve worn them…get rid of them! They will be hopelessly out of style when you get back to them and besides, once you get skinny it will be FUN to shop! Let ’em go!
After dinner I rewarded myself with some stamping time. I wanted to try another one of the Dirty Dozen challenges so I decided to try working with some Kraft cardstock and I ended up making 2 cards with a lot of the same tools and elements. Both cards have a Kraft base and use Wintergreen designer paper along with Artichoke and Soft Sky. I cut a 4 1/8″ square of Soft Sky and a 4″ square of Wintergreen and cut both in half on the diagnol to form triangles. Both cards also utilized my brand new photo corner punch and round rhinestone brads. Each is stamped with a different motif from True Friend using white craft ink for the background.
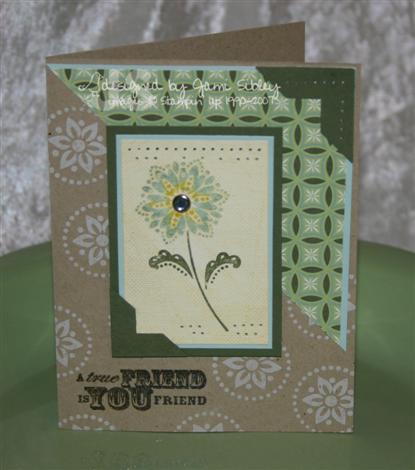
For the first card I stamped the flower from True Friend on a vanilla panel and overstamped it with the Linen BG in Banana ink. I used a blue rhinestone brad for the flower center. The main panel is popped up on foam tape. The sentiment is stamped in Artichoke craft ink and embossed with Irridescent Ice ep.
For the second card I used the left over triangle pieces of dp and Soft Sky, but went a different direction with the design.
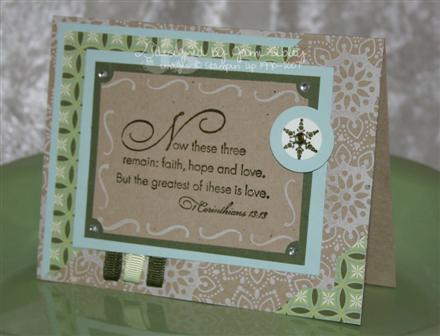
I decided to use a verse from Elegant Inspirations as my focal point – it is stamped in Artichoke craft ink and embossed with clear ep. The little jewels in the corners are Adorn It jewels from eclectic Paperie. There are little grosgrain ribbon loops in Artichoke and Celery and the finishing touch is one of the little snowflakes from Snowburst embossed with Artichoke craft ink and clear ep on white cs and punched with a 5/8″ punch from EK Success. That is layered onto a 1″ circle of Soft Sky and in the center is a celery Rhinestone brad. That whole piece is up on foam tape. I wasn’t sure what I thought of this color combo at first, but the subtle look of it is growing on me.
Speaking of color combos – Emily used my Rust True Friend card for the Color Combo this week – Really Rust, Chocolate Chip and River Rock. I’m so excited. I hope you’ll play! Click here for details.
We’ve lost power twice while I’ve been typing this post! The second time was long enough for us to find and light a bunch of candles. I’m going to to get to bed and hope the power stays on at least until I get there. Thanks for stopping by.
Color Index Labels
July 23rd, 2007
I wanted to take a minute to share a little item with you from the Stampin’ Up catalog that could be easily overlooked. On page 193 toward the bottom are the Stampin’ Color Index Labels. You get a complete set of 2 for $3.95.
I put a quarter in the picture for size reference. The labels are clear with back writing and quite tiny so that they fit perfectly on the ends of our stamp pads.
 They would also be great on file folders for cardstock or page protectors holding cardstock scraps (I wrote on mine with Sharpie).
I know some folks on SCS have made up their own files to print labels – even matching up the RGB code as closely as possible – and they are set up to punch with the word window punch. It was my original intention to use one of those files, but for $3.95 to have these labels ready to go with no punching…totally worth it for me.
If you want to see some awesome organization check out Nicole Heady’s new stamp space – wow!
Remember Dare to Get Dirty starts on SCS Wednesday morning – make sure you have a current membership to the Fan Club! I know you’ll want to play at least some of the fun challenges hosted by both current and Alumni Dirty Dozen for the week of July 25th – July 31st. 🙂
Mmmm Ribbon Mmmm
May 29th, 2007
Ribbon! What stamper doesn’t LOVE ribbon? And living in SoCal so close to Fabric Barn, I’ve had a *thing* for ribbon since my earliest crafting days with lace and silk flowers! My ribbon, however, had gotten completely out of control. I had this great rack on the back of stamp room door, but for the last year or more I had completely outgrown it! I had ribbon in several different containers – mostly living under my desk which was a royal pain.
I decided that I need all my ribbon visible as much as possible. Weekend before last I dragged Curt to Ikea to look for some shelves I had seen on their website. I was sooooo excited to come home with these rails and baskets from the Bygel line.
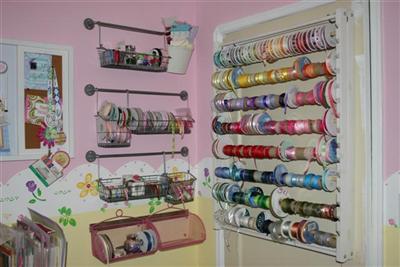
My old rack is still on the door and I still love it, but on the left (behind the door) is my new Ikea stuff. 🙂
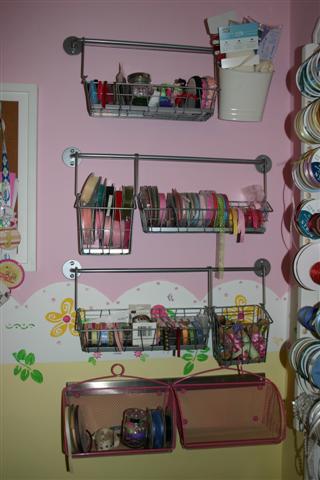
I got 3 of the rails with 3 of the 13″ shallow baskets and 2 of the 5.5″ deep baskets as well as a hanging bucket from another line at Ikea. At the bottom we hung a magnetic bar from Ikea and attached 2 pink locker baskets I already had from Target. It’s so fun because the baskets can be moved around anytime and they are very easy to access or take down and carry to my table.
Each basket has a bit of a different configuration of *stuff*. One basket has my velvet ribbons and ric racs. This basket has some of my specialty ribbons like Basic Grey and American Crafts as well as ribbon rolled into the tiny Cropper Hopper embellishment holders. They fit perfectly 2 deep. They hold approximately 5 yds of ribbon and I originally had them in a CH case, but found that having them *put away* like that made it more difficult to know what I had.
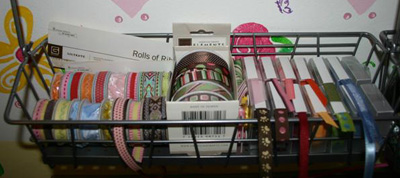
The next basket has SU stitched and gingham ribbons, along with polka dot ribbons of various brands.
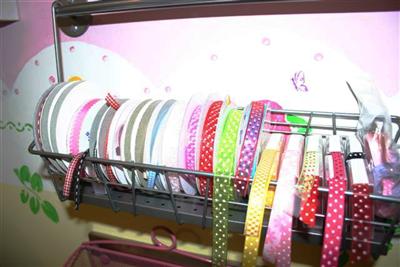
The bucket at the top holds my fibers on cards. I got a set of little glass jars and so far I have hemp in one and ribbon scraps in another. I still have a little room left over – which is good thing since I just got some velvet ribbon from my friend Jody. *wink*
It’s funny how excited I am about this. I just love to sit at my stamp table and stare at my wall of ribbon. I worked on cleaning up my stamp room yesterday and I got the table mostly done. The desk is still piled high – that is tomorrow morning’s project! It just kills me how it seems to take days to get everything cleaned up and then only a matter of hours to fall right back into hurricane status! *eye roll*
Side note: My husband has decided that the word Ikea is and old Norse word for realm of evil! Bwahahahahahahahaha!!! In his defense I have to admit that I wasn’t sure we’d ever make it out of there either!


