My March Class
March 17th, 2014
I held my “monthly” stamp class on Friday night. I hadn’t had one since November, so it was great to see everyone and to get stamping! This class featured Stampin’ Up products since one of my regular students is a Stampin’ Up! Demo and SAB is going on. I like to give my girls the chance to order during SAB. At the end of the evening I discovered that one of the stamp sets we used (Charming) is actually retired. D’oh! I’m pretty out of the loop when it comes to SU these days.
Anyway – I wanted to share the three projects we made in class.
First up is a card featuring that retired set. I’m not sure how long I’ve had it, but I had never inked it up before and it’s quite pretty.
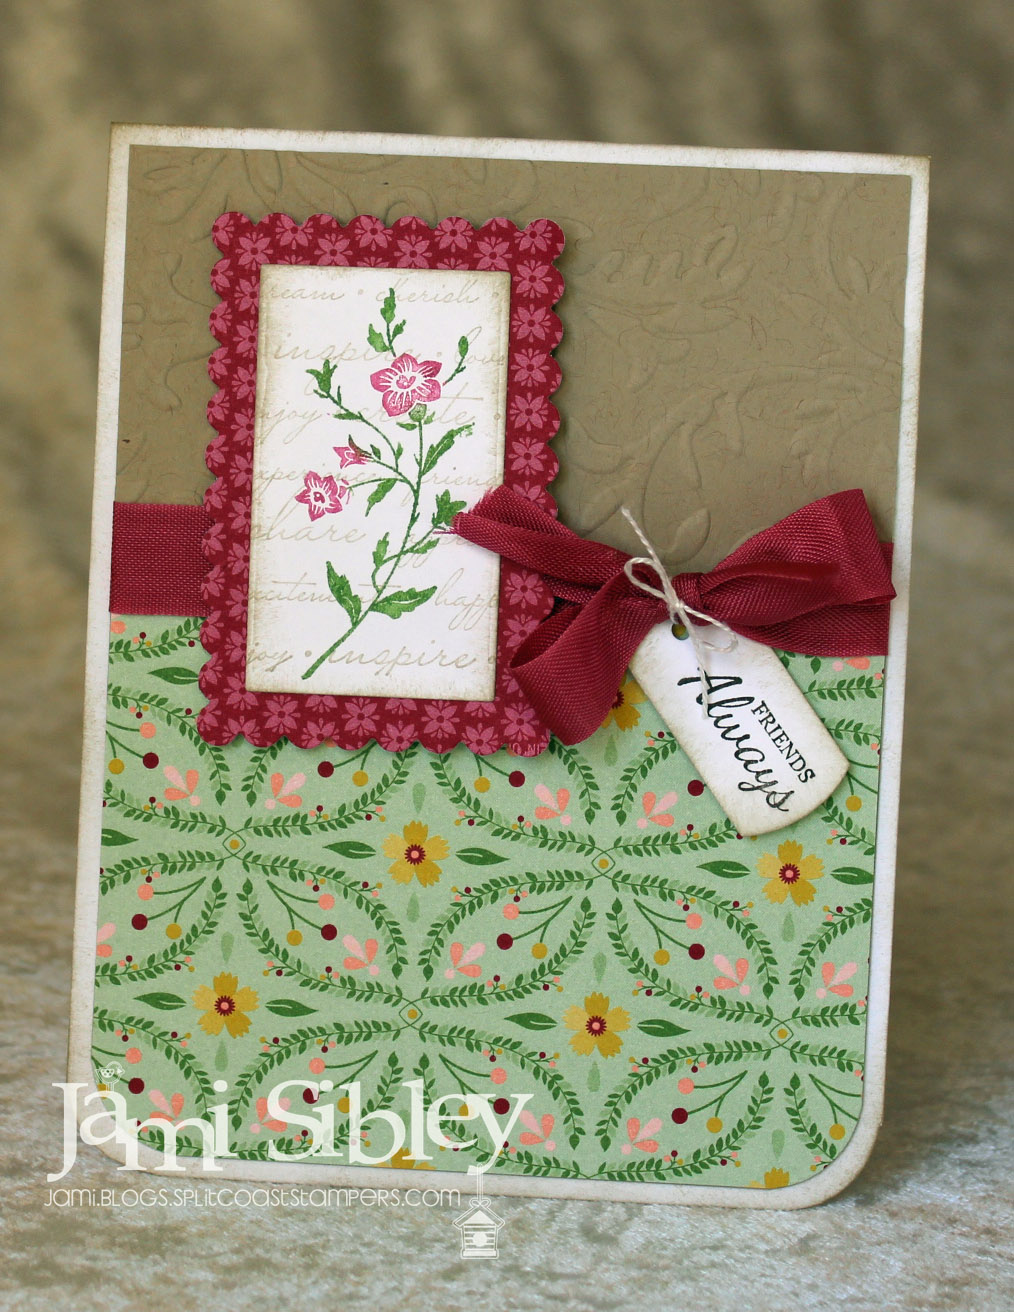
The sentiment is Taylored Expressions – Many Mini Occasions and the little tag die is also TE. The paper is all SU.
The next card features the new So Very Grateful stamp set along with the new Hardwood Background stamp on SU notecards.
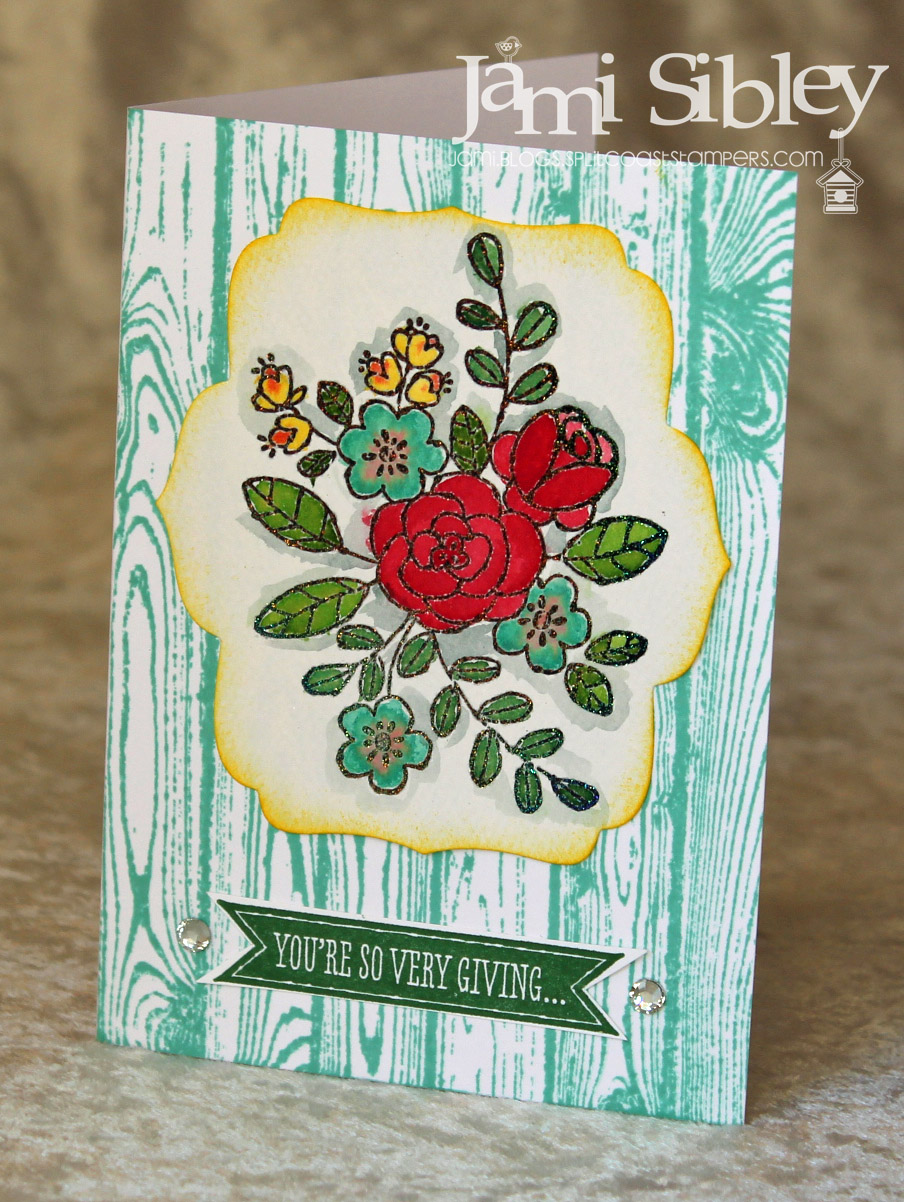
The image was embossed with black craft ink and iridescent embossing powder. It was them water colored with ink from classic pads and an aquapainter. The background was stamped with Coastal Cabana ink.
Our third project was created with the Petite Purse die. So stinkin’ cute! And thank you to Dawn Olchekske for her great video with all the tips on how best to assemble this little purse.

Thanks for stopping by. I hope you have a fantastic week!
![]()
November Stamp Class
November 18th, 2013
Happy Monday! First I want to thank everyone for the comments and e-mails after my last post. The love and encouragement shown to me by so many has truly meant the world to me! Thank you from the bottom of my heart!
It’s been over a week since I held my November Stamp Class, and I know my girls always like to have the projects posted up here on my blog for reference, so I thought I better get caught up. This was my Christmas class and we created four projects all featuring Taylored Expressions stamps and dies. First up is this adorable little penguin bag/box/sack made with the Sack It Die set and the Sack It Penguin add-on die set.

While this project is super simple, I have to say that I wouldn’t recommend it for a class of 10 or more people. I’m afraid that all the die cutting of so many pieces (along with the next project I have to show you) was a bit too much for a class setting. I always want my classes to be fun and relaxing and I think I may have stressed out some of the girls. SORRY!
The cute little penguin is attached to the front of a simple little die cut sack that can be used for party favors or any small gift. I think he’s DARLING!!
The next project was a Santa gift card holder. This was created with the Santa dies that come with the Sack It Die and the addition of the medium scallop border die (with white felt). Instead of layering the Santa pieces onto the sack, we used the Tag Pocket Die to create a gift card holder.
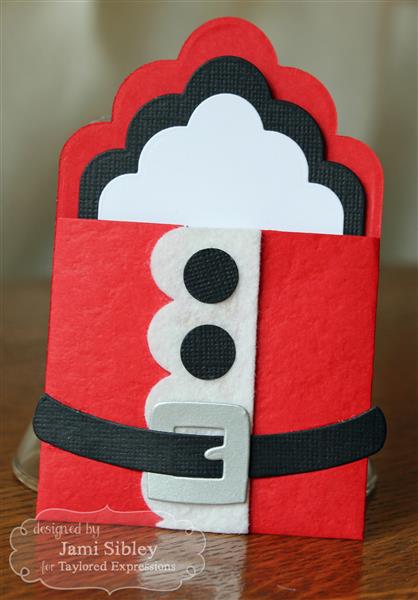
Everyone uses gift card holders at Christmas, right? We also created a little tag to go inside and then the gift card slides in behind the tag.

The sentiment on the tag is Stampin’ Up!
Next up is a card I CASEd from my friend Wanda Guess. I pretty much LOVE everything she creates and as soon as I saw her card during the October Release, I knew we had to make it in class. It features the stamp set Christmas Doodles.
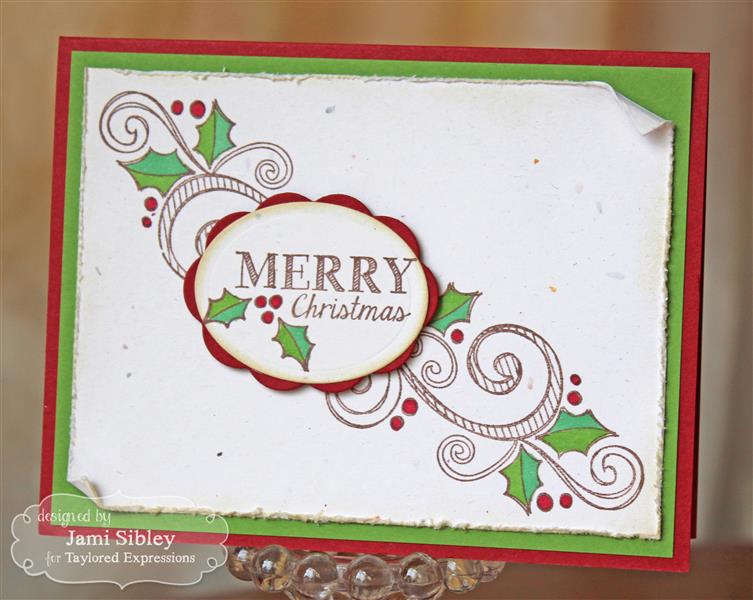
So quick and easy and so super cute!
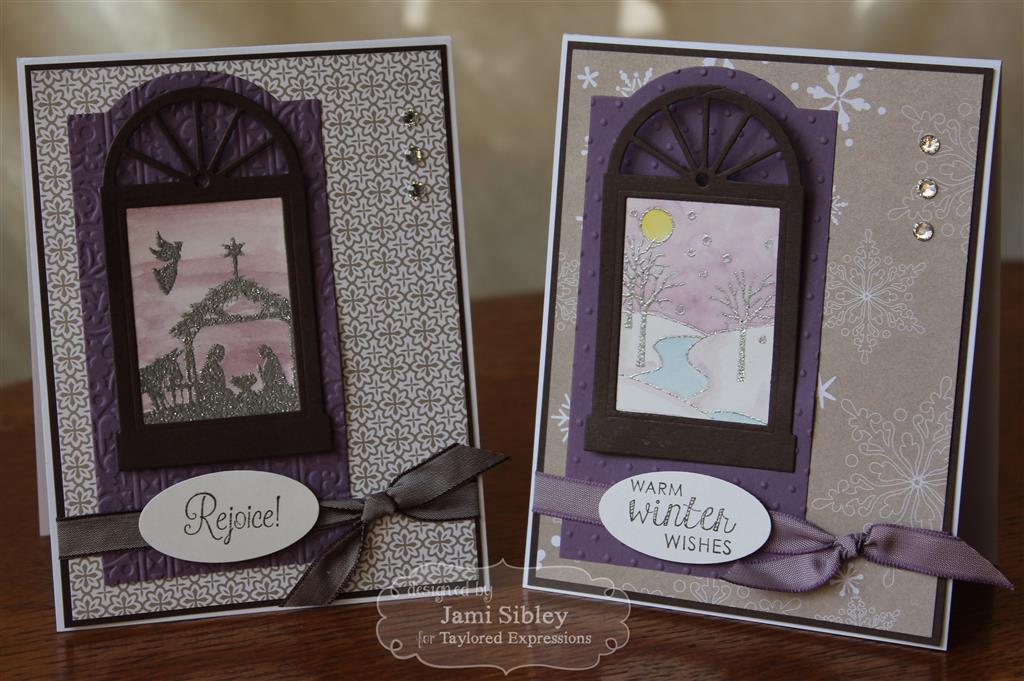
The last project we created was a card featuring A Winter View. Each student had a choice between two versions of the card. The designer paper is from SU and you see the two sides of the same paper on the two cards. It’s hard to see in the photo, but the paper is shimmery. I love all the window dies and the stamp sets to coordinate with them! We heat embossed the image with silver embossing powder for a special holiday sparkle and watercolored over that. Unfortunately, the photo just doesn’t do these cards justice.
Of course you can click on any of the photos above to see them larger. Thanks so much for stopping by! Time for me to get ready for work. It’s the “busy season” with Thanksgiving and Christmas quickly approaching. It seems there is never a time when the church office isn’t busy, but I think this next 5-6 weeks might just be the busiest of all! Have a great day!!
![]()
September Stamp Class
September 28th, 2013
Happy Weekend! After not teaching a stamp class since June, I finally got back in the saddle and held a class last night. It was so great to see my girls again! I always do 3 cards/projects in class, but I got a little carried away in my prep yesterday and we ended up with 4 cards. Three of them were related – as you’ll see below. I have to give a shout out to the Baker’s Dozen and the Taylored Expressions Gallery, because all of the ideas for these cards came from there.
First up is a card inspired by Shannon White. I loved her Easter card and just had to find a way to make it work for my class!
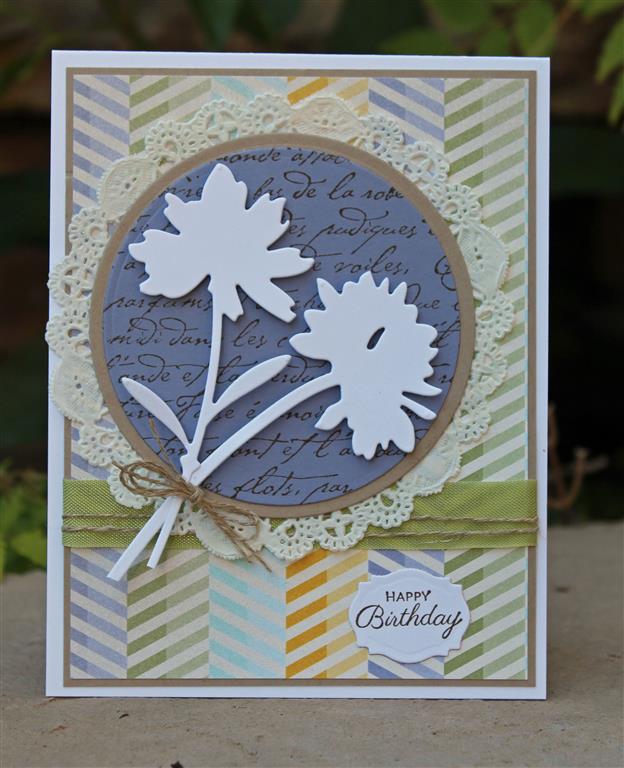
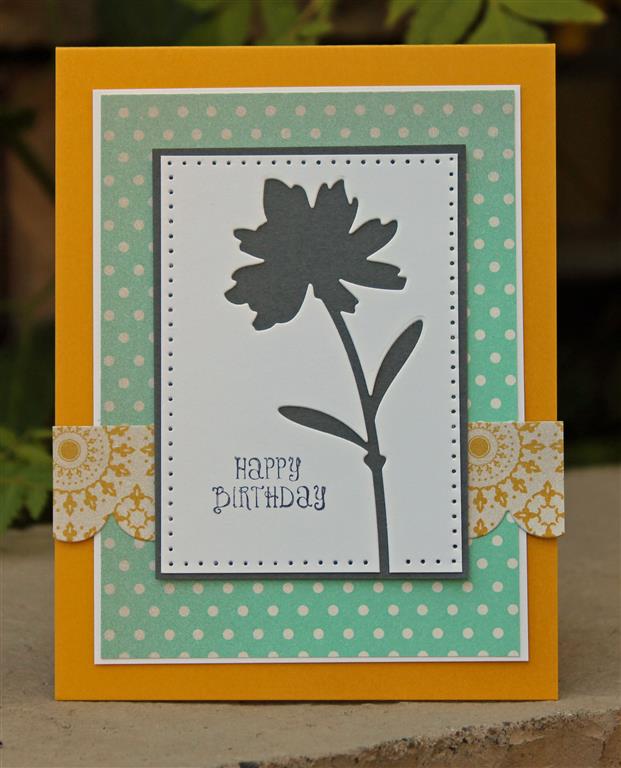
The general theme of the class last night was “birthday”. I just love how Shannon took two of these silhouette bloom die cuts and used them together. The next two cards were inspired by negative die cut examples created by Shelly Mercado and Tammie Edgerton. I started with this one. I used some piercing to create a little extra detail.
Then I realized that I would have a 2nd negative panel in making the first card and I just couldn’t let it go to waste, so I created the next one. This time I went for a 4.25″ square. I really really tried to go monochromatic with just the Melon Mambo and white, but you know me…I had to add the black! Just had to!
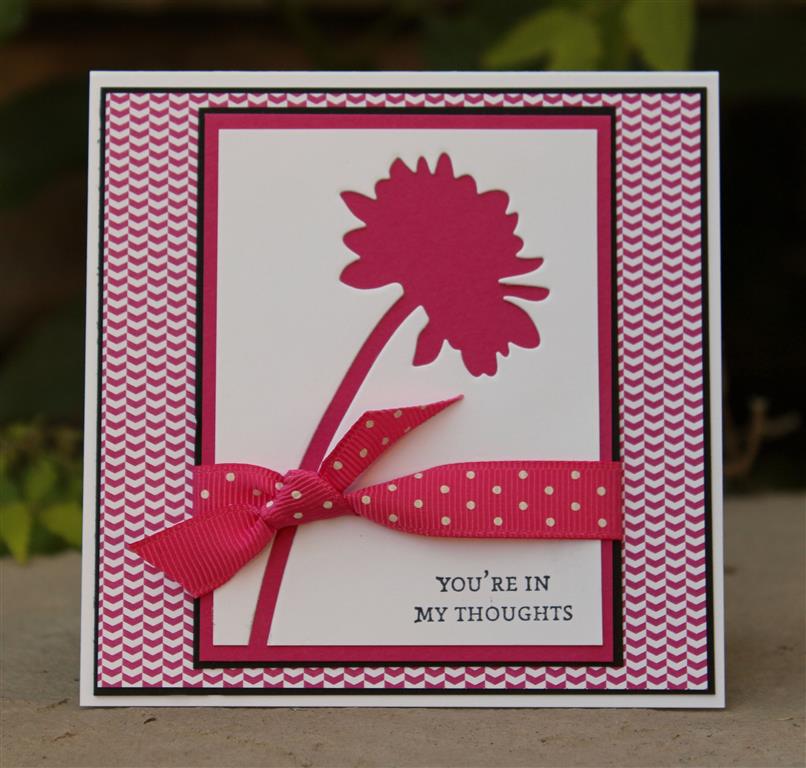
Both of the cards above cut the blooms from white 2.5″ x 3.5″ panels. I think it would be fun to just cut a bunch of those and then see how many different cards I could come up with to showcase them.
After these three were ready to go is when I found myself in trouble. I had printed out a bunch of ideas from the TE gallery and it was after 3:00 p.m. on Friday (when I start feeling the pressure!) I went through 3 different ideas before I settled on using the adorable Candy Monster set. I had 4 different samples that I loved and wanted to work from, but ultimately I went with one that Carole Burrage shared recently. Here’s my interpretation.
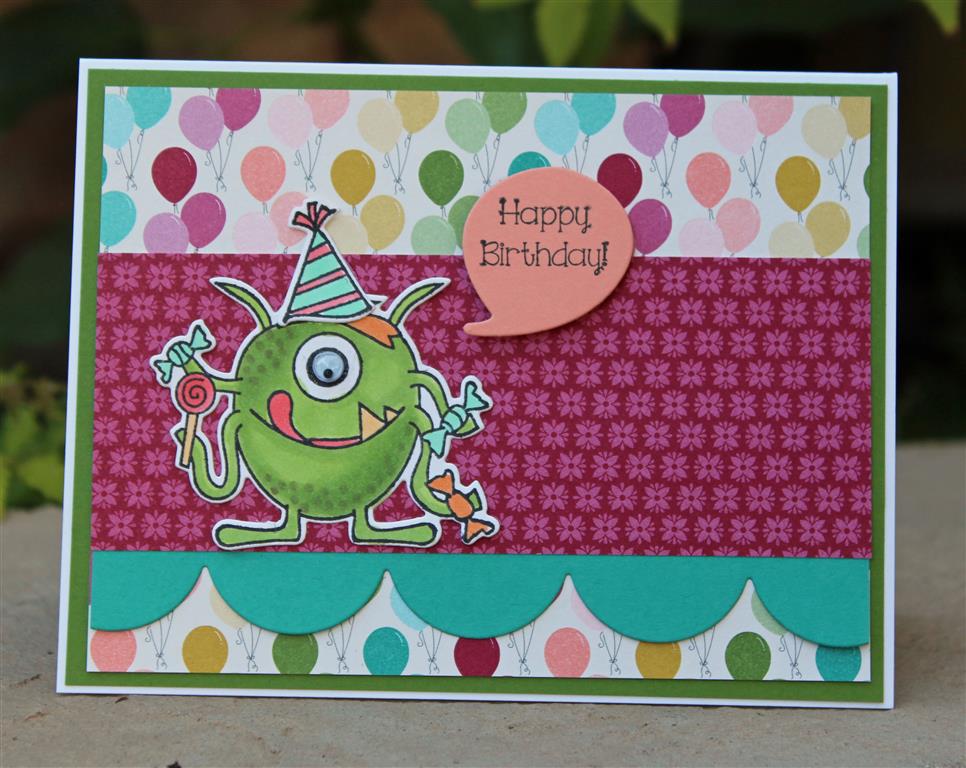
All of the patterned papers are from Stampin’ Up! Although I generally work from 6×6 pads for all my personal creating, I find that having packs of 12×12 SU paper is perfect for class. I can usually get enough of any one pattern for enough cards for class, plus I always know that I will have the perfect coordinating cardstock.
It was great to teach a class again and exciting to have a brand new stamper join us last night! TE Sneak Peeks start on Tuesday with lots of awesome holiday stuff! I have one project ready to go, and we’ll see if I have time to play some more. I know the Baker’s Dozen will knock your socks off!
![]()
Here are the supplies available at the TE Store:
 |
 |
 |
 |
 |
 |
 |
 |
June Class Cards
June 24th, 2013
Happy Monday. I held my monthly stamp class on Friday night and this month we focused on Stampin’ Up! I have two cards to share with you and they are both created with Gingham Garden dsp. I have a SU order going in today and I’m trying to convince myself that I don’t need another pack of this paper. I just adore it so much! I really have to say that this new SU catalog is the best one they’ve produced in several years.
Both of these samples were created while we were camping in Malibu. Before I left I did some searching and printed out some inpsiration photos to work from. The first card was inspired by one I found on Pinterest by Amy O’Neill. I switched the papers around to work with the ribbon I had available. This card is so simple and I love the happy look of it! The stamp set is Label Love.

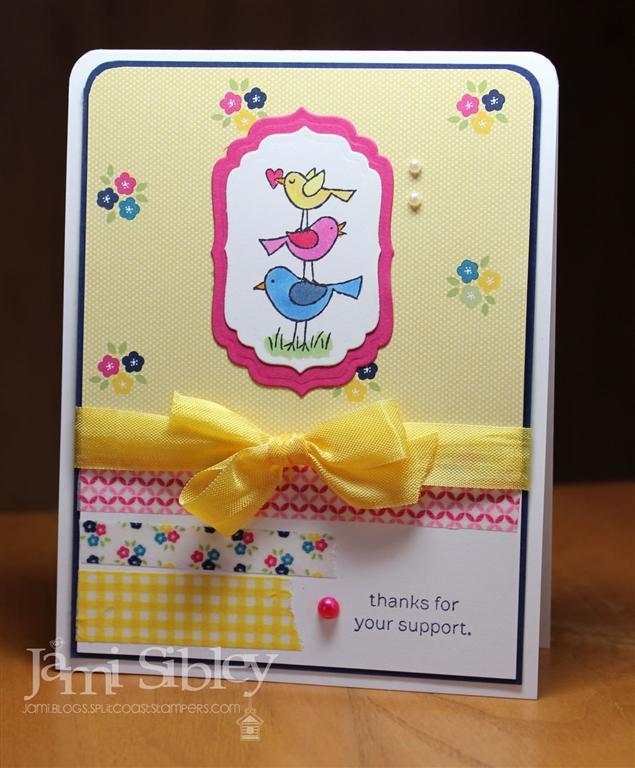
For the second card I wanted to use For the Birds and continue with the Gingham Garden papers. I found a card on SCS created Cindy Hall that was the perfect inspiration. I used some of the matching washi tape and colored a pearl with a Copic marker. Cardstock is Night of Navy and the ribbon is Daffodil seam binding.

Isn’t it sweet? I think the girls had fun making these on Friday. 🙂
I needed to get my Stampin’ Up! order figured out this weekend. I still use mostly SU cardstock, ink and ribbon even with all the TE supplies I create with. Teaching a class once a month means that I need to have plenty of cardstock and ribbon on hand so that when I come up with a class sample, I already have the supplies I need to to prep multiples. With the new SU color resfresh and the fact that I had not reorganized my cardstock drawers in a few years, it was a little bit of a daunting task to take stock. I spent about two hours organizing my cardstock and I even went on ebay and ordered a brand new set of file folder labels for all the SU colors (new and old). Feels so good to be back on the organization path again with all of that. My stamp room has lots more organizing projects to be done, but that was a big one! Now I will have a place to put all that pretty new paper when it arrives!
Thanks for stopping by. I hope you have a wonderful week ahead!
![]()
My May Class
May 30th, 2013
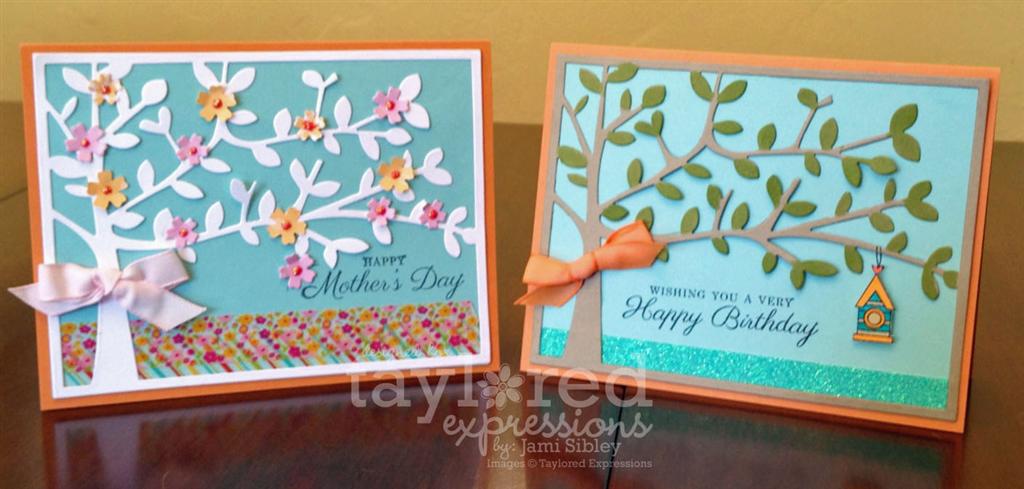
I thought I’d sneak in with some of the cards we created in my May stamp class before the month of May is over. First up is this pair of cards created with the TE SHade Tree Cutting Plate. Each gal chose to either make the white flowering tree or the kraft tree with birdhouse. Of course the sentiments were interchangeable. The white tree has washi tape (inspired by a card made my Broni Holcombe) and the kraft tree has glitter tape. You KNOW I love that shade tree! Seriously cannot get enough of it! You can click the photo to make it larger, This was snapped quickly with my phone and then I gave these cards away before I could get a better photo.
I typed up instruction sheets for my class. Here they are, in case you’re interested:
- Die cut the tree from white cardstock
- Die cut the flowers twice: once from pink paper and once from peach paper
- Choose two patterns of washi tape and adhere to the bottom of your blue panel.
- Lay your tree over the blue panel (but don’t adhere yet) and determine where you want to stamp your sentiment using your stamp-a-majig. Note: You may need to trim off a leaf or low hanging branch to get the placement you want. (You can use either sentiment.)
- Adhere the tree onto the blue panel carefully using SMALL amounts of liquid adhesive.
- Use your stamp-a-majig and stamp the sentiment.
- Adhere blue panel to peach cardbase.
- Curl the flowers with your fingertips and then adhere randomly (10-14 of them.)
- Make bow and adhere with a mini glue dot.
Optional – apply Stickles to flower centers.
-OR-
- Die cut the tree from kraft cardstock
- Color the leaves green with the broad tip end of a copic marker
- Stamp and color a birdhouse.
- Apply a strip of glitter tape to your blue panel.
- Lay your tree over the blue panel (but don’t adhere yet) and determine where you want to stamp your sentiment using your stamp-a-majig. Note: You may need to trim off a leaf or low hanging branch to get the placement you want. (You can use either sentiment.)
- Adhere the tree onto the blue panel carefully using SMALL amounts of liquid adhesive.
- Use your stamp-a-majig and stamp your sentiment.
- Adhere blue panel to peach cardbase.
- Cut out your birdhouse and adhere with a foam dot. Draw in the string so it hangs from the branch.
- Make bow and adhere with a mini glue dot.
This next card was inspired by one that Shelly Mercado created using the TE Arched Window die, Banner Stacklets, and the stamp set A Glimpse Inside. I also used the TE Band It Die.

- Stamp and color the tulips image. Trim with scissors: close on the two sides, but leaving plenty of room at the top and bottom to adhere it to the back of the window die.
- Die cut the window and two pieces of the Band It die on white cardstock. All 3 pieces can be cut in the same pass in the die cut machine.
- There are two sizes of white tag Stacklets to be layered. Emboss the smaller one with an embossing folder in the Cuttlebug. Then adhere the two pieces together.
- Adhere your stamped image behind the window die cut.
- Adhere the window to the layered tags.
- Choose one of the background paper panels and adhere it to your cardbase.
- Adhere the tag panels to your card.
- Center the large piece from the Band It Die on your card so the top of it slightly overlaps the bottom of the window die cut. Adhere to card. Trim off ends of Band It die cut with scissors.
- Take the small inset piece of the Band It die and adhere it to your work surface with temporary tape.
- Choose any sentiment from Labels of Love or Labels of Love II (double check that your choice will fit—most will) and use your stamp-a-majig and stamp the sentiment onto the small piece.
- Adhere your sentiment to your card.
Design Tip:
When creating a with a white on white or other monochromatic look, use texture such as an embossing folder to create interest and depth.
We also created a third card in class, but I forgot to take a photo of it. I’ll try to share that one later. Thanks for stopping by!
![]()
July Stamp Class
August 6th, 2012
Happy Monday! Yes, I am well aware that it is August! I seem to be running a little behind in several areas of life and I have not yet shared the projects we created in my July stamp class. Previews for the August Taylored Expressions Release begin tomorrow, so I thought I bet get my act together and get these July projects posted!
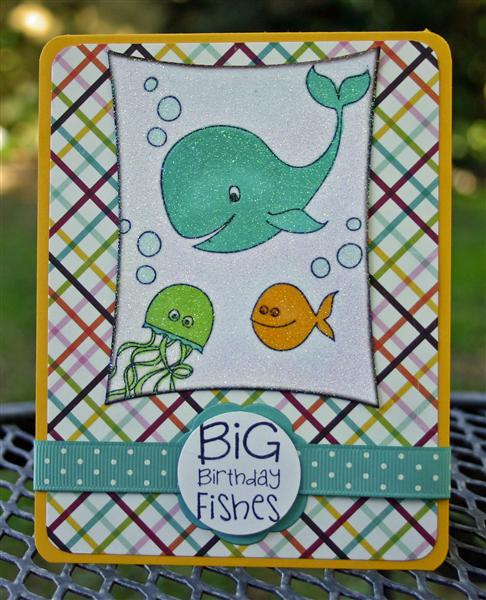
First up is a really cute card featuring Under the Sea and the Faux Diamond Dust Technique (kaleidescope embossing powder used here). The main image panel was inspired by a card created by Baker’s Dozen Designer Shannon. Her card is much more involved and quite spectacular which was great inspiration for my simpler class card. Paper is Echo Park. This card is SO sparkly in person!!
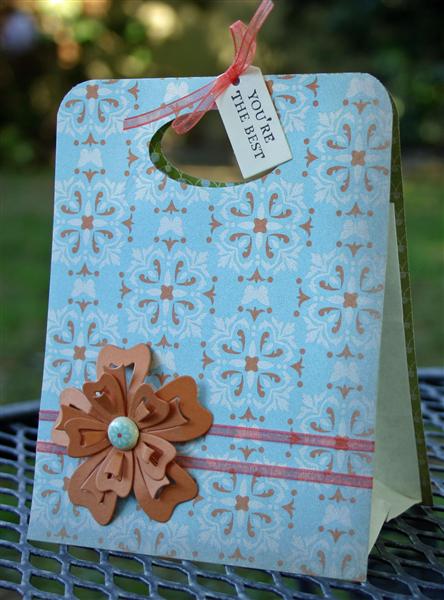
Next up is a simple Genie Bag created with some SU dp and the Taylored Expressions Petal Pop-up Dies. I adore Genie Bags and will be forever grateful to Jen del Muro for coming up with the idea several years back! This one is quite small. I used small white lunch bags from Smart’n’Final and cut the tops down. The dp panel is 4.25″ x 5.5″ and the handle was punched with an SU oval punch. I love that you can make these whatever size meets your needs. The tag is a TE Mini Tag and the sentiment is from the Daisy Bouquet Petite set.
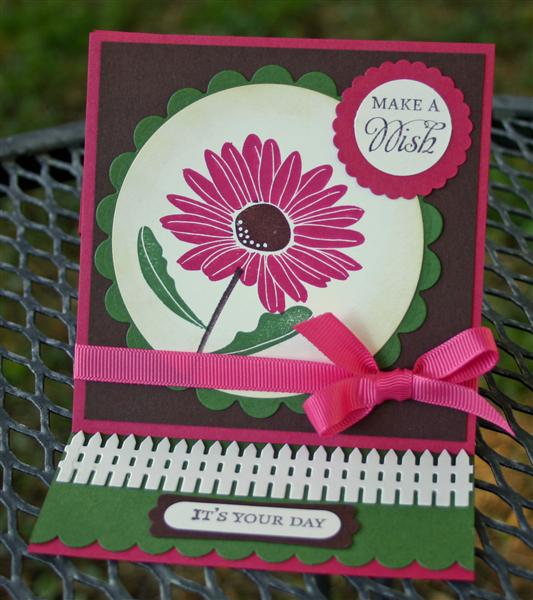
The final project we created was an easel card…my very first easel card. Yes, I was reading the tutorial on SCS the afternoon of class to pull this together. LOL! And I’m pretty happy with how it turned out. The card features TE stamp set Oops-a-Daisy and the Fence Border Die. The bloom was first inked with a Melon Mambo pad, then the ink was removed from the center with a Q-tip. Then the chocolate ink was added from a SU marker direct-to-rubber on the stamp. I think this would have also been beautiful with Faux Diamond Dust added to the panel! If you haven’t tried an easel card yet, I’d encourage you to go for it. It’s really easy and has quite a WOW result!
So, those were our 3 projects for July. Even though I have a bunch of ideas swirling around in my head for my next class, I’ve decided to skip August. I’ll be back at in September though! I hope you’ll come back and visit me tomorrow as I have a new TE stamp set that I’m super excited about!!!
Thanks for stopping by!
![]()
June Class
June 26th, 2012
Happy Tuesday! So last week was really crazy! A quick run-down: Wednesday early afternoon I ended up in tears at work (yes it can happen even in a job you love and even at a church, although I must say it had nothing to do with anyone from our church), Wednesday later afternoon the copier broke again just when we needed to run bulletins and programs for the weekend. Thursday (the day I’m supposed to get off work at 12:30) the copier tech didn’t come until 11:00 am and didn’t finish until after 3:30 at which point the choir aide needed the copier. Curt had a doctor’s appointment in the afternoon at which time he found out that he has 2 new kidney stones and will need another lythotripsy procedure. 🙁 Thursday night I went back to work and didn’t get home till 9:30 pm. *deep breath* Thursday night/Friday morning at 2:30 a.m. we had a huge power surge and then a power outage which fried our microwave, dishwasher, air conditioner and some other things. Friday night I taught stamp class (started creating samples and prepping at 1:00 in the afternoon.) Saturday was somewhat of a quiet day and then Sunday we had church in the morning and in the afternoon thCurt participated in the church Patriotic Musical as well as performing in the Old-Timey Gospel Band (on mandolin) during the BBQ that followed.
*PHEW* Am I ever thankful that Pastor Jeff gave me yesterday off, so I could get some bills paid and get caught up on some things!
Now, on to what this post is really all about…the class I held Friday night. I just wanted to share the projects we created. First up is a pretty card featuring Forever in Bloom from Taylored Expressions.

We used shimmery white cardstock and colored the image with SU water-based markers directly on the rubber before stamping. The background panel was run through the Cuttlebug with a Sizzix embossing folder and then aged with Tim Holtz Antique Linen Distress ink.
Our second project featured my newest TE set Bikes & Trikes along with Echo Park Dots & Stripes 6×6 papers. 🙂 (I say “my” because it was my concept, wonderfully illustrated by Emily Burger!!)
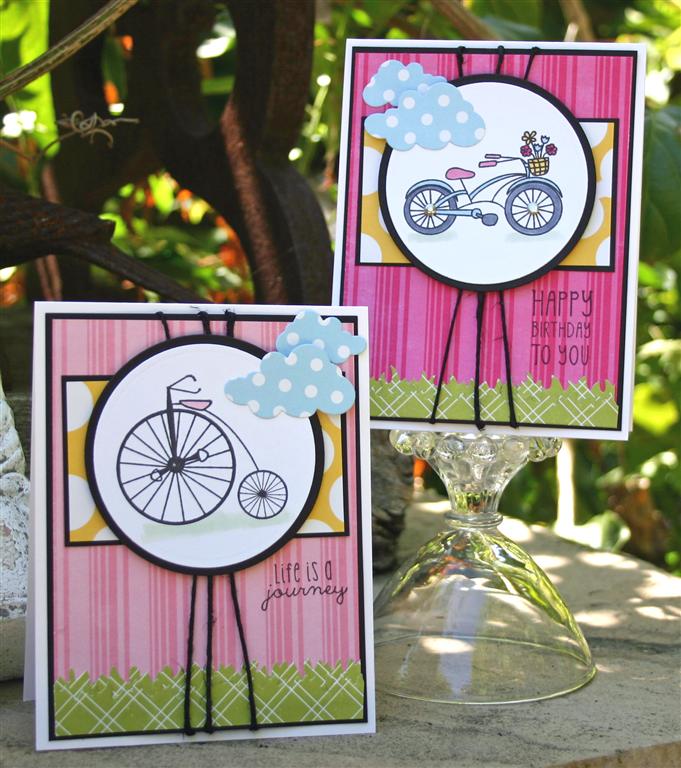
The girls had a choice of which image they preferred and also which sentiment. A lot of my girls don’t care much for coloring, so most of them chose the old-fashioned trike. We also used the grass border and cloud duo Taylored Dies along with Spellbinders circle dies.
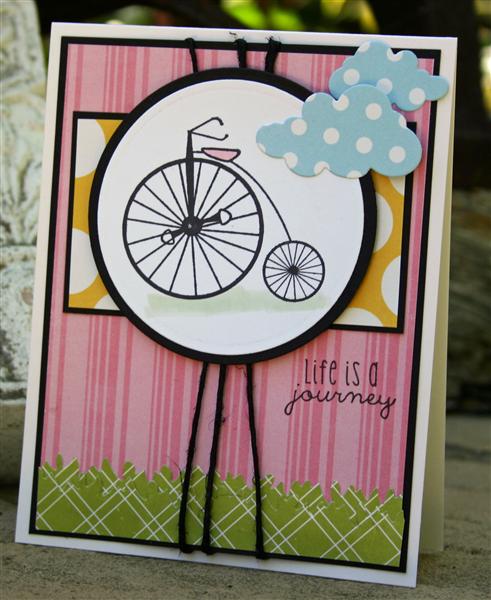
I messed up this sample as the sentiment should have been on the left to balance out the clouds on the right. I had to tell the girls to “do as I say, not as I do!” LOL! I love how the black in this design makes the card pop – my old adage…when you’re not sure what to do, fall back on black!
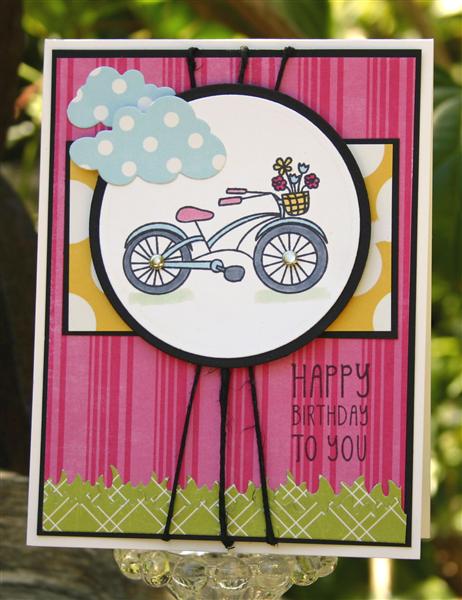
The idea for these 2 cards came from one by my friend Melody Rupple. I absolutley LOVED this card she created and had to figure out how to adapt it to make it work with supplies I had for class.
It was so great to see almost all of my regular students Friday. I had missed teaching a class in May and even though I was pretty spent on Friday night after a crazy week, I wouldn’t have missed it! I’ll be back tomorrow with a sneak peek of the TE July release which is happening early! Please come see me tomorrow. 🙂
![]()


