More Stampin’ Fun…For EVERYONE!!
May 31st, 2007
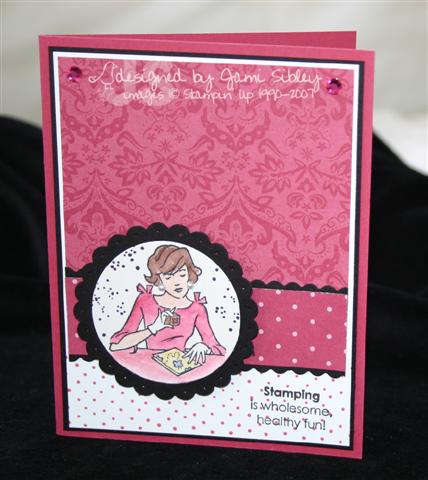
When the Stampin’ Up! retirement list was released there were a few sets on the list that really made me sad. Don’t get me wrong – for the most part I’m just excited for new rubber and am ready to let a lot of the sets go – but Roses in Winter? That’s a tough one and one I will certainly be keeping! But the set I felt the most sad for was Stampin’ Fun For Everyone. It was brand new last year and I wanted it from the moment I saw it, however it didn’t make it’s way to my house until January. I just love the retro feel of it and the tongue in cheek aspect of the sentiments as well as her white gloves. *chuckle* Now I realized that not a lot of people were *feeling the love* for the June Cleaver Demo when I looked at her gallery on SCS and saw just how small it was.
It was then I decided that she needed to go out with a bang! Hmmmm….how to populate her gallery with fantastic cards and projects when hardly anyone I know has the set? My wheels were turning. Just about everyone loves a little friendly challenge now and then, right? Well I know that my fellow Dirty Dozen Alumni do, so here’s the plan I cooked up. I stamped up a bunch of images from SFFE and popped them in the mail to 11 Dirty Girls (and I would make the even dozen *wink*) along with a note explaining my challenge to make a project with some of the images and upload them by May 30th to the SCS galleries and personal blogs. It’s a Cyber Retirement Party!
I shared my first sample in yesterday’s post and here’s my second
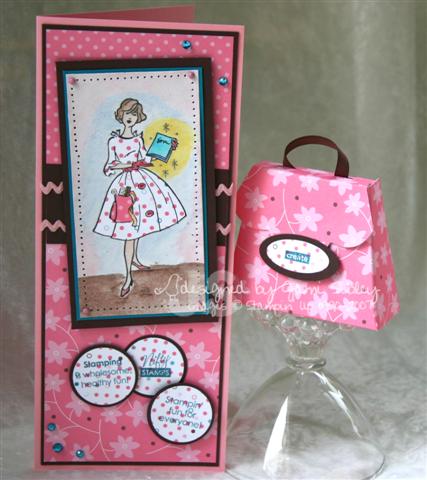
This card measures 3 7/8″ x 91/4″ to fit into a standard business sized envelope – a tall card. The cute little purse template was cut out of SU Loves Me paper (from the Winter Mini) when I was playing with Joy’s Cricut and was the inspiration for this card. I stamped June on confetti white cardstock and paper pieced her dress – with a different paper for the pocket. I just love the look of paper piecing! The remainder of the image was watercolored. This card is *almost* SUO (Stampin’ Up! Only)…except for the ric rac, the K&Co teal rhinestones and the teeny tiny Queen & Co. Brads.
You can view (and comment on please 🙂 ) all the projects made for my challenge by clicking here or by going to the SCS gallery and typing in the keyword JCMAY07. Or you can go to individual blogs as listed below.
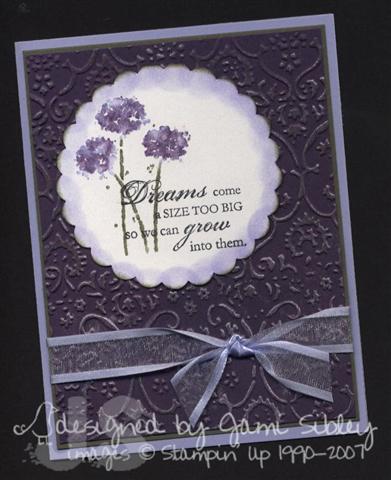
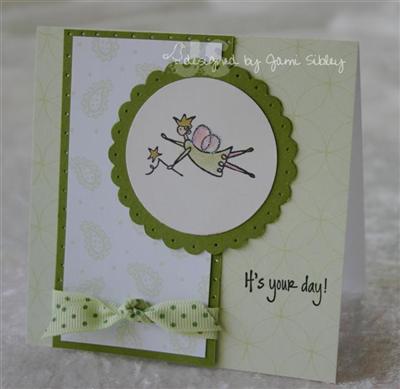
I just had to do one more card for this challenge and it is based on this week’s SCS Sketch Challenge which comes from a card by my friend StamperSharon. This card is a classic example of my More is More philosophy.
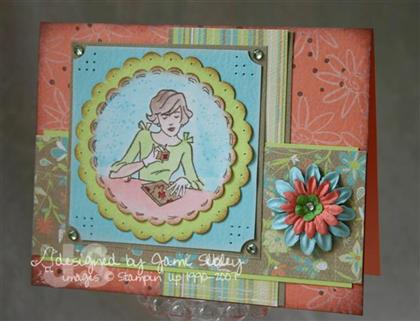
I still had this Crate Paper (Birdie Collection) out from making Joy’s box last weekend and I thought it would be perfect for this layout…and of course the whole color scheme then came from the paper. I decided to pull out my huge package of Prismatics cardstock and was thrilled to find matches to the Crate with Desert Coral Light, Frosted Kiwi (similar to Gable Green – maybe a little brighter) and Frosted Teal (very similar to Cool Caribbean). The Prismatics cardstock is lighter weight than SU and it is smooth on one side and textured on the other and obviously comes in some very yummy colors. Although I am really a die-hard SU cardstock devotee, the weight and texture of the Prismatics seemed a perfect companion to the textured Crate.
So I started out by just cutting the pieces for the basic layout according to the sketch. This time June was stamped on Shimmer White cardstock, watercolored and punched with my Marvy Mega Scallop Circle punch. That was layered on the Kiwi Giga Scallop Circle. Coordinating Daisy Crazy Primas were chosen and then the fussing began. LOL! It was one of those *just one more thing* sessions….flowers from Mixed Bouquet stamped in white for the background…sponging white edging around the teal square and cocoa edging on the circles…a little doodling…the ticket corner punch and some kiwi rhinestones…some paper piercing in those corners and on the scallops…hmmmm….some dots from Itty Bitty Backgrounds in cocoa over the white flowers…some cocoa edging on the card base….still needs just a little something else…ahhh….a tiny solid matting behind each of the patterned paper pieces….done? *phew* DONE! And I have to say I’m quite happy! 🙂
Please visit the blogs of my players by clicking on their names below:
Anna Wight – Anna’s card has a mod feel to it, I think, with that FUN big flower background! And boy oh boy was I doing the happy dance when I found it in my mailbox!!!
Cambria Turnbow Cami Baby gets the award for using ALL the pieces I sent. I had to copy you and use those same adorable tiny brads!
Jen del Muro Genie-Jen made wall art that made me slap my forehead and say “why didn’t I think of that?” GJ – I’m puting in my order for a pink and yellow one of those for my stamp room!
Jenn Balcer It’s the perfect gift bag for any stamper! Martha would be proud Jenn!
Leslie Miller Leslie pulls June out of the 50’s and into a fresh and funky artist’s studio – at least that’s what her card makes me think of.
Linda Bullard (no blog – but here’s her awesome gallery) You’ll have to see Linda’s clever bookmark card design to believe it. She may come in at the last minute, but I knew it would be worth waiting for!
Lindsey Botkin Linds did her tall card first, but I swear I was already thinking about making one! Red and yellow is one of my favorite combos, but I managed not to copy that part! LOL.
Sharon Harnist Sharon shares a little secret about using ribbon to hide a seam on her beautiful rich looking creation. “Share your secrets over stamping.”
Taylor Van Bruggen you’ll have to scroll down about a dozen posts or so on her blog – for some reason I can’t get a direct link to the post. Taylor is the only Current Dirty Girl I asked (’cause we hang out) and I know it was extra hard for her to find time – but I happen to know she’s an incredibly fast stamper which just makes me crazy! – Oh and I stole the glowing catty idea from her.
Valerie Stangle Val was so excited she couldn’t wait and posted her card first! I knew this would be a little out of her *comfort zone* but am so glad she’s such a good sport and played anyway – you could never tell by her adorable card that this set isn’t her cuppa!
And my 11th player had to pass because she lost the images! LOL!!!
And now that you’ve seen them all – how many June’s were blond and how many brunette??? Thanks so much for playing ladies! This has been blast!
For any of my readers – you can now play too – just upload a card or project using Stamping Fun for Everyone to the gallery at SCS using the keyword JCMAY07 and come back to this post and leave me a comment with a link to your card.
My challenge to everyone is to pick a favorite retiring Stampin’ Up set and issue a challenge to 5-10 friends during June. If you do that please leave me a comment with your SCS Keyword so I can check it out.
I’m teaching my monthly Stampin’ Techniques Class tomorrow night and still have lots of prep work left to do and this blog post took me forever!!! Thanks for stopping by!
Stampin’ Fun!
May 30th, 2007
It’s been a non-stop day and I am exhausted! The good news is that I spent a good amount of time stamping…the bad news is I didn’t do any of the stamping that I actually have looming deadlines for. Oh well – I had FUN! I haven’t had a chance to photograph any of the stuff I worked on today, but I will be sharing it over the next few days.
Tonight I’ll just share a little teaser because tomorrow night I have something really fun to show you….Stampin’ Fun!
Here’s a birthday card I made awhile back using pieces I had cut for my class last month and the set Stampin’ Fun for Everyone. This card had to go all the way to Canada and I haven’t had the best luck with mail going there, so I wanted to wait awhile to share this hoping my friend would receive it first. I just LOVE the Palette o’ Prints and can’t wait to see exactly which 16 colors these papers come in when the new SU catalog comes out July 1st! The tone on tone is perfect for cardmaking and there is such a nice variety of patterns! This is a very simple card with just a little bling added.
Thanks for stopping by! Be sure to check back tomorrow night or Friday morning for some very special Stampin’ Fun!
Mmmm Ribbon Mmmm
May 29th, 2007
Ribbon! What stamper doesn’t LOVE ribbon? And living in SoCal so close to Fabric Barn, I’ve had a *thing* for ribbon since my earliest crafting days with lace and silk flowers! My ribbon, however, had gotten completely out of control. I had this great rack on the back of stamp room door, but for the last year or more I had completely outgrown it! I had ribbon in several different containers – mostly living under my desk which was a royal pain.
I decided that I need all my ribbon visible as much as possible. Weekend before last I dragged Curt to Ikea to look for some shelves I had seen on their website. I was sooooo excited to come home with these rails and baskets from the Bygel line.
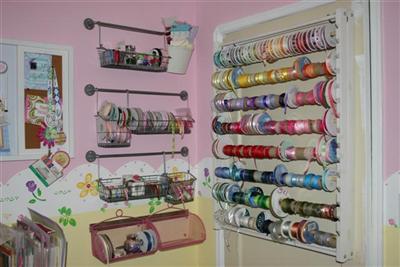
My old rack is still on the door and I still love it, but on the left (behind the door) is my new Ikea stuff. 🙂
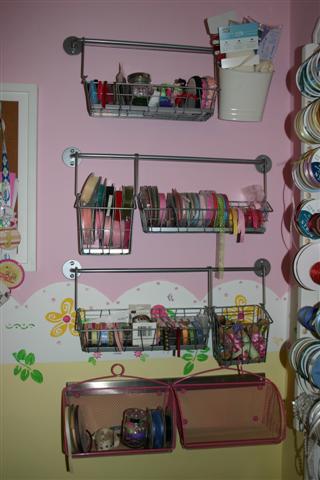
I got 3 of the rails with 3 of the 13″ shallow baskets and 2 of the 5.5″ deep baskets as well as a hanging bucket from another line at Ikea. At the bottom we hung a magnetic bar from Ikea and attached 2 pink locker baskets I already had from Target. It’s so fun because the baskets can be moved around anytime and they are very easy to access or take down and carry to my table.
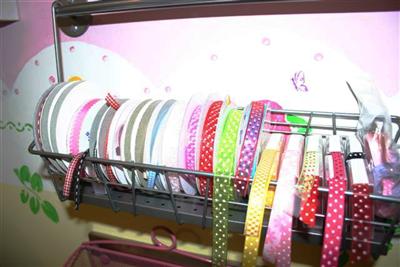
Each basket has a bit of a different configuration of *stuff*. One basket has my velvet ribbons and ric racs. This basket has some of my specialty ribbons like Basic Grey and American Crafts as well as ribbon rolled into the tiny Cropper Hopper embellishment holders. They fit perfectly 2 deep. They hold approximately 5 yds of ribbon and I originally had them in a CH case, but found that having them *put away* like that made it more difficult to know what I had.
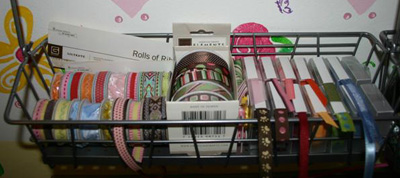
The next basket has SU stitched and gingham ribbons, along with polka dot ribbons of various brands.
The bucket at the top holds my fibers on cards. I got a set of little glass jars and so far I have hemp in one and ribbon scraps in another. I still have a little room left over – which is good thing since I just got some velvet ribbon from my friend Jody. *wink*
It’s funny how excited I am about this. I just love to sit at my stamp table and stare at my wall of ribbon. I worked on cleaning up my stamp room yesterday and I got the table mostly done. The desk is still piled high – that is tomorrow morning’s project! It just kills me how it seems to take days to get everything cleaned up and then only a matter of hours to fall right back into hurricane status! *eye roll*
Side note: My husband has decided that the word Ikea is and old Norse word for realm of evil! Bwahahahahahahahaha!!! In his defense I have to admit that I wasn’t sure we’d ever make it out of there either!
College Graduation
May 28th, 2007
I’m working backwards here, but Saturday we attended my Sister-in-Law Lill’s college graduation. She says she has been working on her college degree for 30 years. The last two years though she really worked hard at the University of Redlands to complete her classes while working a stressful full-time job, being a wife and mom to 2 girls and just a little stamping here and there (she’s in my stamp club 🙂 ) We are so proud of her!!!
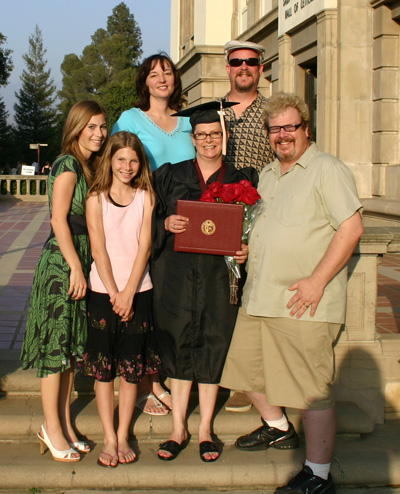
In the front are my nieces Kira and Britta with their parents Lill and Craig (Craig is Curt’s brother). Curt and I are in the back. Congratulations Lill! We love you!
Here’s the card I made for her. I had to scan it rather than take a photo because of course I was finishing it just before we were out the door!
I was inspired by the Friday Limited Supply Challenge on SCS to make a graduation card without using traditional graduation images. That was perfect because I don’t really have any grad images. I actually put this card together in about 15 minutes since the Eggplant background panel was one I had already run through the Cuttlebug with Textile Texture embossing folder and inked over dtp with Brilliance Pearlescent Beige ink. That was my jumping off point. Then I went rummaging through my sets for an image or sentiment to grab me and this sentiment from the SU SAB set Happy Harmony seemed just perfect.
The flower image from the same set was inked with SU markers (Amethyst, Eggplant and Artichoke) and then misted lightly with water before stamping on Shimmer White cardstock. The image was punched with my brand-spankin’-new Marvy Giga Scallop Circle Punch (*happy dance*) that just arrived Friday. I used a sponge dauber to ink the edges of the scallop with Amethyst ink and then Artichoke ink. It’s hard to see in the scan but the Eggplant panel was layered on an Artichoke panel before being attached to the Amethyst base. Some Amethyst organdy ribbon from the local ribbon warehouse finishes off the card.
Speaking of ribbon…Curt put up my new little Ikea shelves today for ribbon storage – I’m super excited! I plan to share pictures tomorrow, so be sure to check back. Thanks for stopping by. Happy Memorial Day (even though it’s almost over).
Fill ‘er up!
May 27th, 2007
It’s been a busy weekend. Let me start by telling you about today. My SCS pal and fellow Dirty Dozen Alum Jody (texasjodylynn) is visiting SoCal on a family vacation. I got to meet her today at lunch along with friends Taylor and Joy. *grin*
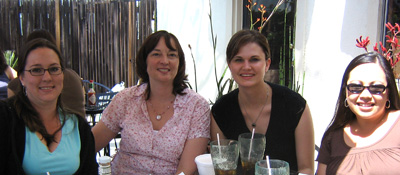
We ate lunch outdoors at a fantastic little restaurant called The Filling Station, a converted old gas station, in Old Town Orange. We ate and talked, walked and talked, shopped and talked. I am so amazed at the number of friends I have made al over the U.S. (and even outside of the U.S.) through Splitcoast. I am even more amazed by the number I have been able to meet in person. What a blessing!
Tomorrow is Joy’s birthday so I made her a little something. The concept is not mine. It came from Taylor’s SCS tutorial and Laura’s blog tutorial (check them out!). I have wanted to make a coaster box ever since I saw Taylor’s first one in person. Seeing Laura’s pencil holder pushed me over the edge – had to do it!
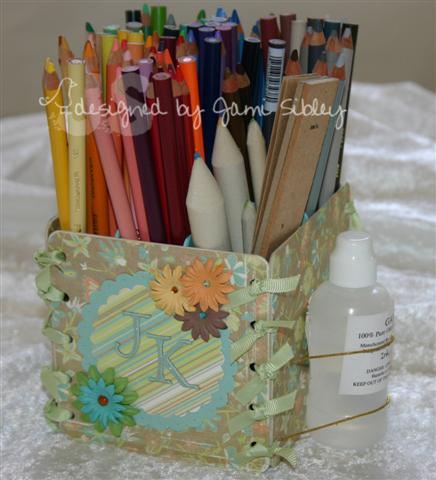
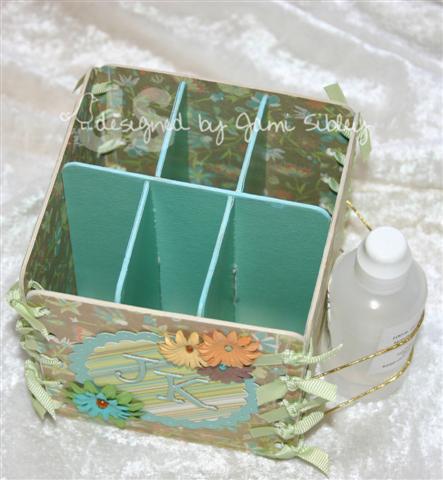
Most of the supplies are from eclectic Paperie:
Crate Paper – Birdie Collection
medium weight coasters
Daisy Crazy Primas
K&Co. Brenda Walton Adhesive Rhinestones
Crop-o-dile
Sakura Stardust Pen
Versamagic ink – Sea Breeze
PLUS
Stampin’ Up! Celery Grosgrain
Stampin’ Up! Crystal Effects
Royal Coat
elastic gold cording
Marvy Giga and Mega Scallop Circle Punches
Olivia Alpha and Cuttlebug
I won’t type out all the directions and measurements here since Taylor and Laura did that so beautifully in the links above. I used Royal Coat (like Mod Podge only better IMO) to adhere the Crate Paper designer paper to the coasters. I only top-coated the coasters to be used as inside dividers. The designer paper is double-sided so the patterned side was used for the box coasters and the solid side was used for the divider coasters. (Side note: Crate Paper has the most wonderful texture and is a really nice heavy weight. If you’ve never tried it, you really must!) To cut the slits in the dividers I drew a line where I wanted the slits to be and using sharp scissors cut just on each side of the line. This created a slit big enough for the coasters to slide into one another. While I sanded the edges of the box pieces a bit, I finished off the top edges of the divider pieces by rubbing on some VersaMagic Chalk ink in Sea Breeze. This project was much easier than I anticpated. The most difficult (or maybe just time consuming) part was tying all those little knots…oh and attaching the bottom piece with the CE – that was just a tad tricky for me.
Now I just have one big problem….I want one of these boxes for myself! LOL! I got out all my Prisma pencils for the photo above (before wrapping the box up in cello as a gift) and now they are spread out all over the table just longing for a box of their own to call home. Perhaps this will be a project for tomorrow. We’ll have to see if gardening or stamping/papercrafting wins the day tomorrow. *wink*
On a different note Curt was grilling burgers for dinner and called me outside to see
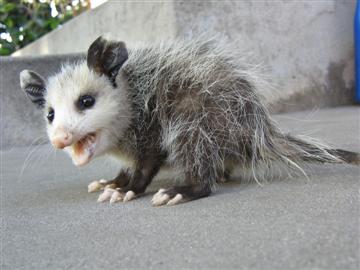
Petey the Possum. Remember Roger the Lizard? We’re pretty sure Petey and Roger are friends. Now I DO NOT like possums at all, but Petey is the tiniest possum I have ever seen without a momma. He was about 5″ long (not including his tail) and he just sat and looked at us when we kneeled down to check him out. Well he did open his mouth really big to *scare* us, but he didn’t run away or anything. Eventually he did scurry off. I’m sure it must be hysterical for those of you who live in the country to see me posting about lizards and possums, but hey – we live in the suburbs. NO WILDLIFE to speak of at all…so this is really something for us!
Yesterday was my SIL’s graduation. I’ll share to card I made for her tomorrow. Thanks for stopping by.
Tiny Fairy
May 24th, 2007
Just wanted to share a card real quick before Im out the door to work…
I actually made this last week – CASEd my own layout from my birdie card. I just love these square A Muse pre-printed notecards and coordinating layering pieces. I simply added some Old Olive. The tiny A Muse Fairy image was stamped on Shimmer White and punched with the Marvy Jumbo circle, and layered on a Mega Scallop Circle in the Old Olive. I had fun with this card because I would normally think of doing this Fairy image in pinks or purples. I love how it looks in the greens with just a touch of pink on her wings and tights. Her wings were covered with Dazzling Diamonds Glitter using the Sakura Quickie Glue Pen. Sentiment is A Muse and ribbon is from one of those wooden spools from Michael’s.
Yesterday was an organization day. Spent a good part of the day working on my ribbon. I got some cool stuff from Ikea and am looking forward to sharing with it you as soon as Curt has a chance to get it up on my stamp room walls. Spent the rest of the day on mail, paperwork, bills, etc. and I’m still not finished with that! I’m not sure how it’s happened but I feel burried by paperwork at home. It’s so funny because I deal with paperwork quite efficiently in my job, but at home it seems overwhelming. I need that Tiny Fairy to come take care of it for me while I’m sleeping!!! LOL! What do you need her for??
Stubborn Stamper Syndrome
May 21st, 2007
A girl in my office is getting married this week and I offered to make the wedding card from everyone at work. I have to take it with me tomorrow, so as the day slipped away into evening and I hadn’t started the card I began to feel pressured. For some reason all I could think of was Roses in Winter, but her wedding color is lavendar and I just hate those roses in purples. Hmmm. I wanted to make a big card so I started with a full sheet of shimmery white folded in half for my base. I decided to go ahead and try the roses in Amethyst with a touch of Eggplant. I cut a panel out of shimmery and stamped. Blech…it was awful…the leaves overlapped weird because I didn’t mask..the purple was ugly…I stamped the sentiment in Artichoke and it was lost in the flowers…blech!
I was just about to throw the panel in the trash when my Stubborn Stamper Syndrome kicked in. I have this weird sense that almost anything can be salvaged and I have amazed friends more than once by saving projects they had given up on. Unlike my friend JulieHRR who will sometimes throw away 4 or 5 or 6 versions of something before she is happy, if I have to throw away a project I am probably NOT going to try it again. I will just move on. And at that point I’m usually done for the night.
Well this card had to be finished tonight and I really didn’t feel any other inspiration, so….I decided to attempt a salvage. And here it is.

The first step was to cut a piece of vellum the same size as the stamped panel. Vellum can really soften and change the look of a project. It is even softer looking IRL than in this photo. Once I did this I knew I could make it work. I added the K & Co. Wedding Collection pearl brads, stamped the sentiment (again) this time on the vellum in black using a stamp a majig, layered the panel on Amethyst and Black cardstock and tied a bow with some amethyst organdy ribbon from my stash. As a final touch I added Dazzling Diamonds Glitter by outlining over the roses and the sentiment on the vellum with a Sakura Quickie Glue Pen. Ha! I did it! I saved it from the trash! Purple roses are still NOT my fave, but at least I didn’t waste a half sheet of shimmery cardstock! LOL!!!
The best part was that I finished in time to watch the season finale of Heroes. I don’t want to give it away for anyone who might have it on tape or DVR, but I do have opinions! Now I’m off to watch Dancing With the Stars on DVR. Soon that will be over too, along with Idol and LOST. Then begins the long summer with no good TV shows. Hmmmm…maybe I’ll stamp more then?


