Time for Dare to Get Dirty 2015
August 1st, 2015
It’s Dare to Get Dirty time over at Splitcoaststampers! If you’re not familiar with this, it’s a week of fun challenges for Fan Club Members hosted by the Dirty Dozen Design Team and Dirty Dozen Alums. Lots of people set aside the entire week to play, play, and play some more! If you’re not already a Fan Club member, it’s easy to sign up. Today I have a sample for my sweet friend, Lori Craig’s challenge. I can hardly believe it has been 9 years since I had the privilege of being on the DD design team. I don’t get over to SCS very much anymore, but it was once a huge part of my daily life and I made so many friends throughout those years. When Lori asked me to make a sample, I had to say YES!
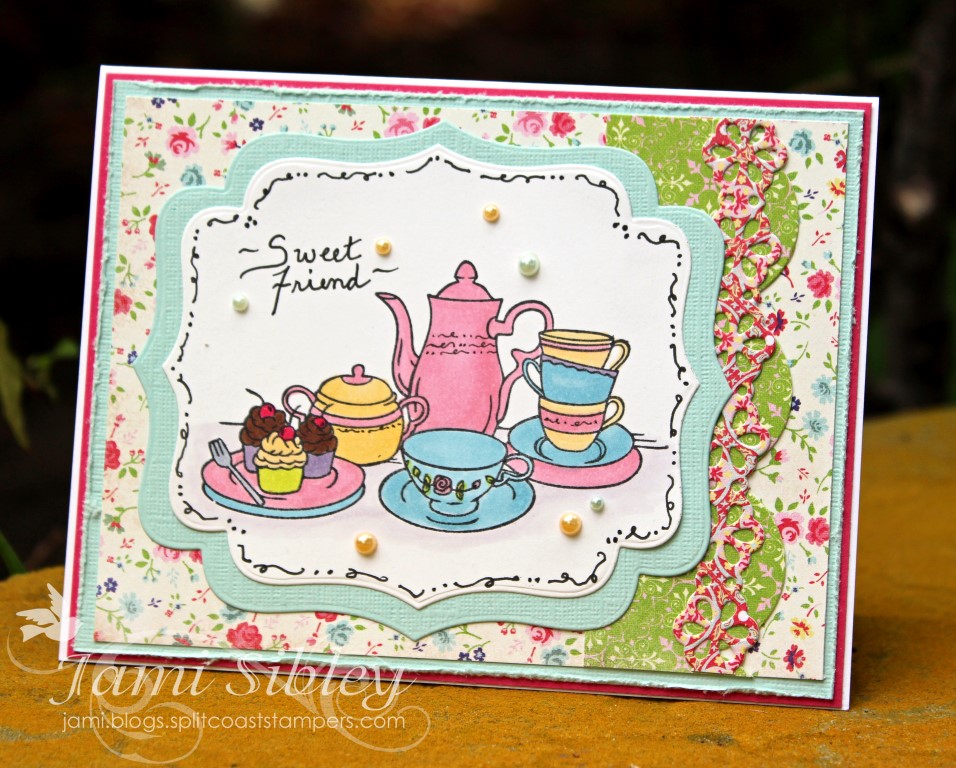
I had actually colored this image a couple of months ago when we were on vacation in our 5th wheel up in Morro Bay and it had been sitting on my stamp table ever since. I knew right away that it would fit with Lori’s challenge. You’ll have to head over to SCS to get the challenge details and play along though!
Of course I got all the supplies at Taylored Expressions. The stamp image is from the set In Other Words – Tea. I doodled the border and hand-wrote the sentiment as well as added a little bit of doodling to embellish some of the images.
A huge thanks to Lori for making sure I got involved! Love you, Girl!
And thanks to all of you for stopping by today. I haven’t been stamping as much as I would like and I’ve been blogging even less. Maybe I’ll get back into a more regular swing of sometime, but for now I’ll just be happy to check in whenever I can!

Taylored Expressions August Release
August 7th, 2014
Happy Release Day! All the new August products are now available in the TE Store. Plus DTDG is still going on over at SCS. Before you head off to shop, Taylor’s team has a ton more inspiration to share. I have a card using two really fun new stamp sets: Smarty Pants and Talk Nerdy to Me. Being married to a Rocket Scientist, I adore the combination of these two sets!

Happy Birthday to my favorite nerd! 😉 The books image has 4 books, so I just used my stamp-a-majig and stamped them several times to create the top and bottom borders. The smart little canine was stamped and colored with copics and cut out with the matching die set, then popped up on foam tape. I colored his glasses with a clear glaze pen.
Here’s the inside.
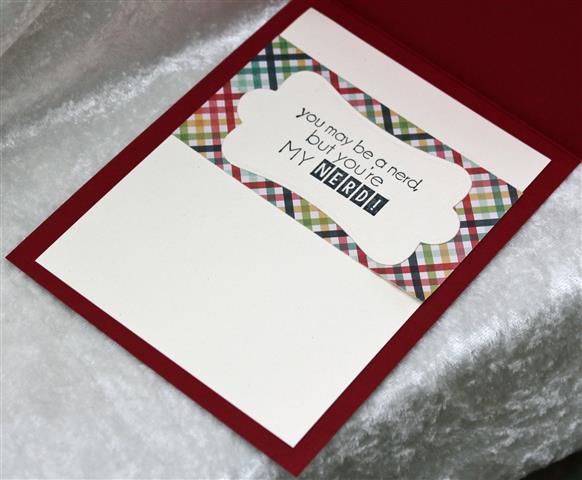
You may be a nerd, but your MY NERD!
Fun, huh?
Let’s see what the Baker’s Dozen has cooked up:
- Amy Crockett
- Cassie Trask
- Charmaine Ikach
- Courtney Kelley
- Danielle Lounds
- Jami Sibley
- Jeanne Streiff
- Jen Shults
- Joan Ervin
- Kendra Wietstock
- Kerri Michaud
- Melyssa Connolly – Guest Designer
- Monika Davis
- Regina Mangum
- Sankari Wegman
- Shannon White
- Shelly Mercado
- Stephanie Kraft
- Taylor VanBruggen
- Tracy Clemente
Thanks so much for stopping by today!
![]()
Taylored Expression Sneak Peeks and SCS DTGD
August 6th, 2014
Talk about serendipity! This week is both the Taylored Expressions August Release (products available Thursday morning at 7:00 a.m. PST) AND it’s Dare to Get Dirty Week at Splitcoaststampers. In order to play DTDG, you just need to be a Fan Club member at SCS. It’s easy to join and the week full of challenges is a ton of fun! I can’t say much about specific challenges, but both of my TE preview cards today were also created for DTDG Challenges.
If you’ve been around my blog much, you know how much I love the TE Shade Tree Cutting Plate so it’s no surprise that I’ve been hankering for even more stamped scenes to use with the plate. Taylor and Emily did a wonderful job on Made in the Shade 2! I have a couple of samples to share today.

This autumn card is for Lori’s challenge and it was inspired by a card created by Michelle Zindorf. If you’re a Fan Club Member, you can see her card here. The background was brayered and sponged. The Shade Tree Cutting Plate was used with rust colored cardstock, then I used a brown copic marker to color over the trunk and branches. The little scene was colored with copics too.
My next card is a spring/summer picnic scene.

I sponged the sky with two colors of blue ink over a die cut made with the TE Cloud Border. The Cutting Plate was used twice – once with kraft cardstock and once with green. In this case, I cut all the leaves off the kraft version and layered it over the green one. This is one of my favorite ways to use this Cutting Plate. The blossoms on the tree were created with the Flower Box Sprigs & Flowers die set. I used a stylus on each one over a piercing mat to give them dimension, then added red Liquid Pearls to the centers. Isn’t that little puppy picnic scene so sweet?
Taylored Expressions is celebrating Release Week with some fabulous giveaways! Visit the TE Blog each Sneak Peek Day this week for details on how you can enter to win. ![]()
Let’s see what the Baker’s Dozen has cooked up for today:
- Charmaine Ikach
- Courtney Kelley
- Jami Sibley
- Jeanne Streiff
- Jen Shults
- Joan Ervin
- Kendra Wietstock
- Kerri Michaud
- Shannon White
- Shelly Mercado
- Stephanie Kraft
- Taylor VanBruggen
Thanks for stopping by! I hope you enjoy the hop and have a great day!
![]()
The Lord is my Rock
July 22nd, 2010
Happy Thursday! Today I have a card to share that I created for a special friend who’s daughter is experiencing some health issues. The card features Psalm 18:2
The Lord is my rock
and my fortress and my deliverer;
my God, my strength in whom I take refuge.
What wonderful words of truth of comfort! The verse stamp comes from the TE mini stamp set Care & Comfort. On the inside of the card I used another sentiment from the same set, “our thoughts, our prayers, and our love are with you.”
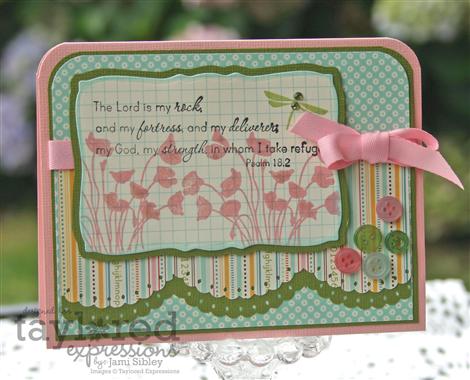
The silhouette floral image is from Summer Afternoon by TE and it was stamped with Versamagic Chalk ink in Pink Petunia. All the ink I used on this card was Versamagic and when I went to get the link from eclectic Paperie I noticed that it’s all 35% off, so you might want to check it out! Designer paper is October Afternoon Fly a Kite (cut into that pack for the first time) and I might have mixed in another OA pad – who can keep track? LOL! I loved the idea of stamping directly onto the graph pattern from Fly a Kite. I added a couple of Tiny Twinkles to the dragonfly. Here’s the really funny thing – those 5 buttons…they were just sitting on my stamp table…and had been for awhile. I guess they got left out at some point when working on another project and never got put away. I was thinking I wanted just one more embellishment of some sort on the card and I noticed that those buttons were just the right color. Serendipity. I just love it when that happens.
I created this card with several SCS Dare to Get Dirty Challenges in mind – Sharon Johnson, Betty Wright, Cindy Haffner and Dawn Burnworth. I wish I could have played more than I have this week. There are so many fun challenges! if you’re a Fan Club Member, be sure to check them out and if you’re not you might want to become one and get in on all the FUN!
Thanks for stopping by!

Recipe:
Stamps – TE Care & Comfort, Summer Afternoon
Paper – October Afternoon Fly a Kite, TE June cardstock kit
Ink – Versamgic Chalk ink in Petunia Pink, Sea Breeze, Tea Leaves, Midnight Black
Other – Spellbinders Curved Rectangle Die, EK Success Diamond Lace border punch, Taylor’s Tiny Twinkles, Smooch Illuminate, pink twill, buttons, Corner Chomper
Dirty Queen
July 18th, 2010
Happy Sunday! I don’t often blog on Sundays, but today I had the privilege of being a sample maker for my sweet friend Sharon Harnist in her Dare to Get Dirty Challenge. You can get the deets to play along here (you must be a SCS Fan Club Member). I had a ton of fun creating this card. I hope you enjoy it!

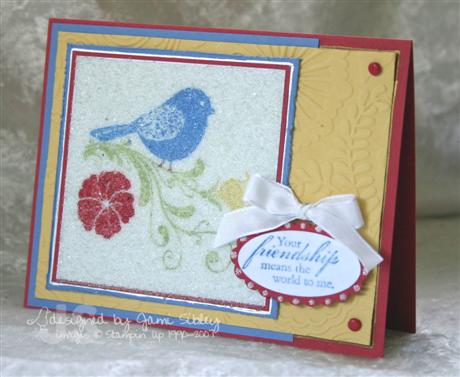
As soon as I saw the SU stamp set Favorite Thoughts I knew I had to have it! It’s a set of 4 fun sentiments and this one says “Don’t treat me any differently than you would a queen!” LOL! How great is that? Then when I saw the Maya Road crowns chipboard I knew it was a match made in heaven! LOL! The crown was inked with Real Red Craft ink and then covered in TE Fire Engine Red Glitter with the addition of Taylor’s Tiny Twinkles (Crystal). I used 3 different embossing folders on the white layers. The border punch is Arbor – doesn’t it look royal? The nesties frame was die cut with Labels Nine (using 2 sizes at the same time) from Real Red cardstock and then covered in Versamark and heat embossed with clear ep. The sentiment was stamped in Real red Craft ink and also heat embossed with clear ep. It was then die cut with Spellbinders double ended tags and layered onto a Spellbinders fancy tag. The final touch is red silk ribbon bow attached with mini glue dots.
You might also notice my new watermark. 🙂 When we got a new computer a few months ago I lost my generic watermark and my SU watermark in the transition. It’s been driving me crazy and I’ve been meaning to look into getting a new one for a long time. I decided to check out what my friend Karen Giron had to offer. Wow – she has a great selection at only $2 each and she got back to me really quickly. I purchased 2 for now (the elegant one you see above and also a more *cute* one.) I plan to get more soon. I highly recommend checking her out of you are in need of a watermark!
Thanks for stopping by. I hope you have a wonderful Sunday!
Dare to Get Dirty ’09
July 24th, 2009
Note: This is my 2nd post today. If you are looking for my TECC sample, please scroll down. Thanks.
This is Day 2 of SCS Dare to Get Dirty ’09. If you are a SCS Fan Club Member there are a whole host of challenges over 3 days for you to play along with Dirty Girls past and present – click here for all the info. If you’re not yet a Fan Club Member now is the perfect time to join! I am thrilled to be a sample maker for Deb Saaranen’s Texture Challenge today.
I made this card for my friend Darla who did so much work to help me paint my kitchen that gorgeous shade of red! That kind of work is above and beyond the call of friendship so I wanted a special card. I loved this SU Hostess set, Wings of Friendship, the moment I saw it. The big bold images on this single stamp are easy to color with SU markers. Here I used Brocade Blue, Certainly Celery, Ruby Red and So Saffron. The color combo was inspired by my kitchen colors of red, yellow and blue. The main image panel was covered with a piece of Sticky Sheet cut the same size as the panel and then covered with clear microbeads. The microbeads give a wonderful texture and a special sparkle. I have always loved this simple technique. Other elements of texture include the cuttlebug embossed background (Floral Fantasy), the distressed edges on the Brocade Blue layer, the clear embossing over the sentiment and the stickles on the scallops around the sentiment. I added just a bit of both silver and gold outlining with a Zig Painty Pen for that little extra touch.
Home improvement update: My nearly 50 year old dining table and chairs came back from the refinisher today. What was an ugly, damaged *french provincial* creamy finish is now a mahogany finish that looks brand new. Now I just need to get fabric and cover the seat cushions. The dining set is part of a whole house full of matching furniture that my great-grandmother purchased in the early 60’s. Many of the pieces have been refinished over the years and this table and chairs were long overdue! My drapes did not come back from the cleaners as scheduled. Turns out they are *more complicated* than the guy thought and he needs more time. No problem – I love having a sheet in my front window…..NOT! Maybe I’ll go ahead and try to get some pictures for you over the weekend. Yep – like I said this is going to be an ongoing process for awhile. I’m going to need to carve out more stamping time!
Thanks for hanging with me. Have a great weekend!

SU Sneak Peek and DTDG
July 26th, 2008
It’s Saturday and the Dare to Get Dirty Challenges are continuing. I had the pleasure of being a sample maker for Jen del Muro (genie1314 – the oh so fabulous creator of the Genie Bag) for her challenge today. You can check it out in the Challenge Forum here. For today’s card I was very excited to play with some of Stampin’ Up Sneak Peek stuff!
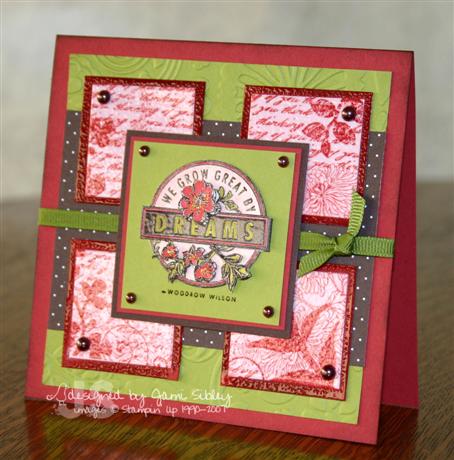
I couldn’t wait to dive into some of the new colors along with sets Dreams duJour and Fresh Cuts. The Riding Hood Red card base is 5″ square. The Kiwi panel appears to be a 4.5″ square, but I actually cut it into two pieces so that I could run it through my Cuttlebug to emboss the pattern. The polka dot chocolate brown dp is from the new Bella Rosa (love it!).
I stamped the main image from Fresh Cuts on Pirrouette Pink with RHR ink and then cut it into four pieces and leyered them onto RHR mats. For a little added touch I heat embossed each square with versamark and clear ep to give the effect of tiles. The main image was stamped three times and watercolored and then carefully cut out and layered with foam tape (paper tole.) I’ve always loved the look of paper tole and it’s really not hard. 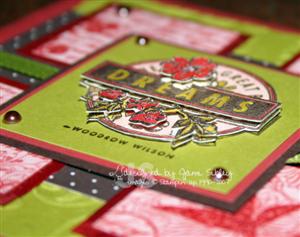 This image was a little tedious to cut, but generally this is a pretty easy technique with a WOW result. The final touches are olive grosgrain ribbon and Kaiser Craft chocolate pearls in two sizes. I think this card very much represents my More is More style. It’s not so much a matter of always adding *more stuff* – sometimes it’s just in the details of layering and texture like the CB embossed panel here and the clear heat embossed tiles along with the dimension of the paper tole on the focal image.
I hope you’re having a great weekend and have some time to stamp! I plan to be back later today with some pictures of my tea adventures this week. Please remember to check out the Midwest Flood Relief Non-Raffle on SCS and make a donation if you can. Thanks for stopping by.


