TESC132 Trick or Treat Chicken
October 29th, 2010
Happy Friday! It’s time for another fun Taylored Expressions Sketch – TESC132 and this week I’m even more excited than usual because I got to design the sketch. 🙂 I hope you’ll play along with us – I think it’s a pretty easy one. You can use any shape where you see the circle.
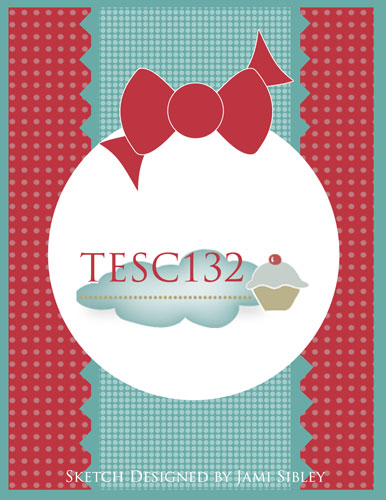
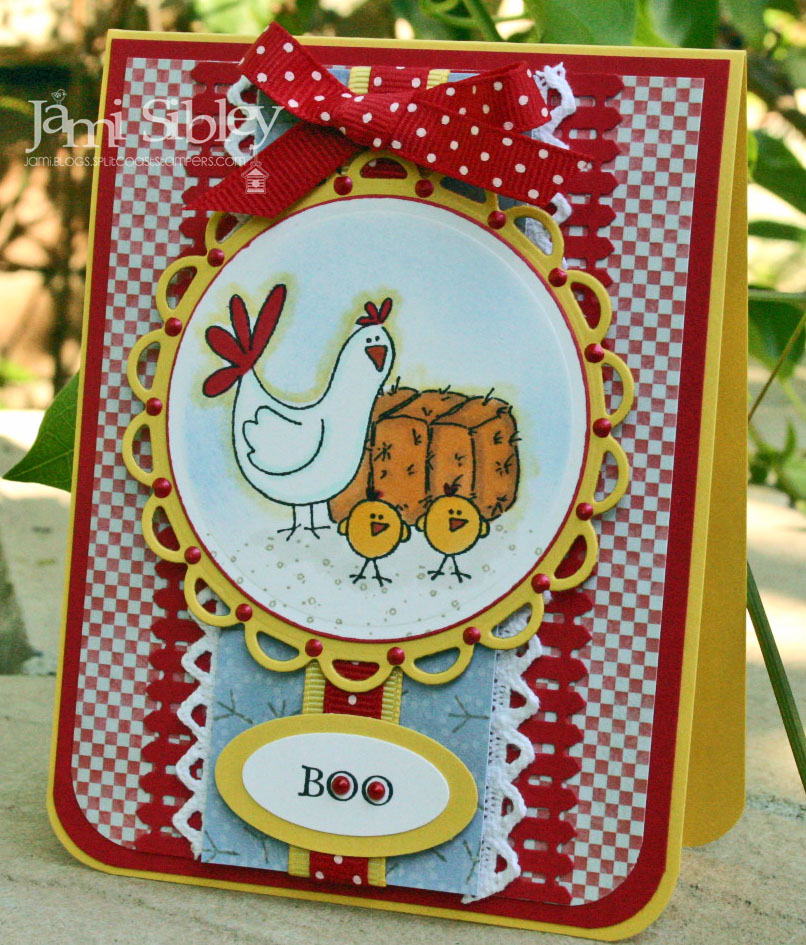
The sketch is based on a card I made a couple of months ago seen here. Since it’s almost Halloween and I really haven’t stamped anything for Halloween this year I decided I better get at least one card in. I went with something a little non-traditional, but stick with me and you’ll see why. *GRIN*
Inside is the sentiment:
Trick or Treat!
Did you know it was me?
With this photo:
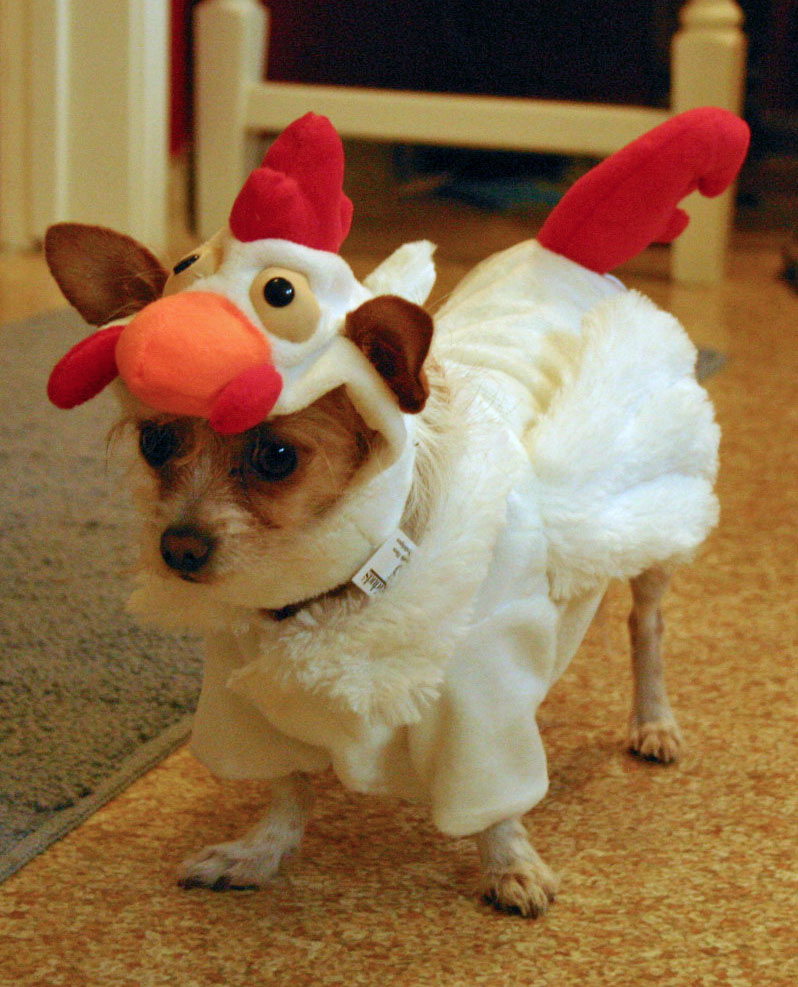
BWAHAHAHAHAHAHAHA! Yep – it’s Tessa in her chicken Halloween costume. If that doesn’t make you laugh, you are hopeless! The photo is funny, but I guarantee you that it is much more hysterical in person. I ended up rolling on the kitchen floor laughing when we took these photos! I’m not really *into* Halloween, but it’s the one time of year that the Rocket Scientist will tolerate clothes on Tessa so I take advantage. LOL!! She doesn’t mind the main part of the outfit too much, but she really does not like the hat as you can probably imagine! The look on her face here is priceless!
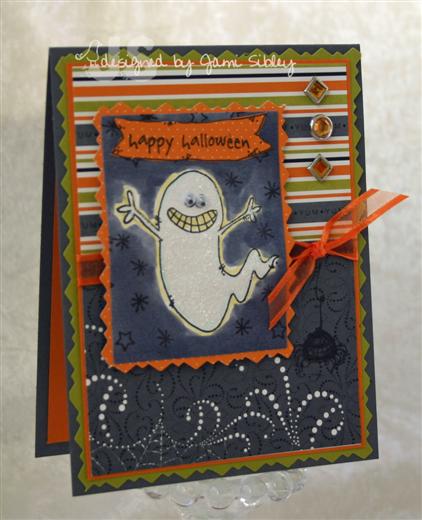
Card info: Stamps are from Anna Wight’s Whipper Snapper Cling Set Crazy for Chickens. “BOO” is from Hangin’ Out Halloween (TE). Image colored with Copics and sponged with Bashful Blue. Designer papers are from Melissa Frances and cardstock is Real Red and Daffodil Delight (SU). Crochet trim from TE. Love love love that Lacey Circle nestie. Fence border punch is Martha Stewart.
Now lets’ go see what the rest of the Sketch Crew has in store!
- Alice Wertz
- Jami Sibley <— you are here
- Lisa Hjulberg
- Lori Craig
- Melissa Sauls
- Monika Davis
- Rachel Sztonyk
- Rosie Hughes
- Sherrie Siemens
- Taylor VanBruggen <—Get all the info to play along here!
So what are your plans for the weekend? I’m excited because our church is celebrating Reformation Day on Sunday (something new for us) with special teaching and an afternoon Faire that includes the In & Out truck for lunch. YUM! Whatever you have going on I hope you have a little time for stamping! Thanks for stopping by.
![]()
TECC64 Party Chicken!
April 17th, 2009
Happy Friday! Lots to do today, but first on my agenda is the Taylored Expressions Cupcake Challenge (TECC64). If you’ve never played along with us, you really must give it a shot. It’s a sketch challenge and in spite of the name, cupcakes are NOT required! It’s a ton of fun and I know you’ll like this week’s sketch. You can hop over to Taylor’s blog to get all the deets to play along.
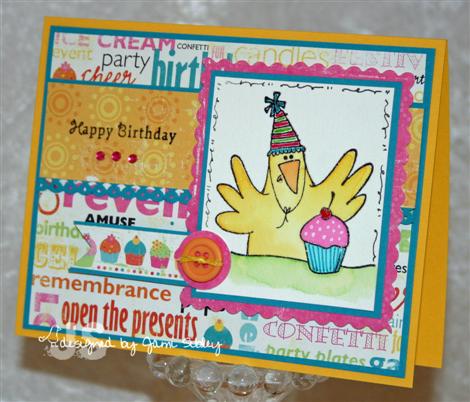
My card this week features a super fun Whipper Snapper image “Birthday Chicken”. Doesn’t he look excited about that yummy pink cupcake? LOL! I paired him with one of my all-time favorite lines of dp – the 6×6 Salsa pad by Junkitz (too bad they aren’t around anymore!) This is such a bright party-like color palette! I used SU Summer Sun and Taken with Teal with layering. The sentiment is from Taylored Expressions Branching Out. The chicken was stamped onto SU watercolor paper with black craft ink and heat embossed with Hologram Highlights ep. This is one of my favorite tricks to use with watercoloring, It makes the image sparkly and softens the look of the black outline. It also makes watercoloring much easier as the embossed lines prevent the ink from running into areas where you don’t want it. This is a great method for beginners especially. I used ink from my SU markers scribbled onto a CD and picked up with an aquapainter.
I just had to use one of my new EK Success border punches – see it on the Teal layer under the yellow dp strip? The whole image panel is popped up on foam tape, so although it’s hard to see in the picture, the little cupcake banner is raised off the surface of the card.
Now it’s time to see what the rest of the Cupcake Crew has cooked up this week:
Thanks for stopping by. I hope you have a fantastic weekend.
-Jami
Googlie Ghost
October 20th, 2008
Today’s the day for the October Dirty Dozen Alumni Gallery Reunion Challenge! Our hostess for this month is my good friend Emily (WaterPixie).
Challenge Focus: Create a Halloween card or treat holder.
Required Element: Googlie Eyes! We want to see those eyes jiggle!
Restricted Element: No pumpkins!
To see what everyone created you can click here.
 I honestly can’t remember the last time I used googlie eyes and now I’ve used them on 2 posts in a row – weird, huh? As soon as I saw the challenge I knew I’d be reaching for one of Anna Wight’s Whipper Snapper Halloween sets. They already have *googlie eyes* of sorts drawn on – so they’re perfect!
I stamped the ghost on white cardstock and colored around him with a yellow and then gray Copic marker. The stars are from the SASI set Frightful Night. After the card was all put together I covered the ghost with Frosted Lace Stickles – he’s soooo super sparkly!
Cardstock colors are Basic Gray, Kiwi, Pumpkin Pie and the dp is SU. I dug out my trusty old-school Fiskar’s decorative scissors to create the jagged borders – scallops just didn’t seem *scary* enough. LOL!
This was a fun challenge! Thanks for hosting Emily!
I have a post over on the SASI blog today too…lots of candy treats. Click here to check it out and if you have time leave me a comment over there. While you’re there don’t forget to enter in the SASI Sweet Treats give-away! Thanks for stopping by!

TECC33 Blue Serenity
September 12th, 2008
Happy Friday. Taylor has a wonderful sketch for us to play with today (and all weekend) TECC33. You can get all the challenge details on Taylor’s blog by clicking here. And remember cupcakes are NOT required to play! But if you got some of Taylor’s new Stamp a Sweet Impression stamps I’d love to see what you come up with using them!
 I love those happy little cupcakes, but I went in a different direction for today’s card. As a Stampin’ Up! Demonstrator I had the opportunity to purchase a new hostess set on pre-order back in June or July. I just loved Serene Spring and had to have it, but alas with all the stamping excitement of the past couple of months it has sat unmounted, uninked until now. I saw the sketch and knew it would be perfect to showcase this sweet bird image.
The image was stamped on confetti white cardstock with chocolate chip craft ink and embossed with irridescent ice embossing powder so it has a soft yet very sparkly appearance IRL. I then watercolored the image with ink from my markers (scribbled onto a cd) and an aquapainter. I created a frame to layer over the image by punching a piece of Blush Blossom cardstock with a Marvy scalloped oval punch. That was layered onto chocolate chip and then brocade blue cardstock.
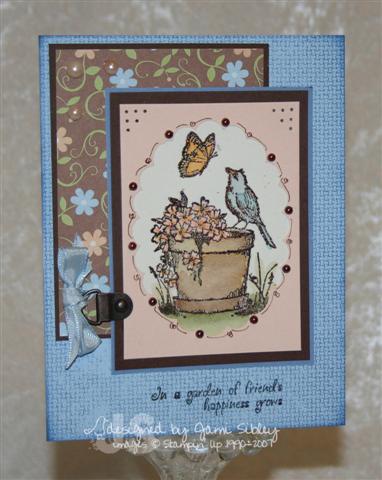
I doodled around the scalloped frame with the fine tip end of my chocolate chip marker and added Kaiser Craft chocolate pearls. As a last minute touch I added a little paper piercing in the corners. There’s a piece of hodgepodge hardware on the side with a bow made from bashful blue taffeta ribbon. The background rectangle is a piece of retired SU dp. I actually chose that piece first to determine the color scheme for my watercoloring. I added three Kaiser Craft blush pearls in that upper corner. I love the way those pearls come in several sizes in one color in a package. The card base is bashful blue cardstock stamped with Aida Cloth Background in brocade blue ink. The sentiment is from the Anna Wight Whipper Snapper set Blooming Expressions. It was embossed just like the image – “In a garden of friends happiness grows”.
For those of you who like measurements with a sketch:
card base 4 1/4 x 5 1/2
first layer (dp on chocolate panel) – chocolate = 3 x4 and dp = 2 7/8 x 3 7/8
image layer – brocade blue= 2 7/8 x 3 7/8, chocolate = 2 3/4 x 3 3/4, framed image = 2 1/2 x 3 1/2
Now let’s do a little blog hopping to see what the rest of the Cupcake Crew has in store for us:
Vicki Chrisman: This Art that makes me Happy
Stephanie Hargis: Steph’s Stampin’ Stuff
Monika Davis: M.A.D. Stamper
Sherrie Siemens: Card Creme
Ana Wohlfahrt: Ink A Stamp
and this week’s featured stamper is my sweet friend and fellow Scripture Chick Lori Craig – be sure to visit her blog Make a Difference.
I have my monthly Stampin’ Up! Class tonight. I had hoped to get a sneak peek posted yesterday, but just couldn’t get it photographed and typed up. I’ll be back in the next day or two to share my class projects. Hope you have a wonderful weekend.

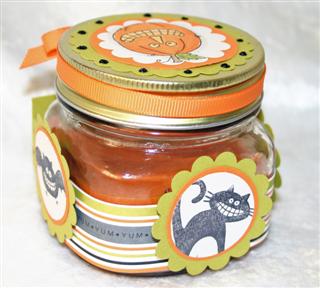
Pumpkin Candle Set
September 9th, 2008
Do you ever just take a half hour or an hour to walk around Michael’s to see if anything *grabs* you? I hadn’t done that in a really long time until a couple of weeks ago. I think I actually I ran over there looking for something in particular, but then I decided to really look around on aisles I usually skip to see if anything would spark creative project ideas. In reality I need more alterables like I need another hole in my head, but sometimes something new will really spark an idea.
I did pick up a few random things and hopefully I will actually USE them! LOL! One of the things I was intrigued with were these little jar candles for $1 each. I resisted the urge to get a bunch and just picked up one in a yummy pumpkin scent. Pumpkin is one of my very favorite candle scents…along with really good vanilla – the spicy, not-too-sweet variety.
Even while I was in the store I was picturing this little jar decorated with Hallowen images from Anna’s Whipper Snapper sets Hocus Pocus and Spooky Expressions. I finally had time last night to sit down and play with my idea. Here’s what I came up with –
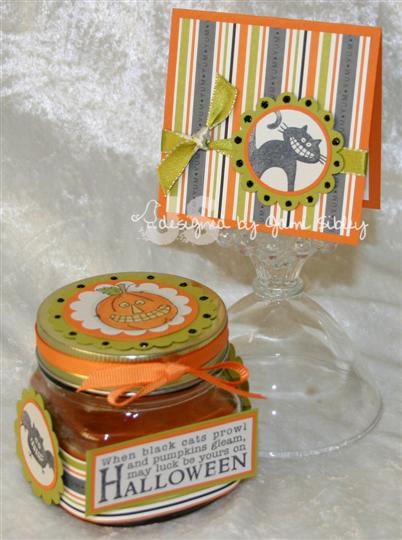
I started by wrapping a left over piece of SU dp from the Ghostly Greetings pack around the jar. I had been doing some class prep for my SU class coming up on Friday and I had some 1″ strips of dp – worked perfectly. Next I stamped the images in Brilliance black ink onto a shimmery pearly white paper called Virtual Pearl Pearlescent from the Paper Palette. It has amazing shimmer and an almost silver cast to it.
The jack-o-lantern image was colored with Copic markers. Everything was punched out and layered onto Pumpkin Pie and then Kiwi Kiss cardstock. The images were then attached to the sides of the jar with pop-up glue dots and onto the top of the jar with Tombow Multi. Black Diamond Stickles were added along with some Pumpkin Pie grosgrain ribbon for a super simple and quick project.
Here are some close ups of the candle.
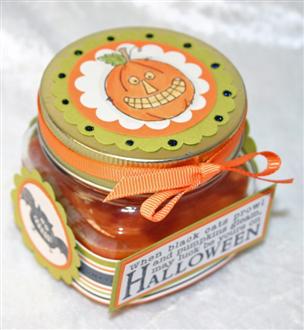
And of course I had to make a little card to match. The card is 3.25 x 3.25. Why? Because I happen to have a piece of cardstock that was 3.25 wide, so why not just use it? I love using left over pieces and letting what I have dictate the direction of a project.
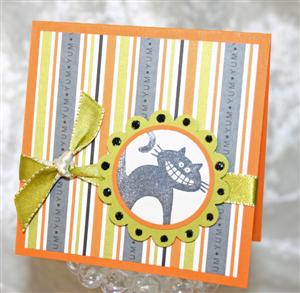 Easy peasy card just using the same elements as the jar, except the ribbon. This was my first time using my new SU double-sided satin ribbon – Kiwi Kiss/Very Vanilla. Oh my! Is it ever yummy! So thick and soft and shiny. Seriously – WOW!
Now that I have actually done something with this candle I just may have to go back to Michael’s for some more. At $1 each they would make great party favors or little thank you’s. I think I’d like to do some up with a Christmas theme. If you’re looking for them, they were on the regular candle aisle at my Michael’s – not with the $1 bin stuff.
Thanks for stopping by. I’m off to work. Hope you have a great day!
Five Years!
August 27th, 2008
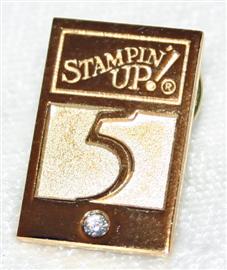 Wow – check it out! I got my Stampin’ Up! 5 Year pin in the mail today! (ummm…it’s no where near this big in real life! LOL!) I can hardly believe I’ve been a Demonstrator for five years. I originally just signed up to be a hobby Demo and get the discount, but immediately found the joy of teaching classes and very soon got a Club going. I quickly discovered that while being a Stampin’ Up! Demo was never going to provide an *income* it could definitley pay for my
 obsession hobby of stamping. I want to say a huge THANK YOU to all of my customers for your business and support over the last five years!
Besides my pin, I also receieved a UPS delivery of a big Stampin’ box which included my new catty order. I couldn’t wait to bust out Humor in High Heels because I’ve had an idea floating around in my head using Anna Wight’s Whipper Snapper set Hocus Pocus. AND as it turned out my idea worked with today’s Sketch Challenge on SCS! Cool!
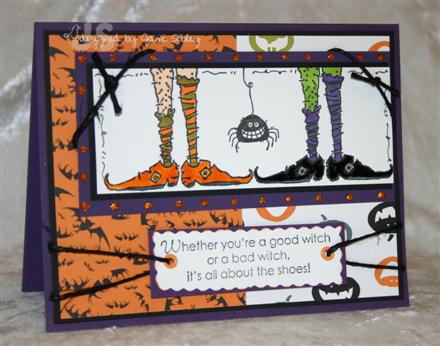
Whether you’re a good witch
or a bad witch,
it’s all about the shoes!
*snort* My original idea was to just stamp the legs/shoes once, but when I saw the sketch a lightbulb went on to have two sets of legs. I colored them with Copic markers and then used a clear glaze pen on the shoes. There’s orange stickles around the eggplant frame. The dp also came in my SU order today – Ghostly Greetings – it has a lot of fun patterns. Oh and one more new thing – the black hemp twine. I love the rough texture and I think it will be great with lots of Halloween projects. The card turned out a little *busy* I think and if I had it to do over I might try using Kiwi cardstock on the right half rather than the 2nd patterned paper…but we’ll never know. LOL!
Recipe:
stamps: Humor in High Heels, Whipper Snapper Hocus Pocus
paper: Elegant Eggplant, basic Black, white, Ghostly Greetings dp
ink: Memento Tuxedo Black
other: orange stickles, decorative scissors, ornage eyelets, black hemp twine, copic markers, clear glaze pen
Thanks for stopping by. Be sure to join me Friday morning for another one of Taylor’s challenges. Oh and I’ve been asked if I have a complete list of Copic matches to SU colors. In fact, I do but at the moment it’s just a hand-written list. I’ll try to work on getting it typed into a chart sometime soon. I’ll be sure to share here as soon as I do.
Grinnin’ Ghostie!
August 19th, 2008
I promised to share my Ghostie and here he is. Isn’t he cute???
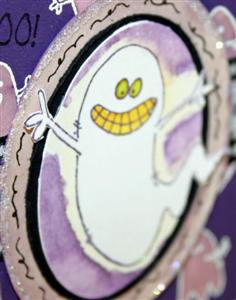
This was a pure just for the fun of it More is More card.  I think my favorite images from both Spooky Expressions and Hocus Pocus (by Anna Wight for Whipper Snapper) are the two tiny ghosts in the Expressions set. I’m not sure why, but they are just so little and cute!

I started this card off my placing the two little individual ghosts on the same acrylic block and stamping them repeatedly on the eggplant panel with white craft ink. Then I heat embossed them with white embossing powder. Next came the really fun part. I painted each little ghost with a 50/50 solution of bleach and water using a small fine tip watercolor brush. It was so fun to watch them change color! Once the panel was completely dry I added “BOO!” all over in black craft ink and heat embossed with irridescent ice ep. It’s hard to see the black against the eggplant in the photo.
Next I stamped the big ghostie in black ink on shimmery white cardstock and watercolored around him – first with Barely Banana ink to give him a glow and then with Eggplant ink to coordinate with the background panel. He was then cut into an oval shape using my Coluzzle – being careful not to cut off his hands or tail (do ghosts have tails?). I layered him onto a black oval and distressed the edges then onto an eggplant oval that had been brushed with the bleach solution to match the little ghosts. I did a little doodling on that last oval and added some Dazzling Diamonds glitter.
I wanted to layer the eggplant panel on a white panel, but before I did I decided to add a glitter border. This was done by wrapping Scotch double stick tape around all the edges of the white panel and then covering it with Dazzling Diamonds. This looks very cool in person! I snipped the corners of the eggplant panel with the ticket corner punch and added some balck faux button brads. A wide black gingham ribbon was wrapped around for some whimsy and then white taffeta ribbon was wrapped over that. Before adding the taffeta I stamped the sentiment on it using classic eggplant ink. It ran just a bit and I liked that look for Halloween. The big ghost oval was adhered with foam tape and the whole layered panel was then attached to the black card base. The final finishing touch was the “be scary” sentiment punched with the Word Window Punch and the addition of a little purple Adorn It jewel.
Recipe:
stamps: Anna Wight for Whipper Snapper – Spooky Expressions and Hocus Pocus
cardstock: Basic Black, White, Shimmery White, Eggplant
ink: white craft, black craft, black Memento, Classic Eggplant
other: coluzzle, word window punch, small circle punch, Adorn It jewels, Making memories balck button brads, ticket corner punch, white ep, irridescent ice ep, wide black gingham ribbon, white taffeta ribbon, bleach, dazzling diamonds glitter
Yep – More is More – especially when it comes to stampin’ FUN! Thanks for stopping by. I’m off to work. Hope you have a great day!


