We’re all singing A Winter Song!
November 20th, 2007
The minute I clicked on the Elzybells banner ad on SCS I was in love! I was just getting an order together when Taylor asked me if I’d seen this new line of stamps and what I thought of them. She was putting an order together too. Then I decided to ask some of my friends in the Dirty Dozen Alumni what they thought of these darling stamps and was happy to find a love-fest! From that love-fest sprang a special Challenge for my DDA and DD friends. Let’s all make a card (or project) with the Winter Song image incorporating the color Pretty in Pink… and to really make it challenging let’s prohibit the use of patterned paper (lots of groans with that last caveat!) Today is the day everyone is posting their Challenge cards on their blogs and in their SCS galleries. I’m so excited to see them all.
Here’s mine.
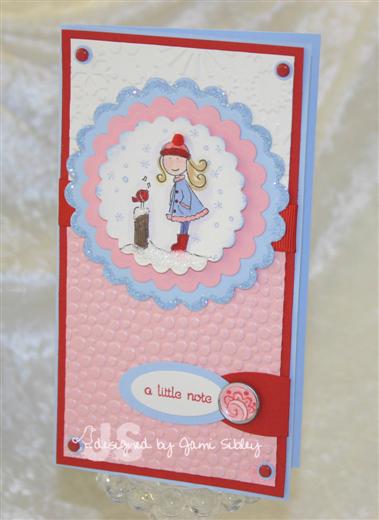 It’s a mini tall card measuring 3.5″ x 6.25″ to fit into a “bill pay” envelope. The base is Bashful Blue layered with Real Red. The top layers of Cryogen White and Stardream Chiara Rose Quartz are oh so shimmery and absolutely yummy! They were each run through my Cuttlebug with embossing folders (snowflakes for the white and tiny bubbles for the pink).
The adorable Elzybells image was stamped on Cryogen White (shimmer white) with Palette Hybrid Noir Black ink and colored with markers, reinker and aquapainter. Snowflakes are from the SU set Wishing You Cheer – they are the perfect tiny size. Frosted Lace Stickles make for sparkly snow and an itty bitty pom pom fits just right on her hat. The image was then cut out with a Nestabilties die (thanks Taylor) and mounted with foam tape to two more Nestabilities scalloped circles. I added blue extra fine Prisma glitter to the Bashful Blue circle with a 2-way glue pen for even more sparkle!
Red brads attached over tiny blue circles adorn each corner of the card and the Elzybells sentiment was punched and layered with SU oval punches. The final touch is the Build-a-brad. I stamped the swirly from Doodle This in red on the pink shimmer cardstock and punched it out for this fun brad. I had so much fun with this card. I hope you enjoy it.
Here’s a list of everyone who said they planned to play (plus there may be some surprises).
11Valerie11
atomicbutterfly
BadSherry
Chantel
cookiestamper
cwilliams
debbiedesigns
Duckwaddlequack
flaxychick
genie1314
Jami
JanTInk
jbalcer
Jeanne S
JulieHRR
kittie747
Lauraly
leigh obrien
Linda D
LodiChick
mel mel
mytime
notimetostamp
rainy
rohla
StamperSharon
SweetMissDaisy
tashers
Tayloredexpressions
texasjdodylynn
waterchild12
WaterPixie
Zindorf
But the easiest way to see all the Challenge cards to click here to go to the SCS gallery where they will be uploaded throughout the day – be sure to check at the end of the day or tomorrow to see them all! I’m sure most people will include blog links as well in their gallery uploads. I hope you enjoy all the entries for this challenge. Thanks for stopping by!
Crayon Resist
November 19th, 2007
I had a few questions on the crayon resist technique I used on the cards in the previous post so I thought I would just go ahead and explain here. It was so late and I was so tired when I posted that last night that I didn’t give much detail, so I apologize.
For the crayon resist in the cards below I started with a 1/4 sheet of glossy white cardstock. I randomly stamped the flower and leaf images using SU Classic Black ink starting with the largest image and working down to the smallest. I actually tried Palette Hybrid Noir ink first, but the crayon smeared it even after some heat setting. I thought that was strange, but I went back to the old faithful SU pad even though the color seemed a little purple. I had read that Stazon doesn’t work and I didn’t really have time to try it out.
Once the images were stamped and the ink allowed to dry for a few minutes I used a white crayon to color in the areas that I wanted to end up highlighted in white. Again – I was really in a hurry and when my cards were all done I realized I had not done that great of a job with my crayon – I missed several places. You can also use a yellow or other colored crayon which would make it easier to see where you have colored and where you have missed. But since I originally learned the technique with a white crayon I have one set aside in my stamping stuff and just use that.
I then got out my sponge daubers. You can use daubers or just quarters of the round yellow sponges or you can even use a brayer for this technique, however to get the look I got on my cards you would need to use daubers. With the daubers I worked in the opposite order – smallest images to largest. For the tiny flowers I used Pumpkin Pie ink – inked up the dauber right on my pad and simply placed the dauber right over the little flower and twisted to get a dot effect. For the rest of the colors I did more pouncing. In the empty white space I sponged River Rock ink – which doesn’t show up so much in the photo, but makes a big difference IRL. The color scheme for this piece was inspired by my favorite Dashing Paper and I just added a little Pumpkin Pie as I was channelling Jenn Balcer a bit! LOL!
Once all the ink was applied and allowed to dry for just a minute or so the entire piece was buffed with a Kleenex – this removed the ink and the crayon from the white highlighted areas. Voila! The piece was then cut in half and trimmed to make 2 cards. You could also do this with a whole sheet for a One Sheet Wonder project, but I find that I prefer working in quarter sheets for crayon resist so I can better keep track of what I’m doing.
I hope this detail helps. if you haven’t tried the crayon resist technique grab some glossy cardstock and one of your kid’s crayons (who am I kidding? My crayon came out of my very own box of 64 Crayola crayons!) and get stamping! It’s super FUN! Let me know if you have any questions.
Don’t forget to check back tomorrow (Tuesday) morning for a special post!
Time Well Spent
November 18th, 2007
How exciting and fun to get a FREE stamp set in the mail! Stampin’ Up! is sending a free stamp set to all demonstrators with a thank you from Shelli. It’s called Time Well Spent and it will be a Level 3 Hostess set in the upcoming January catalog. Mine came Friday and I just had to make a few quick cards over the weekend with it. It’s so CUTE!!!!
The first one is for Beate’s Weekend Sketch Challenge
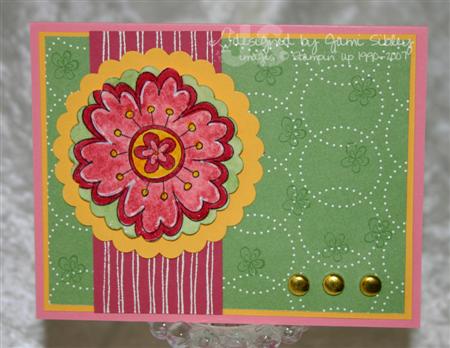
The large flower was stamped onto watercolor paper and watercolored with markers, then punched out with a Marvy Mega circle scallop punch and covered in Versamark and heat embossed with clear powder. I love the shiny look that results from clear ep, but I just can’t get it to show in the photo. The flower image was then layered onto a Summer Sun giga scallop circle with foam tape. The stem image from the set was embossed onto the Rose Red cardstock with white embossing powder to create stripes. The background paper is from Apple Cider (SU) and is stamped with the smallest flower from the set with Wild Wasabi ink. The large brads were colored with a yellow sharpie. Cardstock colors are Regal Rose, Summer Sun, Rose Red, plus the Wild Wasabi piece from the Apple Cider designer paper.
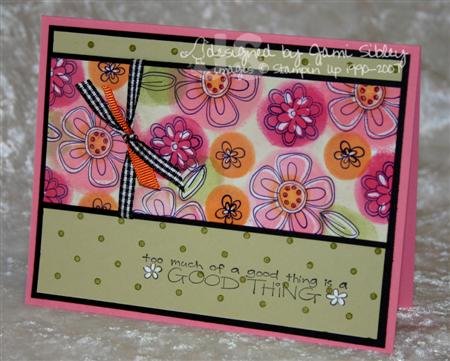
The next two cards used a piece of crayon resist on glossy cardstock and built from there.
This one makes me think of my friend Jenn Balcer. I don’t know if she actually came up with this layout, but I always think of it as hers and I use it often…plus I used Pumpkin Pie as part of this bright combo and that always makes me think of her too! Crayon resist here used ink colors – Regal Rose, Pumpkin Pie, Old Olive, River Rock and Real Red. Cardstock is Regal Rose, Basic Black, River Rock, glossy white.
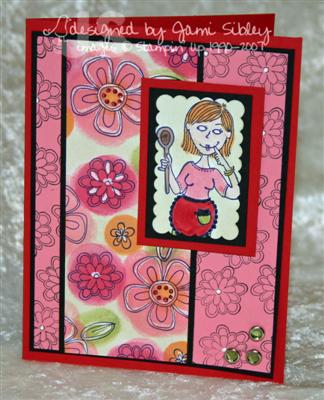
And the last card is just another variation using the same piece of crayon resist (I made a quarter sheet and cut it down for 2 cards).
I wanted to see how Cooking Ronnie would look among these wild flowers. I stamped her on glossy and colored her with SU markers before punching her out with a Marvy scallop rectangle punch. Background was created by stamping the medium size flower with black ink on Regal Rose cardstock. This card was finished off with 3 green rhinestone brads. Cardstock colors are Real red, Basic Black, Regal Rose, glossy white.
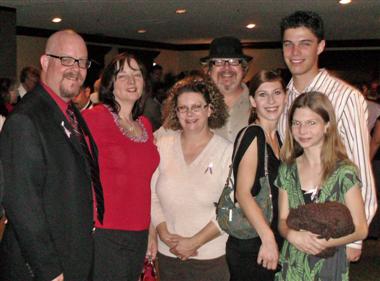
I hope you had a good weekend – we sure did! Last night we attended a charity event for Breast Cancer Awareness put on by my niece’s sorority. (I still can’t get over that the little 3 year old flower girl from my wedding is in college and holds a very decent adult conversation!) It was a Casino Night and it was surprisingly fun! I learned to shoot craps which was a blast and played a little blackjack as well. Gambling with fake money is really fun (I’m way too anal to enjoy gambling much with real money). Here’s a family photo…
Curt, me, Lill (my SIL), Craig (Curt’s bro), Kira and her boyfriend Matthew, Britta (our youngest niece).
Yep…time well spent…
Thanks for stopping by. I have something special to post first thing Tuesday morning so be sure to come by!
The 15th Brings Excitement
November 15th, 2007
There is so much excitement going on this morning that I honestly don’t know where to begin.
The SCS Fan Club/Dirty Dozen gallery opened today and my long time friend (and StampMania co-host) Emily Gunnell (WaterPixie on SCS) is one of the two new Dirty Girls. I almost peed in my pants I was so excited for her! If you are a Fan Club member you can see Emily’s DD stuff in her gallery here. I’ve been looking for her to pop up in the DD for a long time and couldn’t be happier. I’m just so sorry I went to bed early last night and wasn’t around for the midnight reveal. The other new Dirty Girl is Amy Rohl – also a very talented stamper and someone I have admired for quite some time. Congrats to both of them! If you are not a Fan Club member at SCS I highly encourage you to join ASAP!
Another piece of exciting news – my good friend Taylor has reached ONE MILLION hits on her popular blog Taylored Expressions and she is doing a full week of awesome give-aways sponsored by some fab companies! Run over there and check it out. Congrats to Taylor!
ETA: I can’t believe in my rush I almost forgot to say that my friend Sharon Harnist (StamperSharon) just announced that she was chosen for the new Spellbinders Design Team! WooHoo! Quite an honor and she is more than up for the task! Congrats Sharon!
And of course there is the new PAPERTREYink release that actually happened last night. I have been wanting a monongram set something like Ambassador for a really long time. It’s beautiful and I love the small size and especially love border set that goes with it. The one big draw back for me is that I really don’t care for the “J” in the set and it’s kind of an important letter for me. So at the moment I’m feeling very torn. I’m very particular about my “J”s.
I have several cards to share, but with all the excitement I’m running late for work, so I’ll just share one now and more tonight or tomorrow.
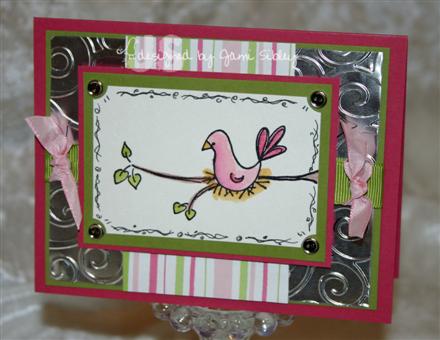
This card was done for the Sketch Challenge on SCS yesterday. I’m embarrassed to say that I was late with a birthday card for a sweet and very talented stamping friend, but the sketch was just what I needed to get me going. The image is a Whipper Snapper (by Anna Wight) and I just love it! The background is a piece of silver-colored very thin metal sheeting run through my CuttleBug. You just have to get some of this metal and play with it! My friend Sencie is selling it on her blog for a very reasonable price – check it out here. I had some shiny silver faux-button brads that go perfectly with the metal background – unfortunately in the photo they don’t look silver at all – you’ll have to take my word for it. LOL! Colors on this card are Rose Red and Old Olive and the image is stamped on shimmer shite. The designer paper is from my stash and I have no idea of the manufacturer.
Wow this is just too much excitement for one day! Especially a Thursday when I need to get to work! YIKES! I’ve got to run for now. Happy Thursday! Thanks for stopping by.
Pointsettias
November 13th, 2007
Just a quick post before I am out the door to work. My classes over the weekend were fabulous! I had so much FUN with both groups. But boy was I ever exhausted! I finally got around to putting everything back in my stamp room yesterday and then last night I ventured into my stamp room to actually put stuff away. Of course I got side tracked and ended up making a quick card. *grin*
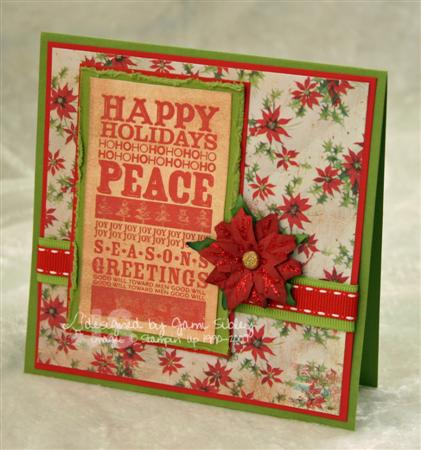
I got an order from eP just the other day and I just had to do something with the adorable daisyd’s 6×6 Paisley Sugarplum paper pad. As I was shuffling through it I discovered this pointsettia pattern that seemed to go perfectly with a package of Making Memory Pointsettia Blossoms (paper flowers with brads) I had purchased at Target. So away I went….
I wanted a simple image to showcase the fabulous paper and Block Party was still sitting out from class – perfect! I only stamped part of the image, masking off and omitting the bottom section when I inked it up with Versamagic Red Magic ink. The image was stamped on Poison Ivory shimmer cardstock and then brayered with Creamy Caramel classic ink to give it a more antiqued feel. Card base is 5″ x 5″ and cardstock colors are Old Olive and Real Red. I used the distressor from the SU Cutter Kit to really rough up the edges of the olive mat around the stamped image. Ribbon is SU Old Olive grosgrain topped with a stitched red grosgrain from my local ribbon warehouse. Stickles were added to the blossom to finish off this very simple card.
My custom cabinet designed for my stamp room is finally here! It’s sitting out in the garage so the laquer can cure. I can’t have the fumes in the bird room. I’m hoping to be able to bring it in and fill it up this weekend. I’ll be certain to share to pictures when I do get it inside. I can hardly wait!
Thanks for stopping by.
Dashing Class Time
November 9th, 2007
The time has finally come for my Dashing Christmas Class. The first session is tonight at 7:00 and the second session is tomorrow at 2:00. We’ll be making the gift bags and one of the cards I shared previously, plus this adorable little Cami Basket filled with Peppermint Patties.
My fabulous friend Cami demo’d these at Portland Regionals. What a fun, quick and cute project. You can view full instructions on Cami’s blog here. This basket is quite tiny in IRL and yet so many possibilties!
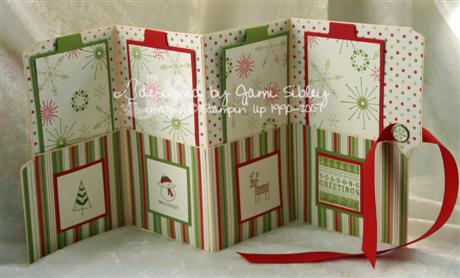
Our last – and most involved project – is this file folder album.
This is just a manilla file folder folded up and decorated. This idea came from another talented friend – Taylor. It’s good to have friends! *grin* You can view directions on her blog here. The folding seems a little tricky at first, but it’s pretty easy once you realize that the front does not match up exactly. I used the slit punch to create a place for the ribbon to slide through and then added a Build-a-brad. The tags inside are stamped with Snow Burst and can be decorated with photos and journaling as a special memory mini scrapbook. I also used Block Party (front and inside right) and Merry & Bright (inside).
A big thank you to friends Jen and Leann who helped me cut and prep yesterday. This class has taken A LOT more prep time than I anticipated and I could not have done it without them! Off now to finish up. Thanks for stopping by and have a great weekend!
Amethyst Gift Set
November 8th, 2007
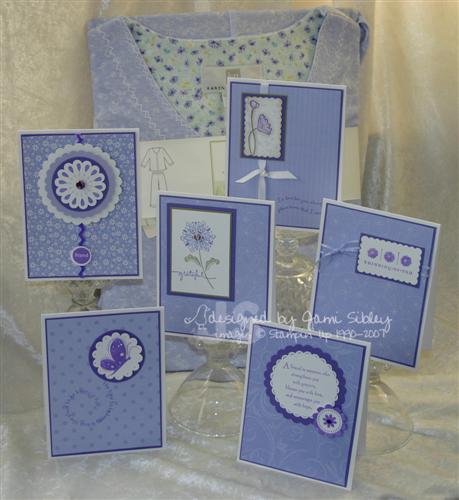
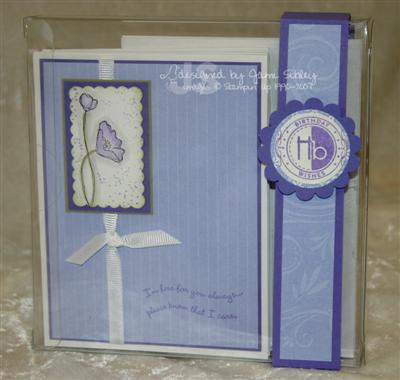
Not only are PJs the perfect stamping attire, but they can also provide creative inspiration! I bought a set of soft yummy Karen Neuburger PJs as a birthday gift for my friend Brenda. But Brenda also loves (and actually uses) cards I give her, so I wanted to make a set of coordinating cards to match the PJ’s.
The PJs are in the background of the photo and they are an Almost Amethyst and white soft print so I decided to make my note cards with Paper Trey white cardstock for the base and use SU Designer Prints in Almost Amethyst on each card. While I love SU Whisper White for stamping, it is just not heavy enough to use for a card base, but the Paper Trey is the perfect weight for that. I used Lovely Lilac for my accent color. As you can see this is a very simple set and I think I did all six cards in about 2 hours.
I’ve been on a roll making *simple* cards lately and to be perfectly honest it’s scaring me a bit! Ummm hello? I’m the More is More Girl! I’m hoping this is just a phase ’cause change scares me!
I packaged the note cards along with envelopes in a plastic box that one of my Paper Trey stamp sets came in (recycling – yea me!) and added a belly band to the side.
I think this makes for a lovely professional looking presentation. I can hardly wait to give this to her…especially since I’m late with it already! *sigh*
HEY – here’s a fun little challenge for you – PJ INSPIRATION! Make a card or project inspired by some PJ’s. Photograph the card with the PJ’s in the background and upload to your blog and/or SCS gallery with the Keyword JPJ1107 (Jami PJ 11/07) and come back here and post a link in the comments section. I’d love to see what you come up with!
My Pampered Chef party was a huge success and way more fun than I had even anticipated! Thanks to everyone who placed an order. We’ll be closing the party tomorrow. If anyone in SoCal is interested in hosting a party and earning lots of free product let me know and I’ll put you in touch with Darla. 🙂
My Dashing Christmas Class is tomorrow night and again Saturday afternoon. Lots of prep to do – I’d better get to it. Thanks for stopping by.
