Grinnin’ Ghostie!
August 19th, 2008
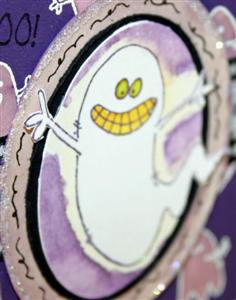
I promised to share my Ghostie and here he is. Isn’t he cute???
This was a pure just for the fun of it More is More card.  I think my favorite images from both Spooky Expressions and Hocus Pocus (by Anna Wight for Whipper Snapper) are the two tiny ghosts in the Expressions set. I’m not sure why, but they are just so little and cute!

I started this card off my placing the two little individual ghosts on the same acrylic block and stamping them repeatedly on the eggplant panel with white craft ink. Then I heat embossed them with white embossing powder. Next came the really fun part. I painted each little ghost with a 50/50 solution of bleach and water using a small fine tip watercolor brush. It was so fun to watch them change color! Once the panel was completely dry I added “BOO!” all over in black craft ink and heat embossed with irridescent ice ep. It’s hard to see the black against the eggplant in the photo.
Next I stamped the big ghostie in black ink on shimmery white cardstock and watercolored around him – first with Barely Banana ink to give him a glow and then with Eggplant ink to coordinate with the background panel. He was then cut into an oval shape using my Coluzzle – being careful not to cut off his hands or tail (do ghosts have tails?). I layered him onto a black oval and distressed the edges then onto an eggplant oval that had been brushed with the bleach solution to match the little ghosts. I did a little doodling on that last oval and added some Dazzling Diamonds glitter.
I wanted to layer the eggplant panel on a white panel, but before I did I decided to add a glitter border. This was done by wrapping Scotch double stick tape around all the edges of the white panel and then covering it with Dazzling Diamonds. This looks very cool in person! I snipped the corners of the eggplant panel with the ticket corner punch and added some balck faux button brads. A wide black gingham ribbon was wrapped around for some whimsy and then white taffeta ribbon was wrapped over that. Before adding the taffeta I stamped the sentiment on it using classic eggplant ink. It ran just a bit and I liked that look for Halloween. The big ghost oval was adhered with foam tape and the whole layered panel was then attached to the black card base. The final finishing touch was the “be scary” sentiment punched with the Word Window Punch and the addition of a little purple Adorn It jewel.
Recipe:
stamps: Anna Wight for Whipper Snapper – Spooky Expressions and Hocus Pocus
cardstock: Basic Black, White, Shimmery White, Eggplant
ink: white craft, black craft, black Memento, Classic Eggplant
other: coluzzle, word window punch, small circle punch, Adorn It jewels, Making memories balck button brads, ticket corner punch, white ep, irridescent ice ep, wide black gingham ribbon, white taffeta ribbon, bleach, dazzling diamonds glitter
Yep – More is More – especially when it comes to stampin’ FUN! Thanks for stopping by. I’m off to work. Hope you have a great day!


August 19th, 2008 at 9:40 pm
WOW Jami !! You outdid yourself on the techinques for this too cute card—Very clever—-This Ghostie is a winner!!!—–B in B
August 19th, 2008 at 9:50 pm
I love these sets! Your card is so fun with all the different More is More touches. The lopsided oval is a great design element. Totally great card, Jami!
August 20th, 2008 at 3:58 am
What a scary gorgeous card!!! LOL
I love how you coloured, added bling, layout – ALL of it.
Thank you.
August 20th, 2008 at 3:18 pm
The Ghostie Scares Me 🙂
August 23rd, 2008 at 5:30 am
This is adobable! 🙂 Just adorable!