My May Class
May 30th, 2013
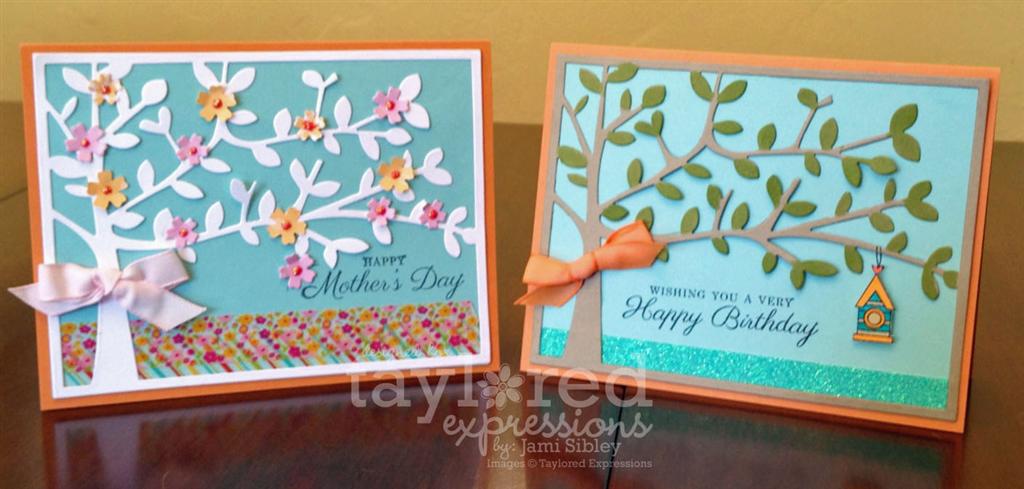
I thought I’d sneak in with some of the cards we created in my May stamp class before the month of May is over. First up is this pair of cards created with the TE SHade Tree Cutting Plate. Each gal chose to either make the white flowering tree or the kraft tree with birdhouse. Of course the sentiments were interchangeable. The white tree has washi tape (inspired by a card made my Broni Holcombe) and the kraft tree has glitter tape. You KNOW I love that shade tree! Seriously cannot get enough of it! You can click the photo to make it larger, This was snapped quickly with my phone and then I gave these cards away before I could get a better photo.
I typed up instruction sheets for my class. Here they are, in case you’re interested:
- Die cut the tree from white cardstock
- Die cut the flowers twice: once from pink paper and once from peach paper
- Choose two patterns of washi tape and adhere to the bottom of your blue panel.
- Lay your tree over the blue panel (but don’t adhere yet) and determine where you want to stamp your sentiment using your stamp-a-majig. Note: You may need to trim off a leaf or low hanging branch to get the placement you want. (You can use either sentiment.)
- Adhere the tree onto the blue panel carefully using SMALL amounts of liquid adhesive.
- Use your stamp-a-majig and stamp the sentiment.
- Adhere blue panel to peach cardbase.
- Curl the flowers with your fingertips and then adhere randomly (10-14 of them.)
- Make bow and adhere with a mini glue dot.
Optional – apply Stickles to flower centers.
-OR-
- Die cut the tree from kraft cardstock
- Color the leaves green with the broad tip end of a copic marker
- Stamp and color a birdhouse.
- Apply a strip of glitter tape to your blue panel.
- Lay your tree over the blue panel (but don’t adhere yet) and determine where you want to stamp your sentiment using your stamp-a-majig. Note: You may need to trim off a leaf or low hanging branch to get the placement you want. (You can use either sentiment.)
- Adhere the tree onto the blue panel carefully using SMALL amounts of liquid adhesive.
- Use your stamp-a-majig and stamp your sentiment.
- Adhere blue panel to peach cardbase.
- Cut out your birdhouse and adhere with a foam dot. Draw in the string so it hangs from the branch.
- Make bow and adhere with a mini glue dot.
This next card was inspired by one that Shelly Mercado created using the TE Arched Window die, Banner Stacklets, and the stamp set A Glimpse Inside. I also used the TE Band It Die.

- Stamp and color the tulips image. Trim with scissors: close on the two sides, but leaving plenty of room at the top and bottom to adhere it to the back of the window die.
- Die cut the window and two pieces of the Band It die on white cardstock. All 3 pieces can be cut in the same pass in the die cut machine.
- There are two sizes of white tag Stacklets to be layered. Emboss the smaller one with an embossing folder in the Cuttlebug. Then adhere the two pieces together.
- Adhere your stamped image behind the window die cut.
- Adhere the window to the layered tags.
- Choose one of the background paper panels and adhere it to your cardbase.
- Adhere the tag panels to your card.
- Center the large piece from the Band It Die on your card so the top of it slightly overlaps the bottom of the window die cut. Adhere to card. Trim off ends of Band It die cut with scissors.
- Take the small inset piece of the Band It die and adhere it to your work surface with temporary tape.
- Choose any sentiment from Labels of Love or Labels of Love II (double check that your choice will fit—most will) and use your stamp-a-majig and stamp the sentiment onto the small piece.
- Adhere your sentiment to your card.
Design Tip:
When creating a with a white on white or other monochromatic look, use texture such as an embossing folder to create interest and depth.
We also created a third card in class, but I forgot to take a photo of it. I’ll try to share that one later. Thanks for stopping by!
![]()


June 6th, 2013 at 5:33 pm
Thanks for all the detailed instructions.