Nestie Frame Two Ways
May 26th, 2011
Oh. My. Word. What a week! The Rocket Scientist and I were scheduled to go on a fun RV weekend down to San Diego last week. We had a spot reserved right on the bay. We were excited. Tessa was excited. On Wednesday I shopped for groceries and got the trailer mostly packed so we could finish up and leave Thursday sometime before noon. When TRS arrived home from work Wednesday night, he was feeling a little “off” and we both thought the trip would do him good. But then…Wednesday night/Thursday morning he was struck by a NASTY stomach virus. The worst of it lasted 2 full days and our trip was obviously OFF.
I did quite a bit of stamping, as I considered it still “vacation” of sorts and completely put aside my regular to-do list. By Sunday morning, TRS was feeling up to going to church and I was feeling relieved that I had not succumb to the ugly illness. Uh…yeah…then Sunday afternoon I started feeling nauseous as I struggled to put the finishing touches on a card. YEP…by Sunday evening it was clear that it was my turn. UGH! It’s Thursday and while I am over all the bad stuff, I still just don’t feel 100%.
WHAT. A. WEEK.
I do have 2 cards to share with you today. These are the last 2 cards we created in my class a couple of weeks ago. The first card was used to teach how to make a nested frame with Spellbinders dies and it was the jumping off point for the much fancier version I made for Lori’s birthday. Everyone had a choice of 2 different sentiment combos all from TE stamp sets. We also used the TE butterfly die. Paper is MME Mary Mary. I love how the one sheet has a scalloped edge!
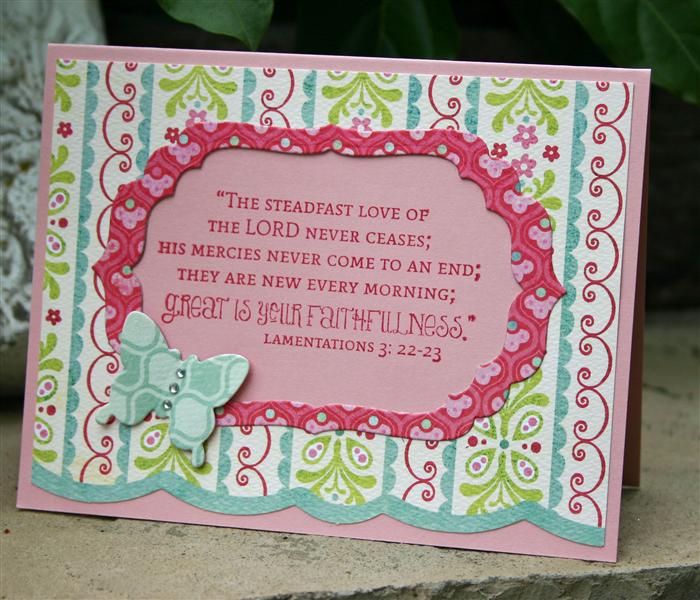
We used 2 sizes of the same Nestie set. First the larger size was centered into the striped dp panel and secured with temporary tape and die cut. This leaves you with the large frame pice you see here and the smaller shaped pice which we used inside the card. Then BOTH dies were centered into the other patterned piece (bright pink) and secured with temporary tape and die cut. That second die cut leaves you with 3 peices – 1. the bright pink frame you see here, 2. the center which we used to die cut the butterfly (you see the opposite side of the paper here), and 3. the large frame piece you will see in the next card. This is an easy way to make a WOW card that is still flat for mailing. And of course you can frame and feature a sentiment or an image.
I had only planned to do 3 cards in class, but when I got done with this card I had this beatiful piece of designer paper left over already cut into a frame. The sage colored side would be wonderful for a masculine card so I decided to see what I could come up with.

I adhered the frame panel to an Early Espresso cardbase. Then I stamped this retired SU lighthouse image with Sage Shadow ink on vanilla cardstock and die cut it with the smaller nestie. I sponged Espresso ink aorund the edges to fill in where the image did’t quite fill the shape. That was adhered to the card and I added some twine and called it done. I think this will make a great Father’s Day card! Isn’t it amazing how two such different cards could come from the same piece of designer paper?
Yesterday all I managed to accomplish was a few loads of laundry. Today I absolutely must get groceries and hope to cross a few more things off my almost-forgotten to-do list. Tomorrow I’ll be back with a fun sample (already done – YEA!) for the new Taylored Expressions Sketch Challenge. I hope you’ll come check it out.
Thanks for stopping by. Have a great day!
![]()


May 26th, 2011 at 4:59 pm
Oh my friend, sorry to hear about you being sick, and Curt being sick and cancelling your vacay! Bu-MMER! Hope you’re 100% soon! Yet, you managed to make a beautiful card! That’s talent baby!
May 27th, 2011 at 6:52 pm
{love}