Thanks Treat Bag
September 9th, 2010
Happy Thursday! Looking forward to taking Tessa for a walk at the park this afternoon. She has a *play date* with Molly and Auntie Lisa. *GRIN* It’s been really fun getting her socialized to other dogs. She’s doing so much better now! When we got her last year it seemed as though she had never been around other dogs and had no idea what to do. She would just bark. Now she knows how to say *hello* (according to Cesar Millan that’s the butt-sniff – LOL) and she sometimes even wants to play a bit.
Today I have a fun little project to share with you. Recently there was a publication call for Paper Crafts Stamp It! Magazine that involved choosing one of six techniques. Getting something published in Paper Crafts is on my bucket list, but I had never submitted before. This call seemed like the perfect time to begin trying, so I created three projects and submitted them. None of them got picked up, but I was proud of myself for finally submitting and have decided I will continue to try. This was my favorite of the 3 things I sent in and it was for the paper-piecing category.
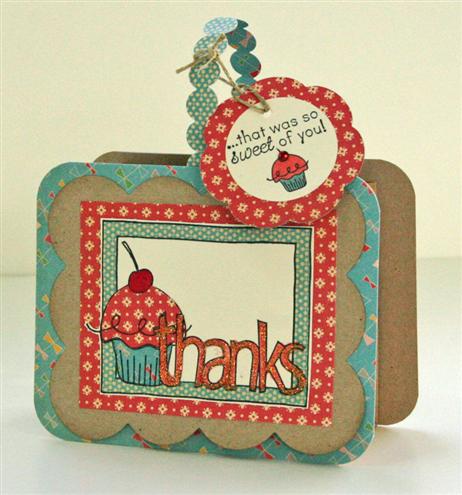
This is a little treat bag featuring the Sweet Occasions stamp set by Taylored Expressions and October Afternoon Fly a Kite papers. I started with a small kraft sack from Michael’s (cut the top off) and panels of kraft cardstock. I covered the panels with patterned paper and rounded the corners with the Corner Chomper. and adhered them to the front and back of the bag with the ends of the handle in between. The handle was created by gluing to pieces of patterned paper together back to back and punching it on both sides with the SU scallop border punch. I thought that was such a cool effect and not even what I had expected.
Next I cut kraft cardstock with the Spellbinders Big Scallop Rectangle die and inked the edges and attached it. The image was stamped on TE Choice Buttercream cardstock and again on 3 different patterned papers so I could paper piece the border, the cupcake liner and the frosting. The word “thanks” was colored with a copic marker and then covered in Fruit Punch Stickles. The cherry was covered in Red Liquid Pearls.
The tag was created with a circle punch and a Blossom Nestabilities and tied onto the handle with some hemp twine. There’s a tiny red KaiserCraft rhinestone on the cherry of the little cupcake.
The paper piecing on this took some time, but the general idea of this would make really cute and easy favors or little thank you gifts if you simply watercolored or colored the images with copics. This stamp set also has similar images that say “congrats”, “friend” and “celebrate, so you could make these for almost any occasion!
Thanks for stopping by. Not only do I have Tessa’s play date scheduled for this afternoon, but I get to have dinner with a dear friend tonight so this should be a really good day! Hope your day is terrific as well!

September Stamp Class – Journals
September 8th, 2010
Happy Wednesday! It’s been a productive day of purging around here so far today. I’m never quite sure how I accumulate so many catalogs, magazines, stacks of coupons and ads, etc. but they do become overwhelming from time to time. What started out as sorting one pile of stuff so I could pay bills turned into a sorting and purging frenzy…which is a good thing because I really don’t get in that mood very often. I think the two episodes of Hoarders that I watched the other night might have something to do with my motivation today. LOL! How about you? Do you accumulate stuff, hoard stuff, or throw stuff away immediately? I’d love to hear from you!
The project I want to share with you today is a sample for my upcoming Journals Class. I really LOVE the way it turned out! In class each person will create two journals or notebooks. The first one will be something like this sample.
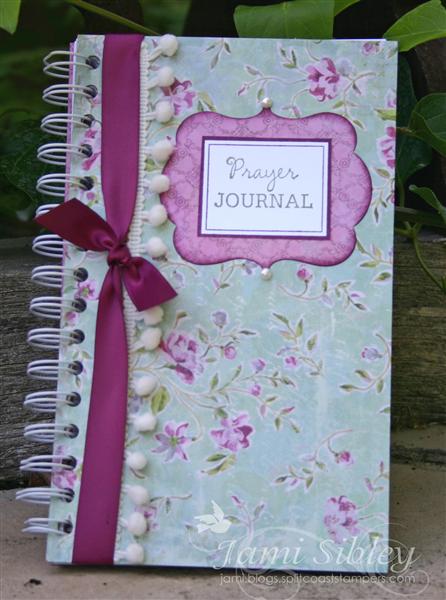
Everyone will get different patterns of paper from a K & Co. by Brenda Walton pad. All of the designs in this collection are gorgeous and I’m anxious to see how each journal will turn out. We’ll be using the Cinch machine and some naked chipboard covers for this one along with the Taylored Expressions stamp set Take Note. With this stamp set everyone will have tons of options for how to title their creations.
The second journal will begin with a composition notebook and I will show you how to cover it and transform it into whatever type of notebook you might like. I’ll be sharing that sample another time.
Class is Thursday September 23rd at 7:00pm and the registration fee is $20. I only have a few spots open, so if you are local (So Cal) and interested in attending please e-mail me through the button on my sidebar and I will get the detailed info to you.
Thanks for stopping by.
Playing with Letterpress
September 7th, 2010
Happy Tuesday. I hope you had a wonderful Labor Day weekend. I have several things lined up to share this week and I wanted to get a post in before I head out to the office today. This card started with an image I had colored for my class a couple of months ago when I taught masking. It’s from the beautiful Flourishes set From the Garden.

I started by stamping the flower/leaf image and masking it and then the tools image and masking that. Then the flower pot image was stamped under the leaves. Next I stamped the bottom flower pot in the stack, masked it and stamped another on top, masked that and stamped another on top. Really almost quicker to do than to describe. I used Eclipse Masking Tape – I LOVE that stuff – so much better than a post-it note! I only made one mask of the pot and just moved it around as needed. The images were colored with Copics and after the panel was die cut with a Spellbinders Nestabilities, I sponged color with the die still in place.
Now for the really fun part. I have been wanting to try the Letterpress technique with some of Cuttlebug embossing folders for quite awhile now to see how it would work. Well, it worked great! I used my new Victoria folder and brayered SU white craft ink on one side of the inside of the folder. I carefully placed a panel of Olive cardstock inside and ran it through the machine as usual. While the result wasn’t perfect, I was really really happy with it and look forward to trying this again with other folders. In person the effect is somewhat chalky – almost velvety. If you have tried this with other types of inks, I’d love to hear about your results.
Cardbase here is Daffodil, layered with Concord Crush. I didn’t have any purple ribbon to match so I simpley colored some SU white taffeta with a Copic marker. Love how well the taffeta takes on ink. (Note” it matches much better IRL than in the photo.)
Thanks for stopping by. I hope to have a post up each day this week.
Taylored Expressions Birthday Bash and September Release
September 3rd, 2010

Happy Friday!! Please join me in wishing a very Happy 2nd Birthday to Taylored Expressions! It’s Birthday Bash Day and everything we’ve been showing you over the past several days is now available for purchase. I’m joining the Baker’s Dozen in a Release Round-up as we each show 1 or 2 new samples of the many new stamp sets and products available at TE today. You can hop over to Taylor’s blog for a summary or go straight to the TE Fresh Out of the Oven Department (click “show all” in the upper right hand corner when you get there) to see it all in one place.
The card I have to share today features the Belated Birthday A la Carte – Ducks in a Row. I just had to make a card with this image right away because this concept is the one that started the whole Belated Birthday stamps idea in the first place.
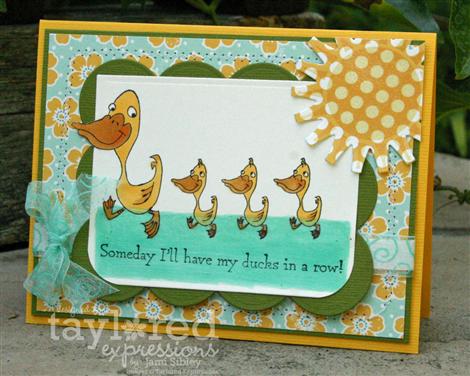
We were driving down the freeway on vacation a few years ago when I saw a billboard with a row of rubber ducks and the tag line “Someday you’ll have all your ducks in a row.” It was followed up by something like “in the meantime you have Chase Bank” – or something like that. Anyway, I immediately thought how much I wished I had a stamp that said that so I could use it for belated birthdays. Well hot-diggity HERE IT IS!!!
Although these ducks were drawn to be walking I realized that they would look really cute swimming, so I colored a pond with copic markers and covered it with crystal effects. The sun is from Garden Party Blooms and I heat embossed it onto patterned paper with versamark and clear ep. Then I die cut it with the sun shape from Garden Party Blooms Die Set 2. Paper is October  Afternoon and cardstock is from a kit TE had to coordinate with the October Afternoon pads, but I no longer see it in the store.
These Belated Birthday A la Carte images come with the cute critter main image AND 2 coordinating sentiments. In this case, they work equally well whichever you decide to put on the front. Many of the sentiments will mix and match well with each other if you decide to pick up several of them. It’s like creating your own custom set! And all of the images will also make adorable cards for occasions other than birthdays.
In celebration of TE’s 2nd Birthday Bash, Taylor is running some great shopping specials now through Monday:
Bash Buy #1 – Buy ANY 4 full size stamp sets (new or old) & receive a free Mini Binder Box.
Bash Buy #2 – Buy ANY 8 A la Carte stamps (from any line old or new) & receive a free set of Storage Panels.
Bash Buy #3- The first 20 customers to order the Fright Night Project Pantry will receive a free set of orange glittered chipboard letters
Win one of Four Golden Tickets – One TE Store order each day ( Friday – Monday) will be selected at random to win a $25 TE gift certificate!!!
And now it’s time to see what the Baker’s Dozen has cooked up today –
- Barbara Anders – Guest Designer
- Charmaine Ikach
- Danielle Lounds
- Jackie Pedro
- Jodi Collins
- Karen Giron
- Karen Motz
- Melissa Sauls
- Nancy McKinney – Whimsical Wishes Illustrator
- Regina Mangum
- Sankari Wegman
- Taylor VanBruggen
- Tori Wild
Thanks so much for stopping by! I hope you have a fabulous long weekend and I hope you make time for some stamping!
Taylored Expressions September Sneak Peeks Day #3
September 2nd, 2010

Happy Thursday! On the menu today for the TE sneak peeks are creepy candy, witch’s brew and everything Halloween! Taylor LOVES Halloween so you can always count on TE for some fabulous Halloween FUN! Today the Baker’s Dozen will be previewing a full sized set (Hangin’ Out – Wicked Wardrobe illustrated by Nancy McKinney in the Whimsical Wishes line), a mini set (Frght Night Favors designed and illustrated by Taylor in the *te* line) along with a coordinating label die, a Spooky Tree A la Carte image AND the Fright Night Project Pantry. So once again today, lots and lots to see!
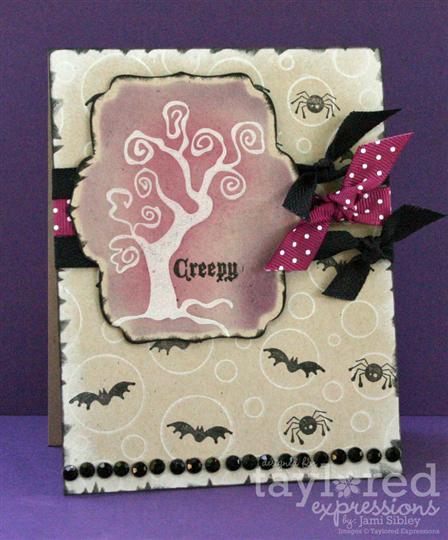
The card I have to share today started with an idea for the background. Ever since I first saw the Bubbles Big Background (introduced on Tuesday) I’ve thought there are a ton of ways to use it. For this card I stamped it in white pigment ink on a kraft cardbase. Then I took 2 of the little icons from Fright Night Favors (the bat and the spider) and stamped them in the large and medium circles with Brilliance black ink. I then sponged white pigment ink all around the edges and took the tip of my Brilliance dew drop pad and applied that directly to the edges for a distressed *scary* look.
For the focal image I used the A la Carte Spooky Tree and stamped it in white pigment ink on craft. Then I stamped part of a sentiment (“creepy”) from Fright Night Favors in the black Brilliance. Both images were covered with clear embossing powder and heat embossed. Next the image was die cut with Spellbinders Label 5 and with the die still in place I sponged Rich Razzleberry and then Elegant Eggplant inks. The image was popped up on foam tape over 3 ribbons tied in knots. The finishing touch is a row of Zva black crystals at the bottom edge of the card. Overall, this was a really quick and easy card and I love how it turned out.
Now lets’ go see what the Baker’s Dozen has brewin’ today!
- Charmaine Ikach
- Danielle Lounds
- Jackie Pedro
- Jodi Collins
- Karen Giron
- Karen Motz
- Melissa Sauls
- Regina Mangum
- Sankari Wegman
- Taylor VanBruggen
- Tori Wild
- Nancy McKinney – Whimsical Wishes illustrator
Remember that everything we are showing you will be available in the TE Store tomorrow (Friday) morning at 8am PST. I’ll be back then for the release round-up and I hope you’ll stop back by!
Taylored Expressions Sneak Peeks Day #2
September 1st, 2010
 Happy Wednesday. I’m tickled pink to play along the Baker’s Dozen to show you sneak peeks of 7 new Belated Birthday A la Carte images in the Apple Doodle Ink line and concepted by ME! *GRIN* I’ve always loved celebrating birthdays, but over the past few years I seem to be ALWAYS be late in mailing out birthday cards. I don’t mean to be late…I hate being late…and yet I’m late. As I’m sure you can guess, I handstamp pretty much all of the cards I send out. You may or may not know that I am a sentiment fanatic. In fact one of my very favorite jobs behind the scenes at TE is getting to help brainstorm sentiments for some of the stamp sets. As far as I’m concerned my cards aren’t finished unless I have appropriate sayings for both the front and the inside. So it drives me crazy that I have almost no belated birthday sentiments…and that’s what drove the concept for these stamps. I’ve been collecting ideas for belated sentiments for quite awhile. I finally decided to send a long list to Taylor that included an outside sentiment, and inside sentiment and ideas for a coordinating cute critters. I was over the moon when she decided to hand these over to our Apple Doodle Ink illustrator and release 7 A La Cartes!!! I may be a tad biased, but I think everyone needs at least a few of these in their stamping arsenal. 😉
I have two cards to share with you today. Both of them feature patterned paper, cardstock and ribbon from the Make a Wish Project Pantry available Friday. My first card features some cute little birdies!
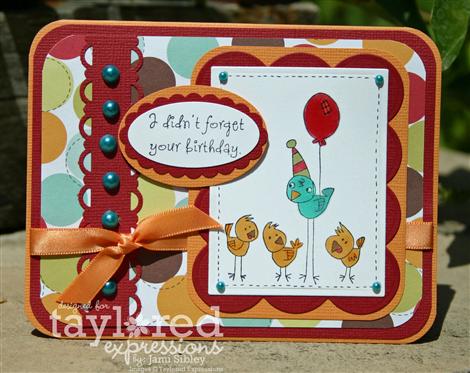
On the front it says “I didn’t forget your birthday”
And on the inside…
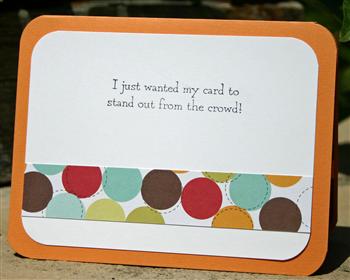
I just wanted my card to stand out from the crowd!
{Oh so TRUE!!}
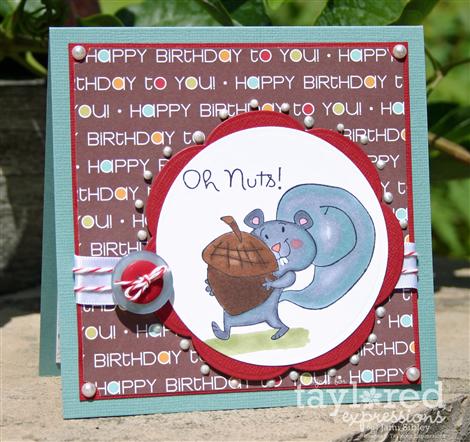
My second card
“Oh Nuts!”
and on the inside…
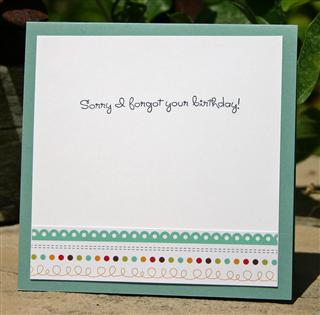
Sorry I forgot your birthday!
I am absolutely dying to see what the Baker’s Dozen has created with these images. Between the entire team you should get a chance to see all of the different Belated Birthday A La Cartes. Let’s go see what they’ve cooked up!
- Charmaine Ikach
- Danielle Lounds
- Jackie Pedro
- Jodi Collins
- Karen Giron
- Karen Motz
- Melissa Sauls
- Regina Mangum
- Sankari Wegman
- Taylor VanBruggen
- Tori Wild
I’d love to hear what you think of these stamps and which of the 7 are your favorites! Please don’t tell me that I’m the only one who can’t get my cards out on time! LOL!
Remember that everything we are peeking this week will be available for purchase at Taylored Expressions on Friday morning at 8:00 am PST. Thanks for stopping by!


