Thanks Treat Bag
September 9th, 2010
Happy Thursday! Looking forward to taking Tessa for a walk at the park this afternoon. She has a *play date* with Molly and Auntie Lisa. *GRIN* It’s been really fun getting her socialized to other dogs. She’s doing so much better now! When we got her last year it seemed as though she had never been around other dogs and had no idea what to do. She would just bark. Now she knows how to say *hello* (according to Cesar Millan that’s the butt-sniff – LOL) and she sometimes even wants to play a bit.
Today I have a fun little project to share with you. Recently there was a publication call for Paper Crafts Stamp It! Magazine that involved choosing one of six techniques. Getting something published in Paper Crafts is on my bucket list, but I had never submitted before. This call seemed like the perfect time to begin trying, so I created three projects and submitted them. None of them got picked up, but I was proud of myself for finally submitting and have decided I will continue to try. This was my favorite of the 3 things I sent in and it was for the paper-piecing category.
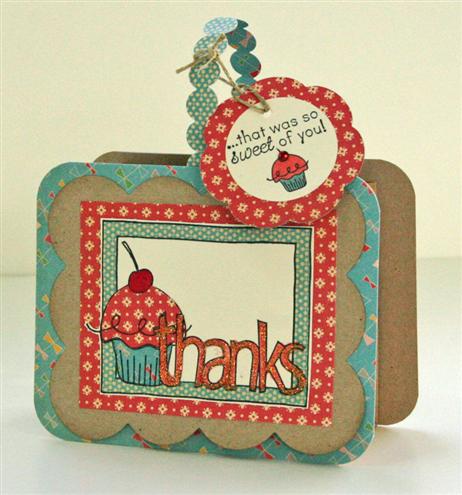
This is a little treat bag featuring the Sweet Occasions stamp set by Taylored Expressions and October Afternoon Fly a Kite papers. I started with a small kraft sack from Michael’s (cut the top off) and panels of kraft cardstock. I covered the panels with patterned paper and rounded the corners with the Corner Chomper. and adhered them to the front and back of the bag with the ends of the handle in between. The handle was created by gluing to pieces of patterned paper together back to back and punching it on both sides with the SU scallop border punch. I thought that was such a cool effect and not even what I had expected.
Next I cut kraft cardstock with the Spellbinders Big Scallop Rectangle die and inked the edges and attached it. The image was stamped on TE Choice Buttercream cardstock and again on 3 different patterned papers so I could paper piece the border, the cupcake liner and the frosting. The word “thanks” was colored with a copic marker and then covered in Fruit Punch Stickles. The cherry was covered in Red Liquid Pearls.
The tag was created with a circle punch and a Blossom Nestabilities and tied onto the handle with some hemp twine. There’s a tiny red KaiserCraft rhinestone on the cherry of the little cupcake.
The paper piecing on this took some time, but the general idea of this would make really cute and easy favors or little thank you gifts if you simply watercolored or colored the images with copics. This stamp set also has similar images that say “congrats”, “friend” and “celebrate, so you could make these for almost any occasion!
Thanks for stopping by. Not only do I have Tessa’s play date scheduled for this afternoon, but I get to have dinner with a dear friend tonight so this should be a really good day! Hope your day is terrific as well!


September 11th, 2010 at 10:42 am
This creation is just so super adorable and creative beyond belief. Honestly – I don’t think I’ve seen a cuter gift bag anywhere!
September 11th, 2010 at 1:53 pm
Well I would have picked it!
This is totally cutealicious, Jami!!
~Tex
September 17th, 2010 at 9:48 pm
How cute is that! Love that idea, and the colors and patterns are so fun. Kind of a vintage fee. TFS
Pam
http://www.1pamperedstamper.blogspot.com
September 19th, 2010 at 11:29 pm
UyaXZz asasjsqbndvy, [url=http://dzqozprtadis.com/]dzqozprtadis[/url], [link=http://fzwcapvnrxcy.com/]fzwcapvnrxcy[/link], http://jhrcldamgfnj.com/