Taylored Expressions Sneak Peeks: Zinnias
April 8th, 2015
Happy Wednesday! I’m so happy to be playing along with the Taylored Expressions sneak peeks for the April release. I truly love working behind the scenes helping to get new products ready for the TE Store and it never ceases to amaze me, when I get the actual stamps and dies and papers in my hot little hands after looking at and discussing digital files months earlier. It’s so exciting! I always have plans and ideas swirling in my head, but I have to admit that I don’t always get them on paper! I’ve been soooooo looking forward to this new set Simply Stamped – Zinnias that I just had to get it inked up. This is a three-step stamp set with coordinating dies! Such pretty flowers and the color combos you can try are almost endless! Here’s my first sample:
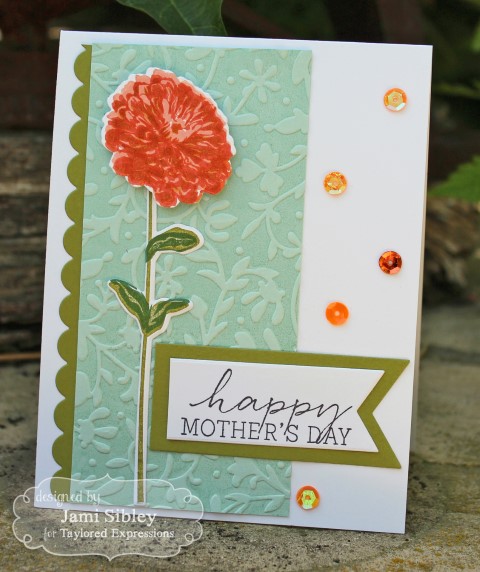
Oh how pretty a simple single stem can be! I used SU inks: Crisp Cantaloupe, Calypso Coral, and Tangerine Tango for the bloom and Old Olive and Garden Green for the stem. The bloom was popped up on foam tape. The background panel is Soft Sky cardstock embossed with the TE Floral Vines embossing folder which had been brayered with Sage ink before being run through the Big Shot. The edging was created with the TE Small Scallop Border die and the sentiment was die cut with Banner Stacklets 1. Just a few sequins finish it off. I’ll have another sample of this set tomorrow, but for now I have something to show you created with an adorable new Petite set called Lovely Landscapes. The original idea for this set came as filler for garden scenes as we began working with the Garden Arbor and Gate dies, but there are so many possibilities with this little set!
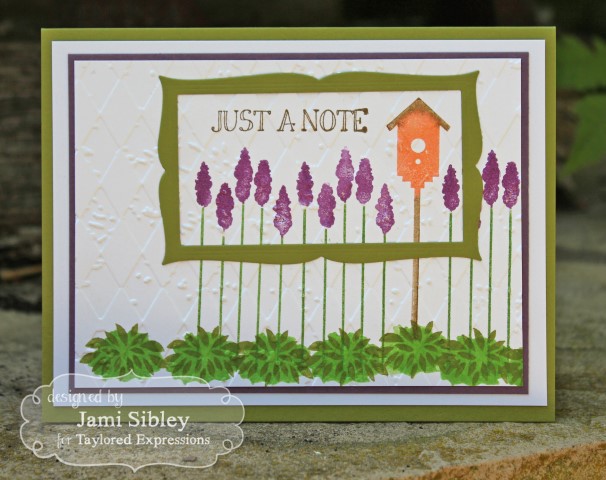
I’ve stamped my little garden scene onto white cardstock and for added interest I embossed the panel with the TE Harlequin Embossing Folder. Can you see the fun texture? Then I framed just a section of my scene with one of the frames from the Frame in Frame Cutting Plate. The sentiment is from Notable Blooms. Lots more ideas for this little Landscape set…just need some more time to play!
Thanks so much for stopping by. Be sure to hop over to the Taylored Expressions Blog to see what the Baker’s Dozen has cooked up for today. I’m sure it’s going to be beautiful!

Rainbow’s End
March 16th, 2015
Happy Monday! Quick post to share some rainbows! I’ve been working on a calendar project for some little gifts (more on that later) and I wanted to use TE Little Bits – Rainbow’s End along with Little Bits – Sun & Clouds on my March pages.
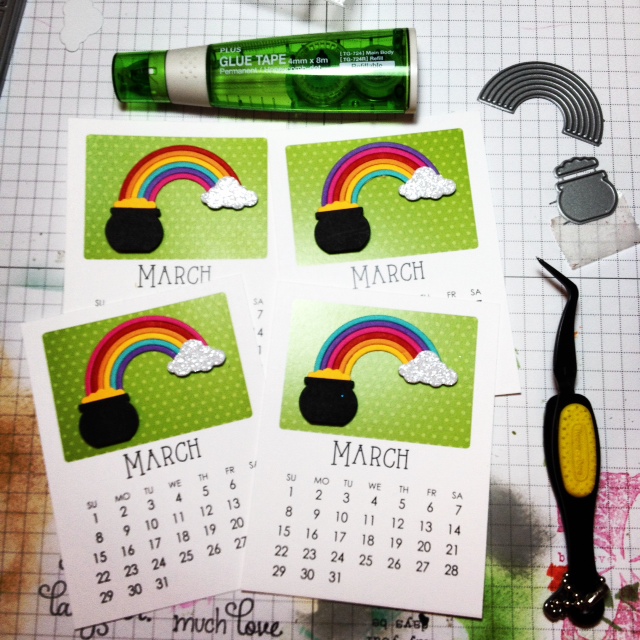
Aren’t they so cute? I have to admit that assembling those rainbows is a little tedious. Since I ended up making 5 of them, I couldn’t let the last one go to waste so I decided I wanted to make a card with it. I saw the Sweet Sunday Sketch Challenge for this week and thought it was perfect! SSSC260:
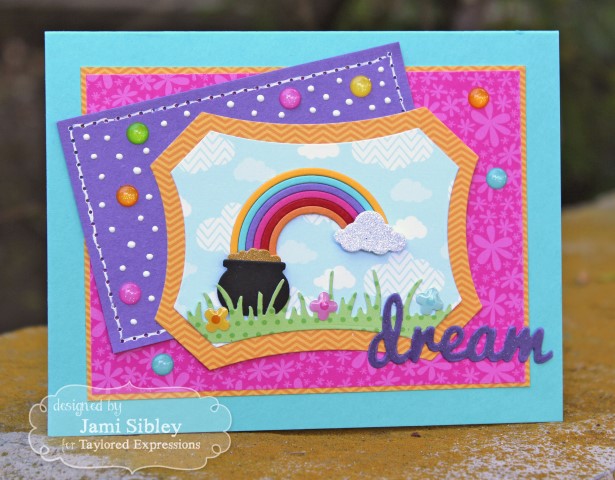
Everything – dies, papers, embellishments came from Taylored Expressions. Can’t remember the last time I used this many bright colors, but I love the way it turned out – so happy! And using sketches is my favorite way to stamp. It’s been too long since I’ve played a sketch challenge. So fun!
Hope you have a great week ahead of you. I’m excited about getting to see a special friend from out of town!
Happy Hump Day! All of the new Taylored Expressions products for the March Release will be available tomorrow morning. In the meantime, we have more Sneak Peeks for you. Today, I’m sharing a sample made with the new stamp and die set If Dogs Could Talk illustrated by Danielle Lounds. I just love the way that girl’s mind works! This stamp set has an adorable pup with a blank face and a bunch of different facial expressions you can add in. (Oh and there’s a cat set too, but y’all know that I’m a totally a “dog person”!)
Our dog, Roger, is quite a “licker”, so the first face I had to use was the tongue sticking out with the sentiment “must.lick.faces.”
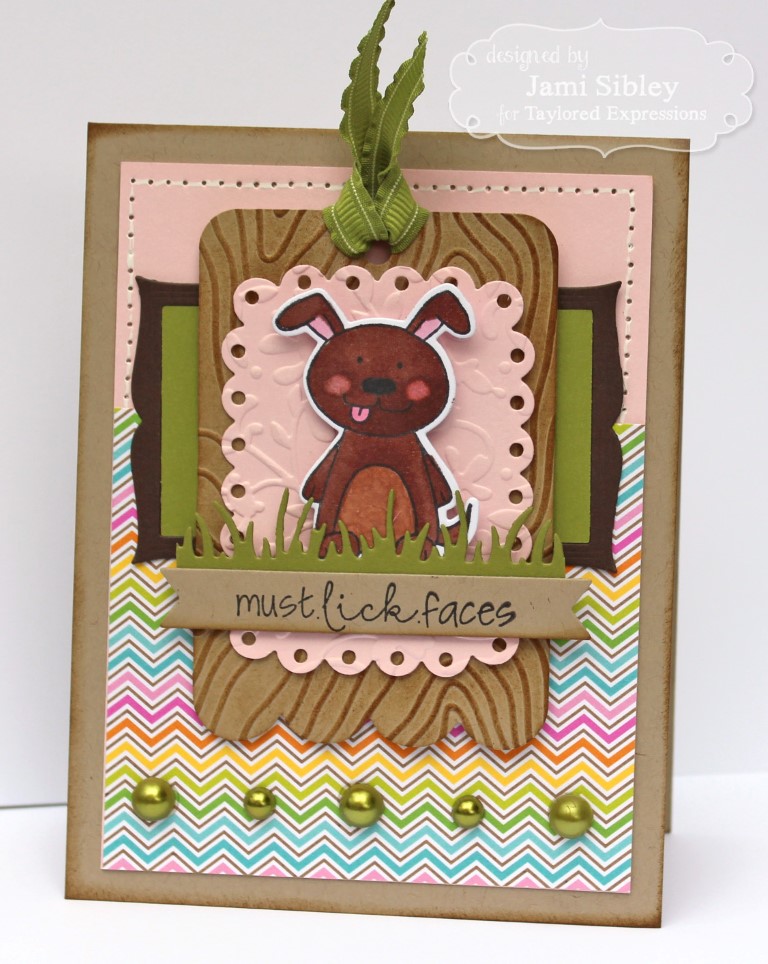
For my layout, I used the Frame in Frame Cutting Plate (horizontal piece) along with Build-a-Tag 3 and the new Wispy Grass Border die. I used two new Embossing Folder on the tag pieces– Woodgrain and Floral Vine. The patterned paper isDoodlebug Hello Sunshine.
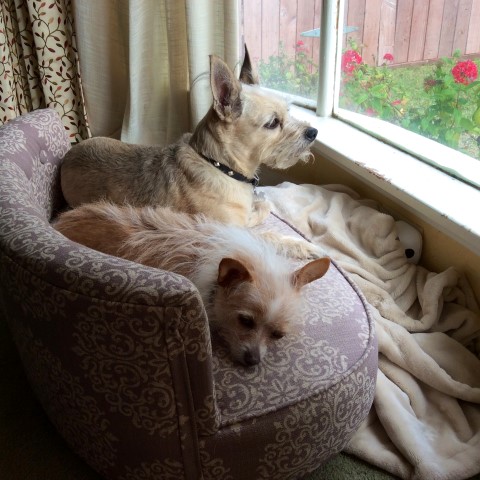
Of course I can’t post a dog card without sharing a photo of my incredible pups! Here they are in a recent shot on their own little sofa looking out our front window. Roger and Tessa. 🙂
Taylored Expressions is celebrating Release Week with some fabulous giveaways! Visit the TE Blog each Sneak Peek Day this week for details on how you can enter to win.
Thanks so much for stopping by today. If you’d like to see more projects and new product information, please head over to the TE Blog for a complete blog roll of our participating designers! I know I always want to see what the Baker’s Dozen has cooked up! It’s sure to be CUTE, CUTE, CUTE today! 😛
Hello Stampy Friends! Long time, no see! I’m so excited to have some creations to share with you this week for the Taylored Expressions March Release. All the new products will be available Thursday morning.
Today we are showcasing some awesome new dies and embossing folders, including Garden Arbor & Gate, Arbor Fence, Arbor Accessories, Wispy Grass Border, Frame in Frame Cutting Plate, Woodgrain Embossing Folder, Floral Vine Embossing Folder. I LOVE creating scenes with stamps and dies – I always have. These new Arbor dies are so much fun to play with! Wanna see?
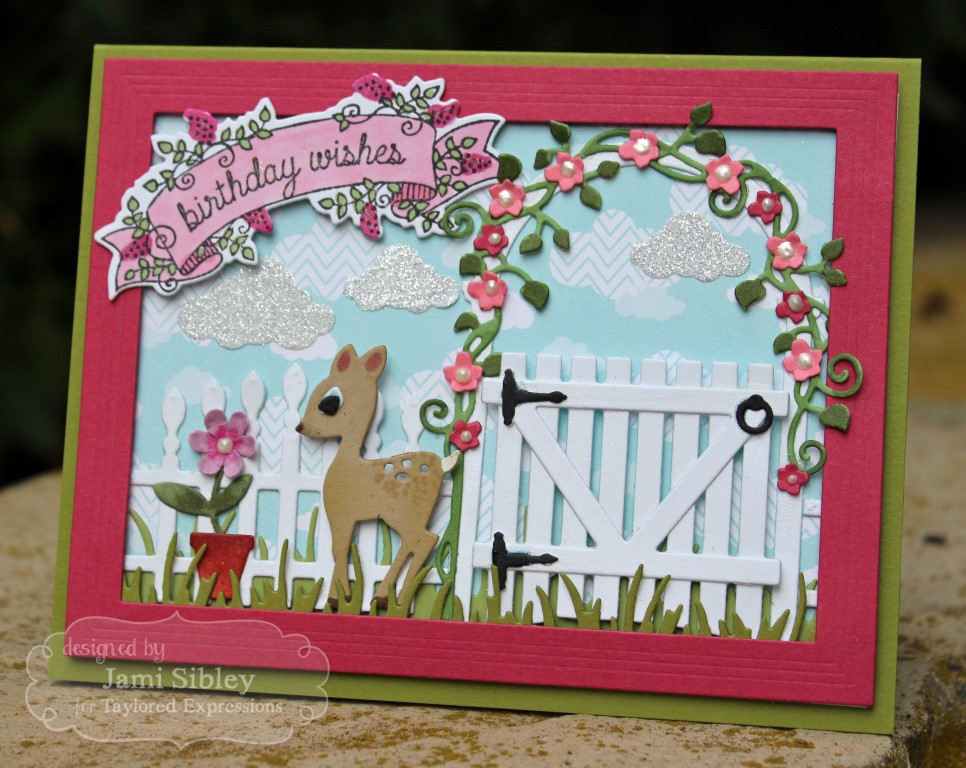 ACK! How fun is that? I die cut the Garden Arbor & Gate and the Arbor Fence from white cardstock and covered them in Crackle Accents. While the Crackle was still wet, I attached the vine (Arbor Accessories). After I die cut the flowers, I used the tip of a dry embossing tool to give them dimension, then I attached them with drops of Crackle and added Liquid Pearl centers. The gate was popped up on foam tape. The Wispy Grass Border was die cute twice and placed both behind and in front of the fence. I added the previously released Little Bits – Fawn and Little Bits – Flowers & Stems, as well as the Little Bits Sun & Clouds (clouds cut from Heidi Swap glitter tape.) The cloud background paper is from the TE 6×6 paper pack – Build a Scene. The red frame was die cut with the new Frame in Frame Cutting Plate which gives you a ton of framing options.
The sentiment from Fancy Banners 1 (introduced yesterday) was a happy afterthought. I actually had stamped another sentiment directly on to to the scene up in that corner and I hated it. Then I looked over at my pile of new stuff and saw this beautiful little set and it rescued me!
I had so much fun with this card, that I couldn’t resist making another one!
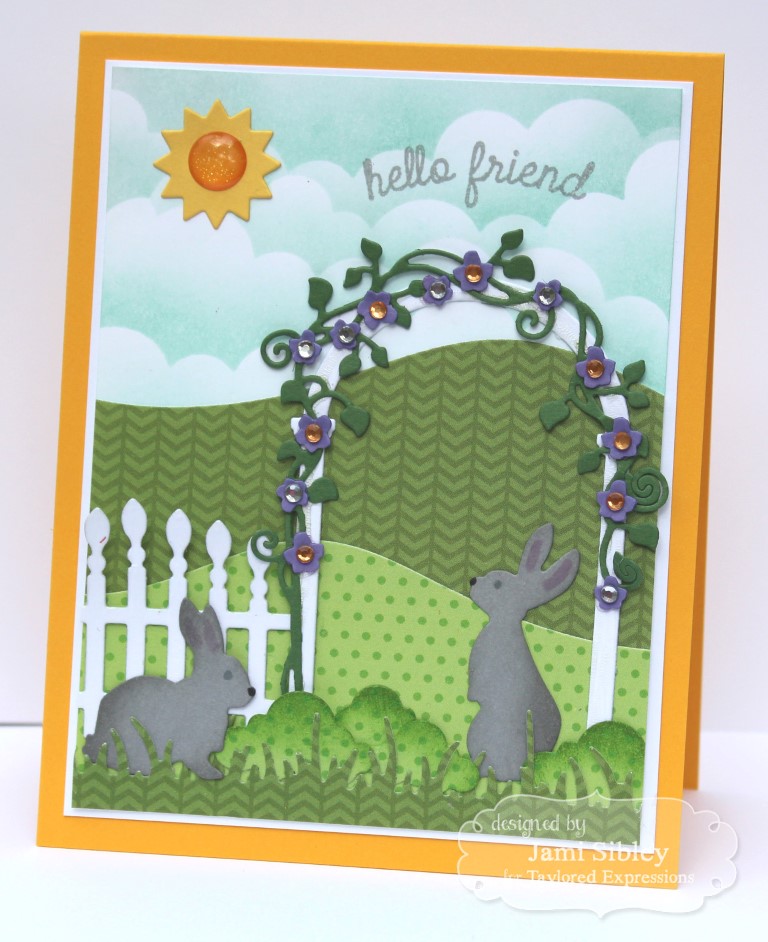
I used many of the same elements as the card above. This time I left off the gate, fo a more simple look and so the rolling hills (Created with Build-a-Scene Rolling Hills Dies) could show through. I added the bunnies from the Hippity Hop die set and the sun from the Little Bits Sun & Clouds. This time my cloudy background was created with sponging and a stencil made with the Cloud Border Die. Keeping this card a little more simple, I used just a sentiment (without the banner) from Fancy Banners 1. The curve seemed just right over the Arbor.
Taylored Expressions is celebrating Release Week with some fabulous giveaways! Visit the TE Blog each Sneak Peek Day this week for details on how you can enter to win.
NOTE: I also used the little clouds from Little Bits Sun & Clouds in a unique way here – I made them into shrubbery. The hills, grass, and clouds were die cute from paper in the TE Build a Scene paper pack. I sponged ink in the clouds and used them to fill in the scene as little bushes.
I just love how this bright, happy card turned out. 🙂
Thanks so much for stopping by today. If you’d like to see more projects and new product information, please head over to the TE Blog for a complete blog roll of our participating designers! I know I always want to see what the Baker’s Dozen has cooked up!
Taylored Expressions November Peeks: Take Your Place Die
November 5th, 2014
Hello friends! How can it possibly be November already? As we were working in the church office yesterday, one of the girls commented that there are only 8 Sundays left in the year! WHAT? Wow! Well, today I’m happy to play along with the Taylored Expressions Sneak Peeks for the November release. All the new products will be available tomorrow morning, November 6th, at Taylored Expressions.
A couple of weeks ago, I hosted a baby shower for my niece who is expecting her first baby. Her nursery will be decorated with woodland animals, so that’s the theme I used for the shower. Everything was soooo cute! I’ll be back in the next day or two with lots of photos, but for today I’m going to focus on the food labels I created with the new Take Your Place and Napkin Ring Dies. These two coordinating dies hold a plethora of possibilities! That being said, I created my labels the night before the shower, in exhaustion mode, so I kept them super simple. I lterally created 16 of these in about half an hour! I absolutely love tools that help me create special touches in very little time!
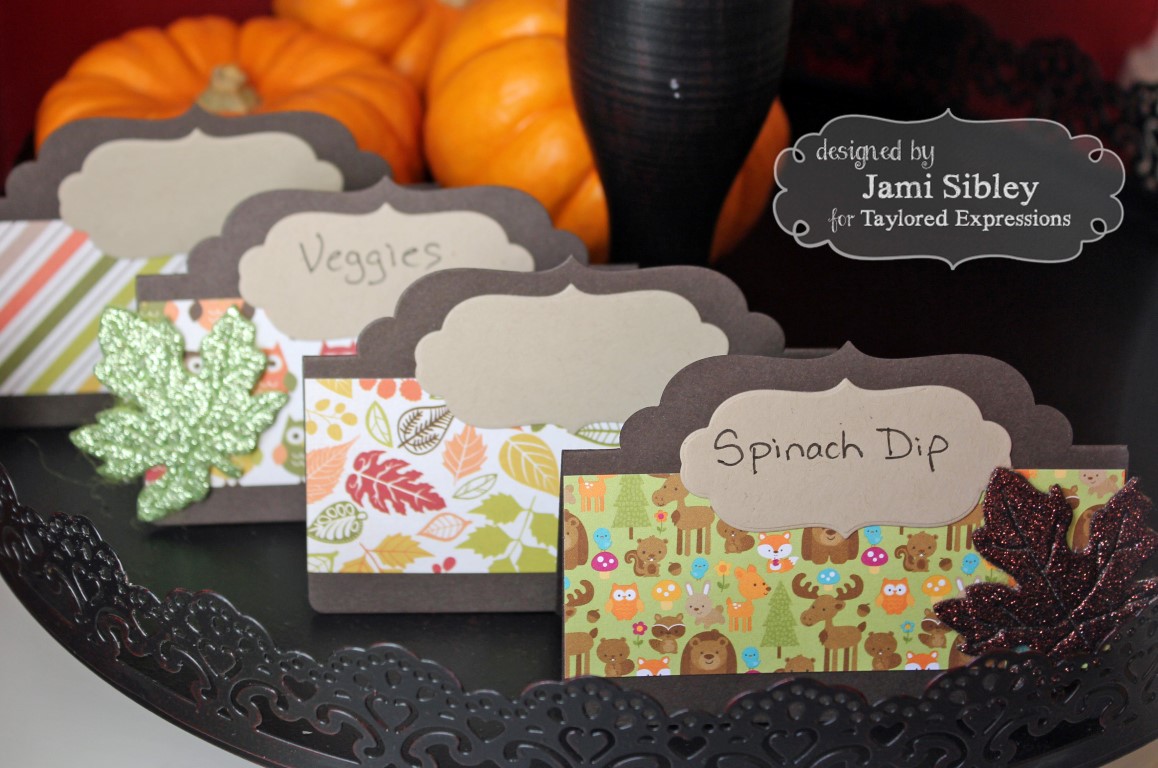
See that cute frame shape at the top? That is integrated in to the die, so you just die cut and fold and that pretty shape pops out! Cool, huh? The smaller layered shape is a piece from the Napkin Ring Die. I used Doodlebug Happy Camper 6×6 and Carta Bella A Perfect Autumn 6×6 patterned papers along with dark brown and kraft cardstock to create this cute little labels for the buffet table. The glittery leaves are stickers I had picked up when gathering decorations for the shower and some of them were scattered on the table as well.
The Take Your Place Die and Napkin Ring Die work equally well to create place cards, escort cards, buffet labels or even cello bag toppers and napkin rings. I’m sure you’ll come up with even more projects. There’s also a new stamp set called Set the Season that coordinates and allows you to stamp an image along the bottom. There are a ton of great things in the release tomorrow and this was one of my absolute must-have’s! I know I’m going to be using these dies for years to come!

![]() Taylored Expressions is celebrating Release Week with some fabulous giveaways! Visit the TE Blog each Sneak Peek Day this week for details on how you can enter to win.
Taylored Expressions is celebrating Release Week with some fabulous giveaways! Visit the TE Blog each Sneak Peek Day this week for details on how you can enter to win.
Thanks so much for stopping by today. If you’d like to see more projects and new product information, please head over to the TE Blog for a complete blog roll of our participating designers! I know I always want to see what the Baker’s Dozen has cooked up!
Taylored Expressions October Release
October 2nd, 2014
Happy Thursday and Happy Release Day! The Christmas Release is always my favorite TE release of the year and there is soooo much to love all available today at Taylored Expressions! I’m happy to get to play along with design team today and have 2 super simple cards to share.
First up features the new stamp set Shiny & Bright along with coordinating dies. It just doesn’t get simpler than this.
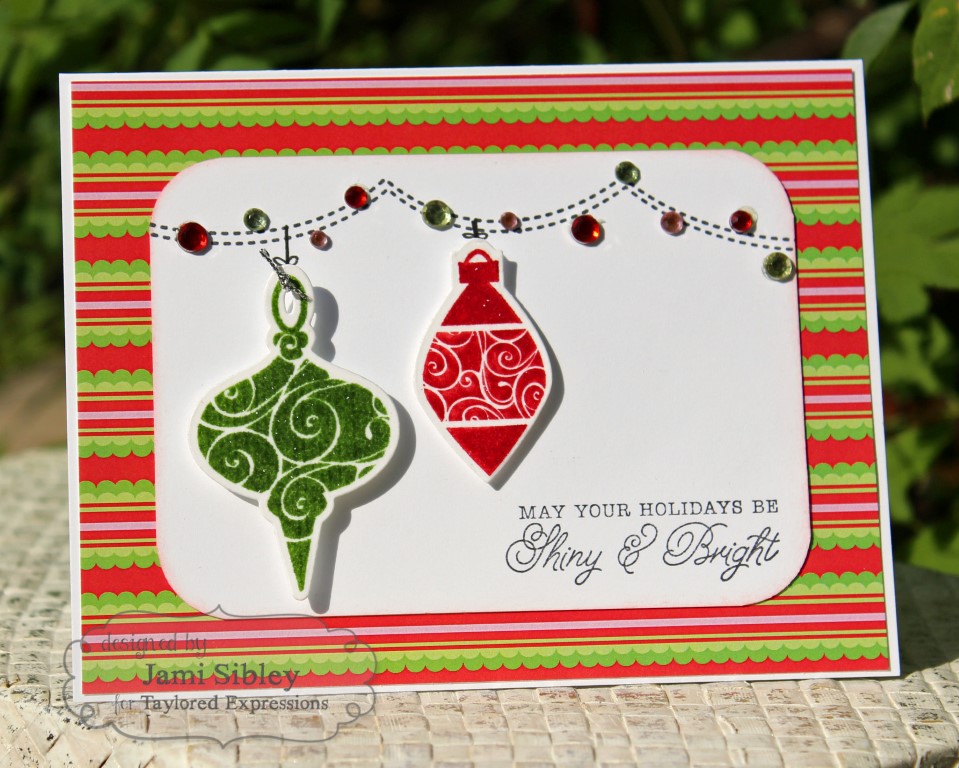
Ornaments were stamped with SU inks (Gumball Green and Real Red) and die cut. Then I covered them with Versamark and heat embossed with clear powder. They were popped up on foam tape. The little garland they are hanging from is a stamp image from the new set Share the Light. I just sparkled it up with some rhinestones. The paper is from the new TE Gingerbread Lane 6×6 Paper Pack.
Recipe for Simple Ornaments –
Stamps: Share the Light, Shiny and Bright
Paper: TE Gingerbread Lane
Other – Shiny & Bright Dies, Kaisercraft rhinestones, corner chomper
This card was so quick and simple that I wanted to make another with the same layout, only vertical. This time I chose an image from Deck the Halls. I’ve always had a soft spot for penguins!
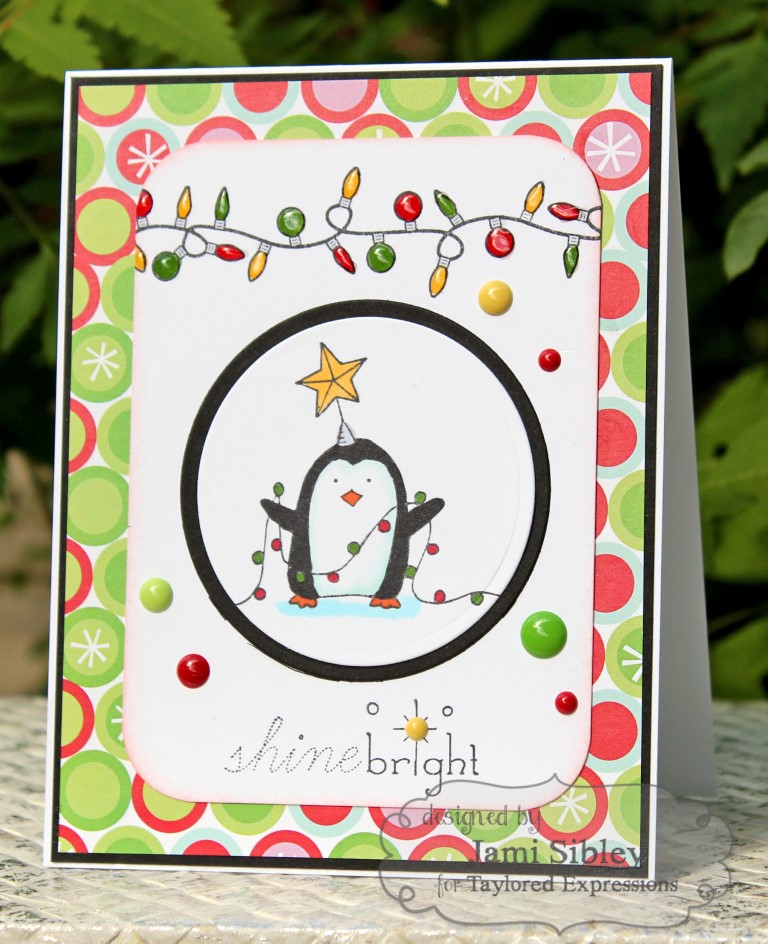
Once again I used the the Gingerbread Lane 6×6 Paper Pack and the string of lights is from Share the Light. I added some glossy accents to the bulbs after I colored them with Copics. I seriously adore this paper collection – such fun bright colors and Taylor made sure the patterns mix and match so perfectly!
Recipe for Shine Bright –
Stamps: Deck the Halls. Share the Light
Paper: TE Gingerbread Lane, plus black cardstock
Other: Spellbinder circle dies, copics, Doodlebug Sprinkles, Glossy Accents, corner chomper
There are so many awesome new stamps and dies, not to mention this yummy new paper! I wish I had more time to play. I hope you are able to treat yourself to something special from TE today! Thanks so much for stopping by!
If you’d like to see more projects and new product information, please head over to the TE Blog for a complete blog roll of our participating designers! I know there’s lots and lots of eye candy!
Taylored Expressions September Release Day and 6th Birthday Bash!
September 11th, 2014
It’s Release Day at Taylored Expressions and it’s our 6th Birthday too! I hope you’ve been enjoying the celebration this week. There’s still time to play in the Challenge and of course, now it’s time to shop! Remember that there is a FREE stamp set with matching die {Think Happy Thoughts} that will come with your purchase of $50 or more.
Today I have several samples to show you featuring the Spooky Tree Cutting Plate. As I mentioned yesterday, I’m not really into Halloween, so my first response when Taylored showed me this cutting plate was “Meh, it’s ok.” (Now, I will say that all the samples the team has made makes me see the spooky fun in the original idea!) But as I thought more about this plate, I began to think about my most favorite and beloved Shade Tree Cutting Plate and I thought of all the possibilities a simple tree image presents. I knew I needed this cutting plate! And here’s why:

Green trees with a summer sunset. I spritzed the trees with a pearly spray that looks super cool in person (but of course does not show in a photo!) and sponged the background with several colors of ink. I used the Build a Scene Rolling Hill dies to create the rosy red hill. Sentiment is from Many Minis – Occasions die cut with Designer Mini Tags.

Kraft trees for fall. This time I brayered the background with a K-pad and added a sun, birdhouse and sign (Birchtree Accessories), along with grass from the grass border die. On this card I spritzed the pearl spray over the sponged background. Just no way to show it in a picture!
White trees for winter with a blue sponged background and some red birds ( Birds and Branch, Birch Tree Accessories ). Once again I used the Designer Mini Tag dies and this time Many Minis – Holidays for the sentiment. Seriously if you don’t have those two Many Minis sentiment sets, you really need them!
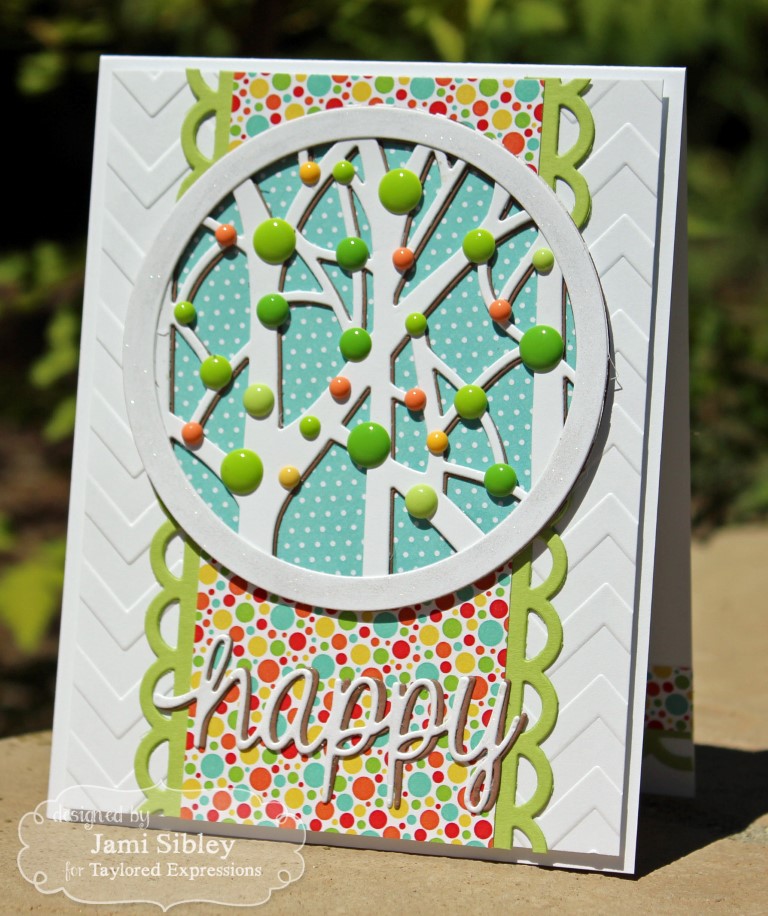
More white trees, but this time for spring. This card was totally inspired by a card created and given to me by my sweet friend Cindy Lawrence. For this look, after using the cutting plate on white cardstock, I die cut just a portion of it with a Spellbinders circle die. Then I created a separate frame piece with that same circle die plus another slightly smaller circle die. You might notice a slight brown shadow. That’s because I first tried this with brown cardstock, but didn’t care for it. I already had my pieces glued together including the background paper from the Double the Fun Paper Pack. I was not about waste that paper, so I just glued the white right over the op of the brown and I did it just slightly off so that the brown would look like a shadow. Then I adhered a bunch of Doodlebug Sprinkles for a touch of fun. The background was created with the Zig Zag Embossing Folder. The die cut “happy” was created with the die from the new FREE set Think Happy Thoughts. I decided not to finish off the inside for now, because there are just so many possibilities with this cute little set. I’ll just wait till I actually need the card!
I hope my samples today have given you just a little taste of the many many things you can create with the Spooky Trees Cutting Plate. And don’t get hung up on that name – it doesn’t need to be spooky at all!
The Baker’s Dozen has cooked up tons of awesome samples today. To get the blog roll and get hoppin’ head on over to the TE Blog. Thanks for stopping by!


