Pumpkin Candle Set
September 9th, 2008
Do you ever just take a half hour or an hour to walk around Michael’s to see if anything *grabs* you? I hadn’t done that in a really long time until a couple of weeks ago. I think I actually I ran over there looking for something in particular, but then I decided to really look around on aisles I usually skip to see if anything would spark creative project ideas. In reality I need more alterables like I need another hole in my head, but sometimes something new will really spark an idea.
I did pick up a few random things and hopefully I will actually USE them! LOL! One of the things I was intrigued with were these little jar candles for $1 each. I resisted the urge to get a bunch and just picked up one in a yummy pumpkin scent. Pumpkin is one of my very favorite candle scents…along with really good vanilla – the spicy, not-too-sweet variety.
Even while I was in the store I was picturing this little jar decorated with Hallowen images from Anna’s Whipper Snapper sets Hocus Pocus and Spooky Expressions. I finally had time last night to sit down and play with my idea. Here’s what I came up with –
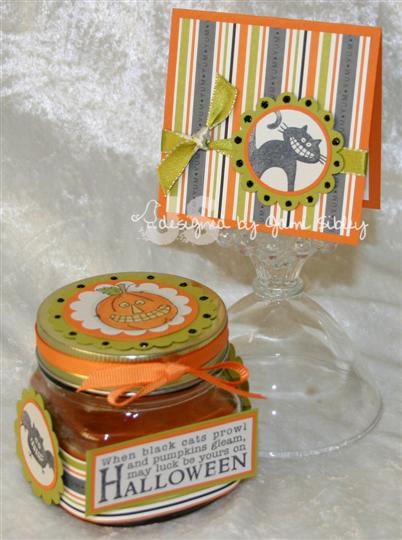
I started by wrapping a left over piece of SU dp from the Ghostly Greetings pack around the jar. I had been doing some class prep for my SU class coming up on Friday and I had some 1″ strips of dp – worked perfectly. Next I stamped the images in Brilliance black ink onto a shimmery pearly white paper called Virtual Pearl Pearlescent from the Paper Palette. It has amazing shimmer and an almost silver cast to it.
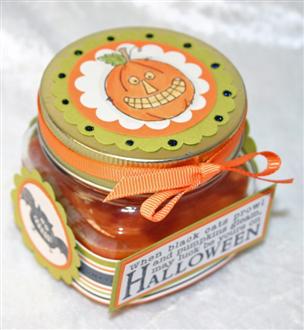
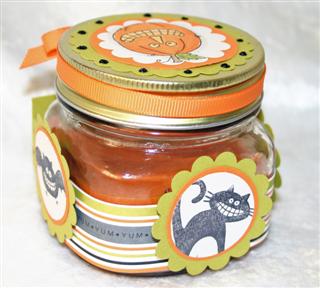
The jack-o-lantern image was colored with Copic markers. Everything was punched out and layered onto Pumpkin Pie and then Kiwi Kiss cardstock. The images were then attached to the sides of the jar with pop-up glue dots and onto the top of the jar with Tombow Multi. Black Diamond Stickles were added along with some Pumpkin Pie grosgrain ribbon for a super simple and quick project.
Here are some close ups of the candle.
And of course I had to make a little card to match. The card is 3.25 x 3.25. Why? Because I happen to have a piece of cardstock that was 3.25 wide, so why not just use it? I love using left over pieces and letting what I have dictate the direction of a project.
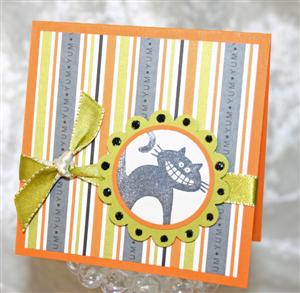 Easy peasy card just using the same elements as the jar, except the ribbon. This was my first time using my new SU double-sided satin ribbon – Kiwi Kiss/Very Vanilla. Oh my! Is it ever yummy! So thick and soft and shiny. Seriously – WOW!
Now that I have actually done something with this candle I just may have to go back to Michael’s for some more. At $1 each they would make great party favors or little thank you’s. I think I’d like to do some up with a Christmas theme. If you’re looking for them, they were on the regular candle aisle at my Michael’s – not with the $1 bin stuff.
Thanks for stopping by. I’m off to work. Hope you have a great day!

Copic Matches to SU
September 2nd, 2008
Quite some time ago my friend Leann and I sat down with Stampin’ Up! cardstock, a full chart of colored Copic swatches (thanks to Joy) and a couple of OTT Lites. That night we came up with a list of what we felt were the best matches of Copic markers to SU cardstocks. We used cardstock rather than ink or markers because we felt it was most likely we would color images and want to layer with cardstock or SU dp and not as likely we would actually have something stamped in SU ink that needed to be matched. Ever since we came up with these matches almost a year ago, I’ve wanted to make a chart where I could color in a box and attach a small piece of cardstock. I finally got my chart made and I want to share it with you. You’ll need to print it out on the cardstock you most often use for coloring with your Copics. It’s 5 pages. In the box next to the SU color name you can attach a little piece of that color of cardstock. Then in the next box you can color in with the Copic when you get it. I hope you find it helpful.
copic-matches-to-su-cardstock-by-jami-leann.pdf
If you’d like to share this chart I ask that you please direct people to this post on my blog and not post the chart itself on your blog, in any forum, or anywhere else without my express permission. If you find it helpful please leave me a comment and let me know! 🙂
I just have to share something fun with y’all. Look what came in my 3rd shipment of Nutrisystems food on Friday.
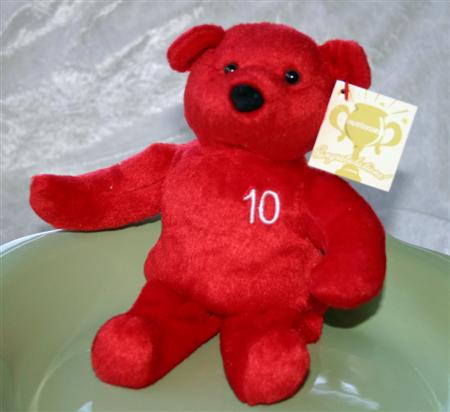
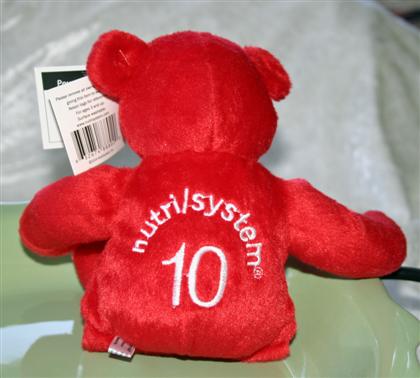
Curt had told me that if I would log my weight loss on the NS website they would send me a bear for every 10 pounds, but I never really looked to see what he was talking about. I kept thinking it would probably be some dumb sticker or picture of a bear, but no…this cute little guy came in my order! I know it’s silly, but I was totally EXCITED!!! His name is Pound!
Thanks for stopping by. Be sure to come by tomorrow for some excitement you don’t want to miss (or at least I don’t want you to miss – LOL)!
Birthday Ensemble
January 19th, 2008
Happy Saturday! I hope you’re having a great weekend and have plenty of time to stamp. 🙂 It’s my turn to host a Challenge for the eclectic Paperie Birthday Party. Every birthday needs a card and a gift so my challenge is for you to make a Birthday Ensemble – a birthday card and matching tin, box, bag or other container to either be the gift or hold the gift.
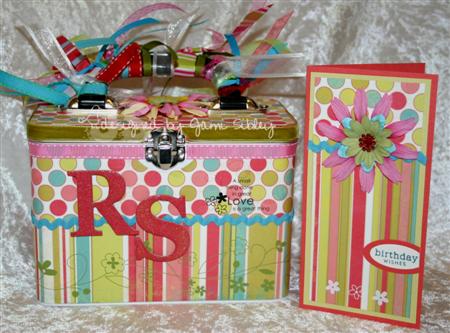
I covered a ProvoCraft lunch tin with My Mind’s Eye Confetti Party designer papers and it’s filled with cards for all occassions for my friend’s birthday. Maya Road chipboard letters were “painted” with Versamagic Dew Drop Chalk ink in Red Magic and embossed with Irridescent Ice embossing powder. (Holy Cow! All three of those things I just linked are ALL on sale!) The sentiment in black (“A small thing done in great Love is a great thing”) and the olive vine at the bottom are from the upcoming SU Sale-a-bration rub-on set called Love & Happiness. White flowers from the same rub on set are used at the bottom of the card. They went on so easily and it is so cool having them in four colors in the one package!
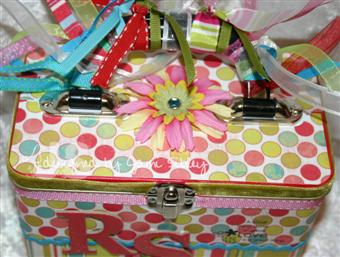
Before covering the top of the tin I went around the edge with a red Copic marker. The lid was then covered with two pieces of paper and a stack of Primas was used to cover the seam.
The card is a mini tall card 6.5″ x 3.25″ to fit in a SU small open ended envie. Cardstock used is Prism Blush Red Medium and Frosted Kiwi. Sentiment is from Paper Trey. I’m really excited about this bright and happy set. I’m going to need more of this paper – it’s so FUN!
Talk about FUN…check this out…
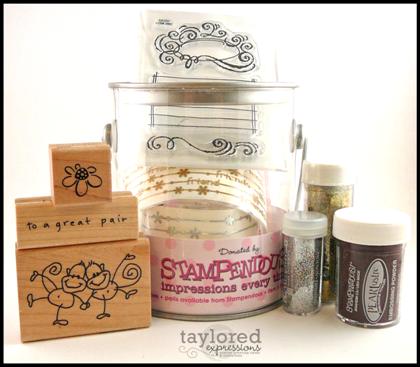
You can win a Stampendous prize pail similar to this one (exact contents will vary) just by playing my challenge! How cool is that? Check out all the deets here (ETA: I have the link in now – sorry for the delay) and upload your photo here with keyword EPBE2008by 4pm Pacific on Sunday January 20th. Joy and Daisy will be drawing a winner from all participants of my challenge and you can enter as many times as you like – each project pair will count as one entry. Of course you are also welcome to upload your project to your blog or SCS gallery and we’d love for you to help spread the word and invite your friends to play along as well. In order to be entered into the drawing you must upload to the eP gallery (you have to be logged in – ask me how I know – D’oh!) and you must post a message in the eP Forum on the thread I linked above. Winner will be announced on that thread. Taylor’s challenge is also open through Sunday afternoon and there will be a separate winner drawn for that as well.
Also don’t forget that eP is sending a party favor of Primas out with every order placed this weekend. And also this weekend lots of papers are on sale – here’s the info from the newsletter
- 40% Off – We will be discontinuing carrying these papers. Final Quantities.
- Daisy D’s Designs
- S.E.I.
- Tinkering Ink
- Papar Salon
- Love, Elsie by K.I. Memories
- Scenic Route
- K & Company
- Basic Grey (Figgy Pudding, Fruitcake, Obscure, Recess, Scarlet’s Letter, Lilly Kate Romani, Periphery)
- Chatterbox
- 20% Off
- Crate Paper
- Cosmo Cricket
- Fancy Pants
- Basic Grey(Stella Ruby, Perhaps, Phoebe)
- My Mind’s Eye
Please note: Quantities are limited and while supplies last. No rainchecks or backorders will be offered. Sale prices apply only to selected items. This offer does not apply to previous orders. Discounted prices are already reflected in the price of the items. No coupon is needed.
Happy Shopping and I hope you will have fun with both challenges. And be sure to check back here tomorrow morning for another Dirty Dozen Alumni project.
Oh and while we’re on the subject of birthdays I want to shout out a big ol’ Happy Birthday to my friend Amy (Propecia on SCS). Hope you’re having an awesome day Pro!!!!
Dashing Class Time
November 9th, 2007
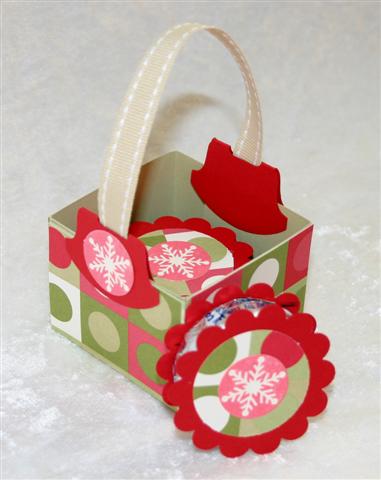
The time has finally come for my Dashing Christmas Class. The first session is tonight at 7:00 and the second session is tomorrow at 2:00. We’ll be making the gift bags and one of the cards I shared previously, plus this adorable little Cami Basket filled with Peppermint Patties.

My fabulous friend Cami demo’d these at Portland Regionals. What a fun, quick and cute project. You can view full instructions on Cami’s blog here. This basket is quite tiny in IRL and yet so many possibilties!
Our last – and most involved project – is this file folder album.

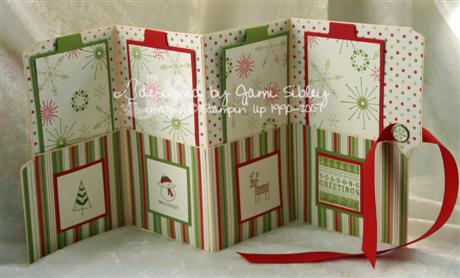
This is just a manilla file folder folded up and decorated. This idea came from another talented friend – Taylor. It’s good to have friends! *grin* You can view directions on her blog here. The folding seems a little tricky at first, but it’s pretty easy once you realize that the front does not match up exactly. I used the slit punch to create a place for the ribbon to slide through and then added a Build-a-brad. The tags inside are stamped with Snow Burst and can be decorated with photos and journaling as a special memory mini scrapbook. I also used Block Party (front and inside right) and Merry & Bright (inside).
A big thank you to friends Jen and Leann who helped me cut and prep yesterday. This class has taken A LOT more prep time than I anticipated and I could not have done it without them! Off now to finish up. Thanks for stopping by and have a great weekend!
Amethyst Gift Set
November 8th, 2007
Not only are PJs the perfect stamping attire, but they can also provide creative inspiration! I bought a set of soft yummy Karen Neuburger PJs as a birthday gift for my friend Brenda. But Brenda also loves (and actually uses) cards I give her, so I wanted to make a set of coordinating cards to match the PJ’s.
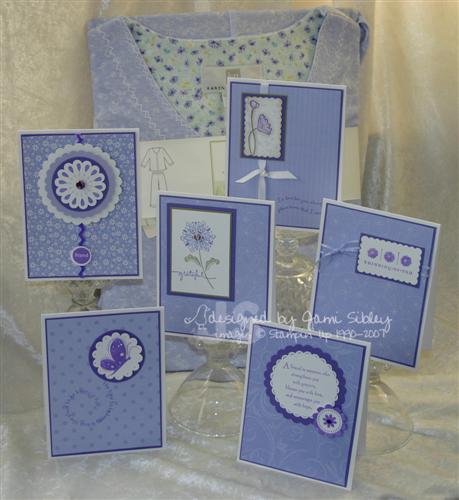
The PJs are in the background of the photo and they are an Almost Amethyst and white soft print so I decided to make my note cards with Paper Trey white cardstock for the base and use SU Designer Prints in Almost Amethyst on each card. While I love SU Whisper White for stamping, it is just not heavy enough to use for a card base, but the Paper Trey is the perfect weight for that. I used Lovely Lilac for my accent color. As you can see this is a very simple set and I think I did all six cards in about 2 hours.
I’ve been on a roll making *simple* cards lately and to be perfectly honest it’s scaring me a bit! Ummm hello? I’m the More is More Girl! I’m hoping this is just a phase ’cause change scares me!
I packaged the note cards along with envelopes in a plastic box that one of my Paper Trey stamp sets came in (recycling – yea me!) and added a belly band to the side.
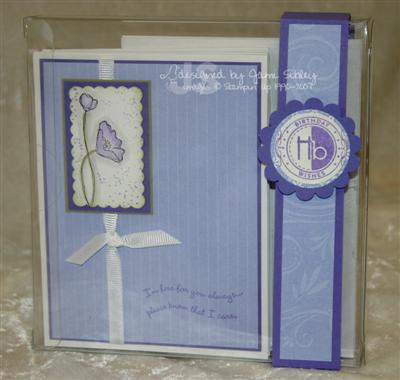
I think this makes for a lovely professional looking presentation. I can hardly wait to give this to her…especially since I’m late with it already! *sigh*
HEY – here’s a fun little challenge for you – PJ INSPIRATION! Make a card or project inspired by some PJ’s. Photograph the card with the PJ’s in the background and upload to your blog and/or SCS gallery with the Keyword JPJ1107 (Jami PJ 11/07) and come back here and post a link in the comments section. I’d love to see what you come up with!
My Pampered Chef party was a huge success and way more fun than I had even anticipated! Thanks to everyone who placed an order. We’ll be closing the party tomorrow. If anyone in SoCal is interested in hosting a party and earning lots of free product let me know and I’ll put you in touch with Darla. 🙂
My Dashing Christmas Class is tomorrow night and again Saturday afternoon. Lots of prep to do – I’d better get to it. Thanks for stopping by.
Paint Can Saga
April 15th, 2007
What a lovely Sunday! Today I got to do one of my favorite things – spend the afternoon in a Tea Room with friends. There is nothing better than a beautiful Tea – scones, tea sandwiches, chocolate and a variety of teas enjoyed over the course of a couple of hours or more. Bliss! The occassion for Tea today was to celebrate all the birthdays in my prayer group PACT. We each buy a gift for one other person in the group. I wrapped my gift in a large clear paint can by Stampendous from eclectic Paperie.
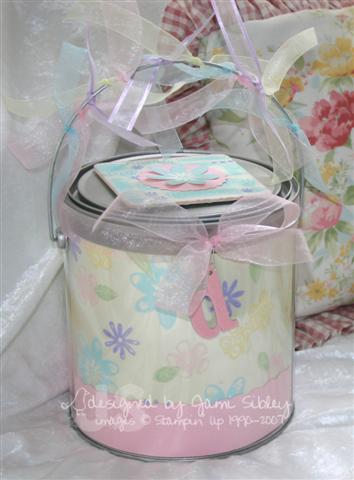 I hesitate to tell the story of decorating this because it is truly so goofy I’m not sure you will believe it. I wasn’t feeling well and it was geting late last night and this needed to be done. I had a vague notion of what I wanted, but no idea how to acheive it and almost no time to experiment. I remembered seeing a paint can Taylor had done for Easter and she stamped right on the clear acetate of the can itself. I wanted that look but was way too chicken to try that. Ahhhh I’ll stamp on acetate sheets and just place them inside. So I started stamping with Versamagic Chalk inks having absolutley no idea if they would dry on acetate. *insert eye roll* When I finished the stamping, I liked the pattern I had acheived but I had no time to see if the ink would dry. Hmmmm….I’ll just cover it with another sheet of acetate. How will I attach it? No time to think – just use some Scotch Tacky adhesive. I wanted a cream/ivory background so the stamping would show up more…hey..how about that Prismatics cardstock by Prism Papers? I cut some of that in Butter Cream, but it wouldn’t sit in the can nicely behind the acetate. Sooooo I glued the acetate right to it. Did I mention that I was not feeling well? Due to some measuring miscalculations there was a weird bottom edge – OK – cover that with some Frosted Pink Prism Paper cut with some decorative scissors. At this point you may be wondering why I didn’t just stamp directly on the Butter Cream cardstock, however I have convinced myself that that would have looked all together different.
On to the lid. I had nothing that would cut a circle that big, so I used the old-fashioned trace and cut and cut some more and ended up with a pretty sad looking circle. I stamped the circle with the flower image from The World Over (SU) and proceeded to color it with Prisma pencils and stuck it on with Sticky Strip. Still not feeling well by the way. Covered the ugly edges by easing around some cute pink felt ric rac. But what’s that you say? You don’t see that in the picture? Perhaps that’s because I stuck it to the WRONG SIDE of the lid!!! No kidding!
At this point I am tired and frustrated and still not feeling well. Ok let me leave the lid alone for a minute and work on a tag of some sort. Hmmm….how about a coaster tag. I took some of the Butter Cream cardstock and ran it through the Cuttlebug with the Happy Birthday embossing folder and sponged it with some of the Versmagic ink and attached to both sides of a coaster. Punched a scallop cirlce out of the pink and stamped and cut out a flower. The intention was to hang this from the can somehow, but I was compeletely out of umph. I decided to leave it til morning (which is really funny since I’m NOT a morning person and knew I had very limited time this morning).
Sunday dawns. Stick the “tag” to the lid, add some ribbons and a Lil Davis pink chipboard letter and call it good. Oh my heavens! Not exactly what I had in mind, but at the rate I stamp what I had in mind would have taken me a week! Of course my friend thought it was cute (including that I decorated inside the lid! LOL!) and I just acted like I whipped it up no big deal! A better woman would have put it aside to start over on another time and just used a gift bag today, but not me – I’m way too stubborn for that! *grin*
Basic Grey Blocks
February 26th, 2007
I got the idea for this fun simple project from the February 07 issue of Sunset Magazine. Sunset is a regional magazine about Living in the West. It has great travel, decorating, gardening and food articles…and apparantly the occassional craft! If you live in the Western United Sates you NEED this magazine! As soon as I saw the picture in Sunset I asked my sweet hubby if he would cut me some wood blocks. He ran right over to Home Depot and picked up a piece of 4×4 – which interestingly enough is 3.25″ x 3.25″, but it’s called a 4×4. I guess that’s not so different from 12×12 paper often actually being 11 7/8″x 11 7/8″, huh?
We fiddled with the heights and came up with 2.5″, 3.25″, and 4.5″. I proceeded slightly differently than the magazine directed. They suggested wrapping one piece of paper all the way around the block, but I was afraid it would get funky at the corners. I opted to start by painting all the edges with 2 colors of brown acrylic paint (you know the little bottles that go on sale at Michael’s 2/$1.00) and then with a touch of aqua acrylic paint.
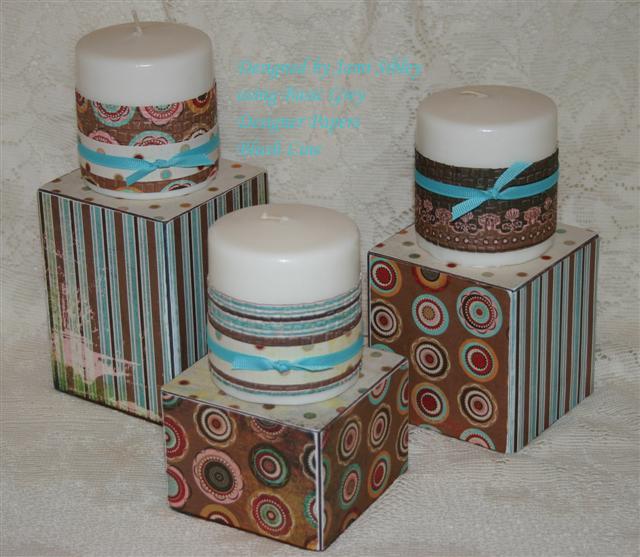 Then I cut pieces of Basic Grey Blush for all 4 sides and the top of each block. Each one is the same with the stripe on 2 adjacent sides and then the circles on the other sides and the polka dots on top. (This way the blocks can be displayed a number of different ways – all the same or showing different patterns as in this photo.) I adhered with Plaid Royal Coat Decoupage Finish. It is basically the same as Mod Podge but I find MP often has a tacky feel when used as a top coat – even when fully dry. I don’t get the tackiness with Royal Coat. After they were compelety dry I used a fine grit sand paper to sand all the edges. I had intended to apply more RC as a top coat, but liked the look and feel of the bare paper so I stopped at that. Of course a top coat would make them more durable.
The candles are from Big Lots and come in a 2 pack for $2. I cut strips of BG Blush 1.75″ and ran them through my Cuttlebug with the Tiny Mosaic A2 folder – hard to see in the photo, but gives a really nice texture. Then wrapped a smaller piece of the polka dot Blush pattern and finished with some Caribbean grosgrain ribbon from Fabric Barn.
I am so in love with Basic Grey papers right now even though I feel like I have been cheating on my big background stamps. LOL! I can’t wait to get the Phoebe, Perhaps, and Stella Ruby lines today. I am so excited for my friend Joy and her wonderful business partner Daisy with the opening of their on-line store electic Paperie! Check it out! They have some amazing stuff already including lots of Basic Grey, Crate, and Cosmo Cricket and are getting new stuff in almost every week right now. You definitely have to check out their alterables section. I got to see the Bare Elements stuff in person at CHA and it ROCKS!
I hope some of you will try this candle block project. If you do, please let me know so I can see what you’ve done. I think it could be great for just about any seasonal decoration and definitely easy enough for the kids to do with you as well. If I planned to burn these candles I would just burn down a bit and scoop out a small hole so that a tealight would fit on top. That way it’s safer and the tealight can be replaced.
Thanks for visiting my blog today. I’m just getting started and would love for you to leave me a comment! Happy Monday. 🙂
Pages

The Fine Print


Past Design Teams


To subscribe to More Is More and recieve an e-mail each time there is an update please click the icon below.


Categories
- Announcements
- Candy Alert!
- CHA 08
- CHA 09
- CHA 2010
- CHA 2011
- Challenges
- Christmas
- Classes
- DDA
- Decor
- Divine Design
- Double Take
- DTGD
- Family
- Flourishes
- Friendship
- FSFF
- Gifts
- Home Improvement
- Inpiration Emporium
- Just a Blog Hop
- MFT
- Organization
- Our Craft Lounge
- Papercrafting
- Projects
- Random Musings
- Roger
- SFYTT
- Share Joy Campiagn
- Shopping
- SSSC
- Stamped Stuff
- Stampin' Up!
- Storage
- Strictly Stampin' Up!
- Swaps
- Tag
- Taylor's Cupcake Challenges
- Taylored Expressions
- TE Baker's Dozen
- TE BFTP Blog Hop
- Techniques
- TESC
- Tessa
- The Craft's Meow
- There She Goes
- Tools of the Trade
- Travels
- Uncategorized
- Videos
- Waltzing Mouse
- Whipper Snapper
- Wildlife
- Yummies
Archives
- October 2018
- September 2018
- October 2017
- September 2017
- March 2017
- February 2017
- October 2016
- June 2016
- May 2016
- March 2016
- November 2015
- September 2015
- August 2015
- June 2015
- April 2015
- March 2015
- November 2014
- October 2014
- September 2014
- August 2014
- June 2014
- April 2014
- March 2014
- November 2013
- October 2013
- September 2013
- August 2013
- July 2013
- June 2013
- May 2013
- April 2013
- March 2013
- February 2013
- January 2013
- December 2012
- November 2012
- October 2012
- September 2012
- August 2012
- July 2012
- June 2012
- May 2012
- April 2012
- March 2012
- February 2012
- January 2012
- December 2011
- November 2011
- October 2011
- September 2011
- August 2011
- July 2011
- June 2011
- May 2011
- April 2011
- March 2011
- February 2011
- January 2011
- December 2010
- November 2010
- October 2010
- September 2010
- August 2010
- July 2010
- June 2010
- May 2010
- April 2010
- March 2010
- February 2010
- January 2010
- December 2009
- November 2009
- October 2009
- September 2009
- August 2009
- July 2009
- June 2009
- May 2009
- April 2009
- March 2009
- February 2009
- January 2009
- December 2008
- November 2008
- October 2008
- September 2008
- August 2008
- July 2008
- June 2008
- May 2008
- April 2008
- March 2008
- February 2008
- January 2008
- December 2007
- November 2007
- October 2007
- September 2007
- August 2007
- July 2007
- June 2007
- May 2007
- April 2007
- March 2007
- February 2007