New Crafter’s Workshop at Taylored Expressions
April 20th, 2010
Happy Tuesday! Taylored Expressions is hosting a blog hop today to showcase the new Crafter’s Workshop stencils now available. You’ll have a chance to see a few of the many opportunities for creativity in using these fun stencils by checking out several different blogs today. There are so many ways you can go with these stencils I can hardly wait to see what each person came up with.
I chose to work with the Daisy Doodad Template as I had an idea for it as soon as I saw it. If you’ve been reading my blog for any length of time you know that we’ve been doing lots of redecorating in our house over the past year. One of the things I’m still trying to complete is getting art hung on the walls. Back in January I went to Home Goods with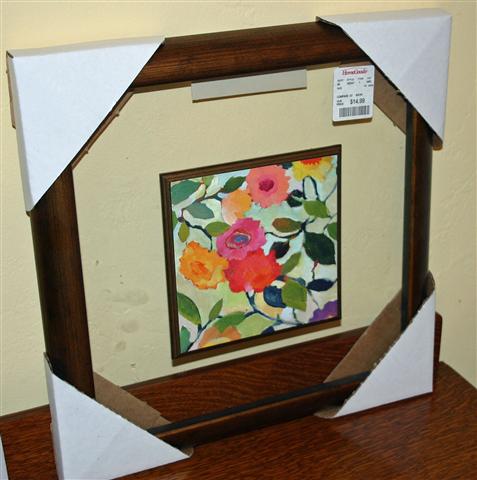 my very talented friend Kim and picked up a number of home decor items. Included in those items was some art that I planned to alter. I bought two of these pieces at $14.98 each. It might be a little hard to see in the photo, but the art work is mounted on a wood piece that floats on a sheet of glass framed by a bronze tone wood frame. I didn’t care much for the actual art and planned to replace that when I bought it. The art piece is 6″x6″ and the frame is 13″x13″.
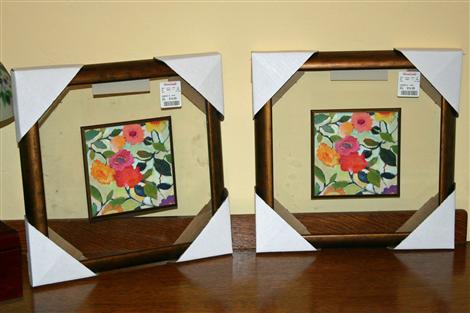
Here’s a photo of the pair.
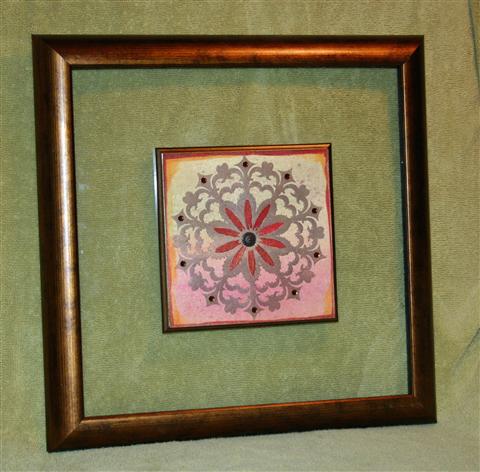
And here it is finished. I did finish both pieces, but unfortunately one of the frames broke as I was taking off the cardboard corners which were apparently stapled on by gorillas. Curt says he can fix it, but I couldn’t handle the piece to photograph it – so just know that there is a pair.
The really fun thing about this project was that I had no idea what exactly I was going to do. In fact my first attempt didn’t work out AT ALL. I really just played over a couple of days and ended up with this. So here’s the basic process I went through.
- I started with some paper from a big watercolor pad I purchased quite awhile ago. It’s quite heavy and I knew it would withstand a lot of *working*.
- First I scribbled watercolor crayons to cover my 6×6 piece of watercolor paper. I used Burgundy, Rose Red, Ruby Red, Saffron, Artichoke and Moss to coordinate with my decor.
- Then I washed all of that with my aquapainter, added a little more crayon and brushed more water.
- The whole piece was then covered with Gold Maya Mist
- Then I moved on to some Twinkling H2O’s. I splattered some of that on with a toothbrush and I painted the edges with 2 colors.
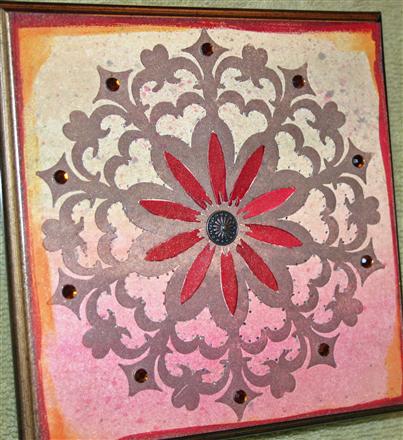
- Finally I get to my stencil! I covered my stencil with Brilliance Pearlescent Chocolate ink by simply taking the dew drop and patting it all over the stencil.
- I placed my painted background piece (still just slightly damp) face up on the platform for my Big Shot and then laid the inked stencil face down on top of it. I covered that with a piece of scrap cardstock before running it through the Big Shot. This acted as a letterpress and the stencil was embossed into the paper and a beautifully inked impression was achieved at the same time.(The ink washed off the stencil easily with running water in the sink.)
- I painted the petals with Twinkling H20’s ad added a decorative brad to the center. It’s hard to see in the photo, but I added piercing around much of the design. The piece was finished off with some KaiserCraft rhinestones around the edge of the design.
The combination of Twinkling H20’s, Maya Mist and Brilliance Pearlescent ink makes this piece very shimmery IRL!
I’m so excited that I got to play along today!!! Now I’m dying to see what everyone else did. How ’bout you….you coming?
- Alex Maldonado
- Carolina Buchting
- Charmaine Ikach
- Jackie Pedro
- Jeanie Witmer
- Jodi Collins
- Karen Giron
- Karen Motz
- Melissa Sauls
- Sankari Wegman
- Taylor VanBruggen
At only $3.99 each these stencils are a steal and I’m pretty sure you’ll need more than one! *wink* Thanks for stopping by! I’m on my way to the office soon. Hope you have a wonderful day!

Taylored Expressions April Sneak Peeks Day 1
April 6th, 2010
WooHoo! I am so excited to play along with the Baker’s Dozen girls in the Sneak Peeks for the upcoming release at  Taylored Expressions this week. We’ll have a couple days of peeks and then everything (and there’s A LOT this month) will be available in the TE Store at 8 am PST on Thursday April 8th.
Today we’re sharing peeks of 2 new Whimsical Wishes stamp sets (unmounted deeply etched rubber on EZ Foam) that coordinate wonderfully together. The first set is tea-themed. Visiting different tea rooms has been a hobby of mine for a number of years, so you know I was excited to find out about this set! Tea is not a beverage…it’s an event! It’s an afternoon spent in a beautiful environment eating beautiful and yummy food with cherished friends. The second set we are previewing contains four ATC sized background patterns that you will love!
I have two very different samples to show you and I think they speak to the versatilty of these sets. For my first sample I wanted to go subtle and vintage. I was inspired by a card I saw in Paper Crafts Magazine (March/April pg 83 by Ann Marie Pultorak.) This card features both stamp sets: CreativiTEA and Miniature Motifs. It is 5.25″ square. Isn’t that sentiment sooooo cute?
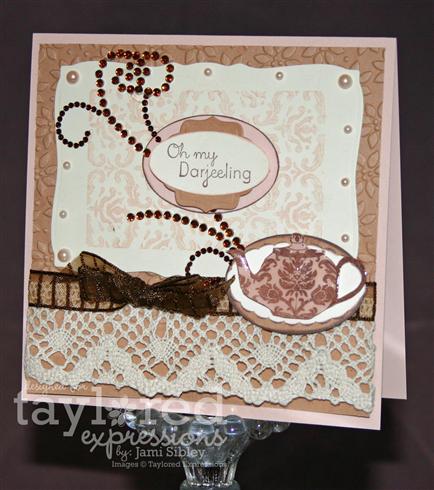
The teapot is covered in Ranger Glossy Accents for a thick shiny finish. The Miniature Motif was stamped onto TE Choice Buttercream cardstock with Blush Blossom craft ink and then die cut with a Spellbinders Curved Rectangle die. Brown crystal swirl is a Zva flourish from TE. Pearls are KaiserCraft Blush. Wide crochet trim is something I picked up at Joann’s last week after asking Melissa for some tips on where to get some more vinatge-y trims. Ribbon was something I had in my stash.
Another thing I picked up at Joann’s when I was there last week was a K&Co. 8.5″ x 8.5″ pad of dp called Berry Sweet. It’s bright colors were totally calling out to me. So my next sample goes in the opposite bold and bright direction. I decided to alter a bright orange tall skinny journal I had picked up from a Dollar Spot awhile back (don’t remember if it was Michael’s or Target.) I plan to give this to a friend at church who is on the committee to plan the Ladies’ Tea each year at Christmas time. Scroll down to my previous post to read the inpsirational story I plan to print out and attach to the inisde cover of this journal.
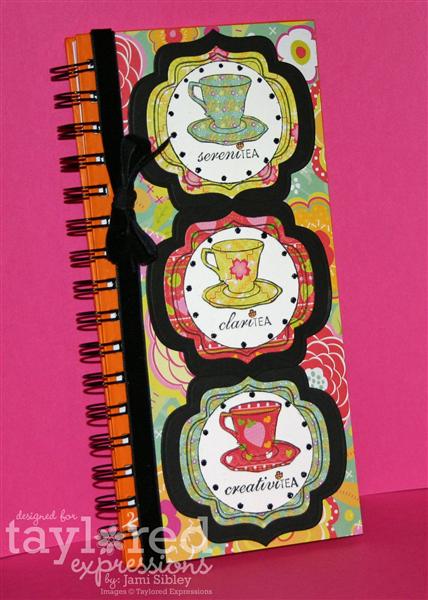
I stamped the teacup 3 times on TE Choice White cardstock and then stamped 3 more times on various papers from my K&Co. pad. Those were cut out and glued on (paper-pieced) the white stamped images. Then I stamped the 3 different sentiments and punched the images with a Marvy circle punch. Do you see the outline that matches the Nesties Label 9? That outline is a frame image in the stamp set. How cool is that? I stamped it 3 times on the different patterned papers and then die cut them. I die cut black cardstock with the next larger nestie and assembled all the pieces and added some black stickles. I covered the journal with the backside of one of the patterned papers I had used. Some black velvet ribbon tied in a bow finishes off the front of this journal.
I can’t wait to see what everyone has created for peeks today! Let’s do some blog hopping, shall we?
Thanks so much for stopping by! I’ll be back tomorrow with even more peeks of more new rubber!!!
Leavin’ on a Jet Plane
March 3rd, 2010
Sorry for the absence this week. I’m getting ready to fly to Iowa tomorrow to take the Copic Certification class and to have some *chick time* with some wonderful friends. I didn’t know I was going for sure until less than 2 weeks ago so it’s been busy – especially since we have a release at Taylored Expressions on Friday…after I get to Iowa! I hope you’re checking out the TE sneak peeks – they started today and will continue tomorrow and then more samples and the release on Friday morning. I had hoped to get something stamped to share today, but it was all I could do to get my card ready for the sketch on Friday. I hope you’ll stop back by then. I’m flying out tomorrow. Should be an awesome time there if I don’t freeze by butt off! I bought the very last pair of gloves out of the clearance bin at Sears today!
Reminder to all of you in SoCal…I have a stamp class coming up next Friday the 12th. I have just a couple of open spots. Let me know if you’d like to come!
Shabby Chic for TEBB
September 9th, 2009
Today is the last day to play the challenges in the Taylored Expressions Birthday Bash on the SASI Blog and be able to be entered for the awesome prizes. There are 13 challenges to choose from, so I know you’ll find something that tickles your fancy. You don’t have to use TE stamps and you can combine the challenges any way you like. I had hoped to play in a bunch of them, but I ended up spending most of the 3 day weekend cleaning up and organizing my stamp room. It’s still not 100% finished, but I stopped at 85% finished so I could stamp some.
This card is for 2 challenges – Sharon’s inspiration and Laurie’s paper distressing.
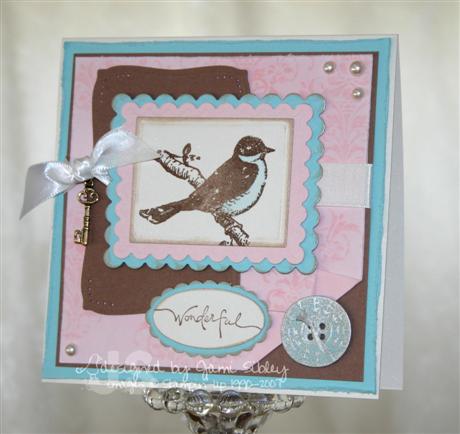
Sharon’s inpsiration photo really spoke to me and I wanted to work in one of my favorite styles – shabby chic. I used some retired SU colors – Cool Caribbean and Pink Pirouette along with Close to Cocoa and Shimmer White for the 5.25″ square card. The colors are actually a little softer in real life, but I had a hard time getting a really good photo. The bird from SU Friends 24-7 is embossed with Close to Cocoa craft ink and clear ep and then die cut with a rectangle Spellbinders Nestie and matted on scallop rectangle nesties. Behind that is a curved rectangle nestie with some piercing in the corners. The pink panel is stamped with the flourish from the same stamp set. The button is actually just Caribbean cardstock die cut with Spellbinders Timeless Heritage die and then rubbed with Brilliance Pearl Beige ink. I used the Brilliance ink around a lot of the panel edges as well. It has a beautiful shimmery pearl finish and I just noticed that eclectic Paperie has these on sale. I used the distressing tool from my SU Cutter Kit to rough up the pink and caribbean panel edges – I’ve always loved that little bit of texture you can get from doing that.
Isn’t that little key charm so cool? I had to run to Michael’s this weekend to pick up something for my organizing project. I hadn’t been in there in awhile and I was surprised to see two full aisles now dedicated to beading and jewelry making. There was a large section of charms on cards that are fantastic for card making! This key is from Blue Moon Charms – Lost & Found Collection. I got 5 charms on a card for $3.99. I thought that was pretty afordable.
Between my stamp room being a wreck and all this turmoil with the new SU IDA I’ve really been in a stamping funk. It felt good to just get stuff out and PLAY with this card. 🙂 I have a Stampin’ Up! class coming up Friday night and have lots of prep to do for that. I’m happy to have a mostly clean space to work in. Thanks for stopping by.

Happy Birthday TE Stamp a Sweet Impression!
September 5th, 2009
One year ago today Taylored Expressions debuted the very first Stamp a Sweet Impression stamp sets: Sweet Celebration, Trick or Sweet, and Frighful Night. To celebrate, Taylor is throwing a huge Birthday Bash over on the SASI Blog AND all 3 of those original sets are ON SALE for 40% OFF through Monday in The Store. There are tons of party challenges to be posted every hour all day today each with an awesome prize! You have until Wednesday night to play and enter for prizes and you don’t even need to use Taylored Expressions images to play.
Taylor asked the Baker’s Dozen Alumni from the original team last year to help celebrate by highlighting one of those original sets. I just had to make a birthday card with Sweet Celebration.
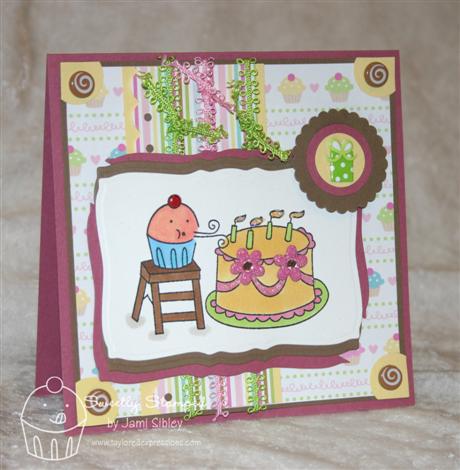
I used elements from the TE Cupcakes Key Ingredients along with the coordinating doodlebug brads I had been hoarding. I actually managed to use 7 of them on this one card – can you find them all? The Cupcake KI is sold out, but you can purchase the elements separately – click here for the patterned paper. The trims I used are the Double Loop Pastel. The image is stamped on TE Choice Snow White cardstock and colored with Copic markers. It was die cut with the Spellbinders Curved Rectangles Nestabilities.
Of course today is also Release Day at Taylored Expressions and what a release it is with 4 new stamp sets (including the next in the Giving Tree charity series and three Halloween offerings), 2 new Key Ingredients and 3 Bundle Deals. You can get all the details on that by hopping over to Taylor’s blog. While you’re there be sure to scroll to the bottom of her post for links to a ton of samples by some amazingly talented ladies including the current Baker’s Dozen, the rest of the Baker’s Dozen Alumni, and a an incredible list of TE Friends who are special party guests today!
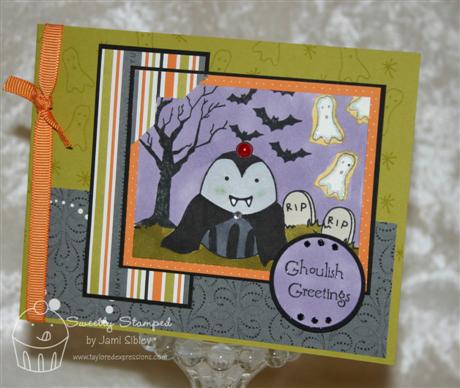
Before I close I just have to share one of my very favorite cards from my first month on the Baker’s Dozen. I went crazy making Halloween cards last year – even though I don’t like Halloween in the least – because these sets are so cute. This card features both Trick or Sweet and Frightful Night. I like to call this little cuppie Vampy.
Thanks for stopping by. I hope you have a wonderful long weekend and I hope you get a chance to play in some or all of the TEBB Challenges!
Taylored Expressions August Release
August 5th, 2009
It’s time for the Taylored Expressions August Release which includes two new stamp sets, a new Key Ingredients Kit, two product bundles and lots of fun stuff in the Fresh Out of the Oven department! And I’m extra excited because I got to play a bit and I have two cards to share.
My first card features the new Whimisical Wishes stamp set Chillax along with the new Cherries and Berries Key Ingredients Kit. Even though this KI is actually coordinated with the other new stamp set, I think it goes great with Chillax! The layout for my card was inspired by a card I saw in this month’s Paper Crafts Magazine.
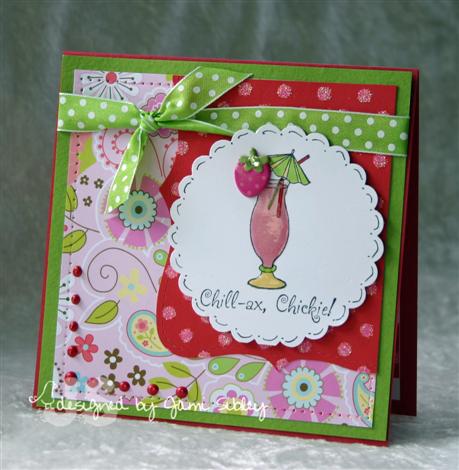
As soon as I saw this huricane glass image I knew I had to make a virgin strawberry daquiri. We have a friend named Bill (you read about him in our dating story as the guy who introduced us) who loves virgin strawberry daquiries. He has an awesome recipe for them and “back in the old days” he would make them at every party we had – no matter who’s house it was at. I LOVE those things! The secret is a little half & half. Mmmmmmm! Most of my friends didn’t drink so the VSD was about as wild as we got. LOL!
This huricane glass image actually has a fruit slice in it…a kiwi or a lime or? Hmmmm…I needed a strawberry! The Berries & Cherries KI was perfect as this strawberry braddie was included and at my fingertips.
The glass was colored with Copics (and did you know that The TE Store now has a wide selection of Copic markers???) and then covered with Crystal Effects for a nice thick shiny coating.
My second card features the new Berries & Cherries stamp set. 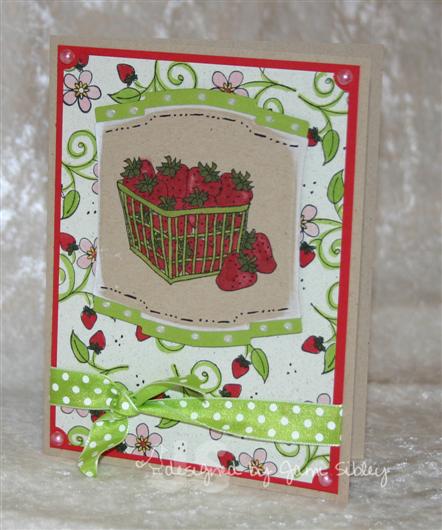 Recently I’ve seen some people color with Copics on kraft cardstock and I’ve been wanting to try it, so that was my jumping off point for this card. I stamped the strawberry basket on kraft with Memento black ink, colored with Copics and die cut with my Spellbinders Labels 2 die. I absolutley love the little blossom image in this set and decided to make a background paper with it. I stamped it repeatedly on SU Naturals White cardstock (which I rarely use) and colored again with Copics. I like the slight contrast between the kraft and naturals white – I don’t think I’ve ever put these two together before. Ribbon is from the Cherries & Berries KI.
Taylor and the entire Baker’s Dozen Design Team have projects to share today and I can hardly wait to see them. Let’s do some blog hopping!
Oh and I wanted to assure all you Cuppie fans – he’ll be back next month. We promise! He just needed a little vacation from this Summer heat! So this month you can enjoy different kinds of sweet treats with TE! To see all the new stuff and shop now click here to head over to the TE Store. Thanks for stopping by and happy shopping!
TECC72 Happy Birthday Taylor!!
June 12th, 2009
Not only is it Friday…not only is it Cupcake Friday…it’s Taylor’s birthday AND Cupcake Friday! WooHoo!!!
I feel so fortunate to call Taylor my friend! I have loved seeing her follow her dreams over the past year or so with Taylored Expressions and I’m grateful to be *on the staff*. Today is such a big day for Taylor as her first day to officially have TE as her one full time job, as she packs up for the move to Iowa and of course as she celebrates her birthday. I love you, my friend! Happy Birthday! Instead of the birthday smilies you might expect I have something I think Taylor will appreciate…

If I could have gotten Gordon Ramsey in the flesh, I would have! bwahahahhahahaa!
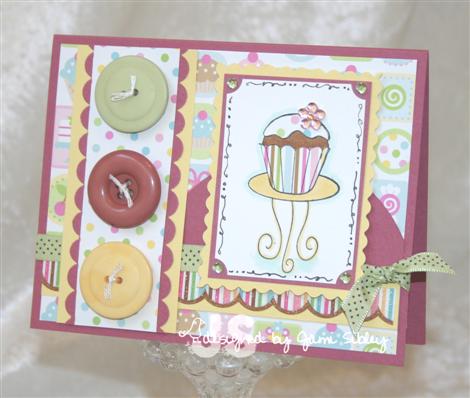
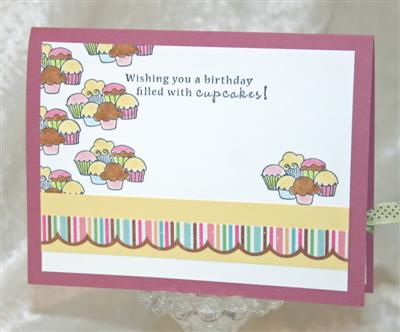
Here’s my card for today’s TECC sketch challenge and although cupcakes are not required I *had to* use them for Taylor’s birthday! This was my first chance to play with the new TE set For the Love of Cupcakes and the new Cupcake Key Ingredients (which is sold out at the moment, but it’s worth getting on the notification list for!) and boy did I have fun with them! Last weekend I also picked up a Bag o’ Buttons – Hall Pass assortment – at TE. I was pleasantly surprised to see these three huge buttons that coordinated so well with the KI colors! I wasn’t even thinking of this KI when I chose them.
Please be sure to hop over to Taylor’s blog to leave her some sweet birthday wishes and to get all the deets to play along with us in this week’s sketch. And now let’s see what the rest of the Cupcake Crew has cooked up –
You’ll see lots more fantastic samples by clicking on the names entered into Mr Linky at the bottom of Taylor’s blog post today. Be sure to add your link as soon as you get your card done. 🙂
Quick reminder – if you upload creations to the SCS gallery using any TE (SASI, Whimsical Wishes, Lasting Impressions) images, please remember to use Keyword tayloredexpressions (no space). This will allow your creation to be seen in the TE company gallery (which is keyword driven) and it also allows you to be considered for Our Friday Friend on the SASI blog.
Looking forward to my SU Class and Club tonight and looking forward to a relaxing weekend. Hope you have some stampin’ and fun in store for your weekend! Thanks for stopping by!


