Taylored Expressions April Release – Coffee Day!
April 8th, 2010
It’s Release Day at Taylored Expressions! WooHoo! So much new stuff including one coffee-themed Apple Doodle Ink set (being showcased today by the Baker’s Dozen and I’m playing along), one tea-themed Whimsical Wishes stamp set with another coordinating WW set of small background images, a full teacher-themed set with a coordinating mini set of sentiments, three A la Carte Cuppies, AND three new Taylored Card Kits. Plus a whole slew of stuff in the Fresh Out of the Oven Department! OH MY!!! You REALLY have to go take a look!
Before you run off to shop, I have a fun little sample to share featuring Let’s Do Coffee. As I was preparing to go visit Taylor in Iowa last month, I remembered that she and Jon do not drink coffee. (I know…crazy…right?) I wasn’t sure they even owned a coffee pot (they don’t!) so I pondered what I would do about morning coffee (can’t live without it). 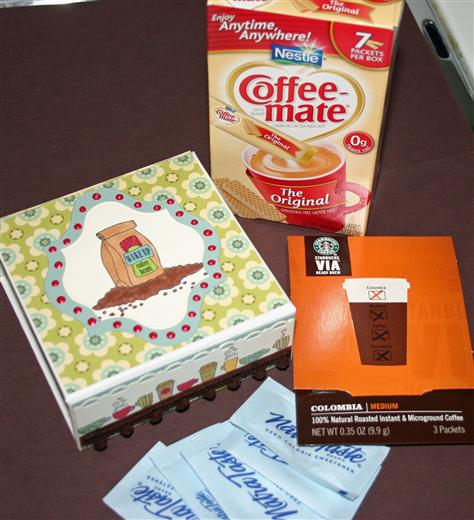 My mom told me about the new Starbuck’s instant coffees that come in little single serving packets (think Crystal Lite tubes), so I decided to try some. What a life saver! Next I began to wonder what would be the best way to package and take some Coffee Mate Creamer with me without airport security thinking I was smuggling some sort of drugs. Lo and behold I came across little individual tubes of Coffee Mate as well! Hallelujah! I threw those in a ziploc with some blue sweetner packets and I was ready to go. But of course I was thinking how much nicer it would be to have a really cute little coffee kit, so that’s what I’ve created to show you today. I think this would make a nice little gift or emergency caffeine kit.
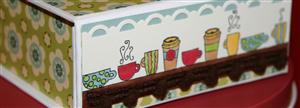
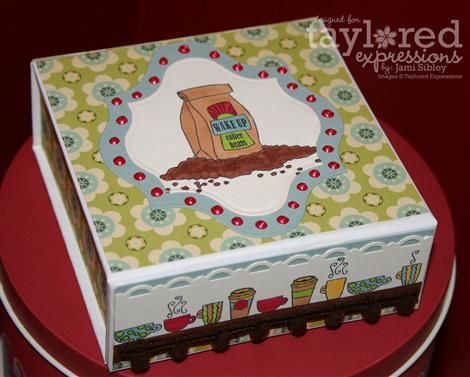
I started with a Small Perfect Package which is approximately 4″ square and some paper from the new Early Bird Card Kit. This was seriously such a quick project! It took longer for the Liquid Pearls to dry than it did for me to make it. LOL! I covered the top, all 4 sides and inside the lid with patterned paper using Zip Dry. I’ve been a little on the fence about this adhesive (I have many friends who rave about it) but it sure did work wonderfully on this project and now I see their point! I was even able to use it to attach the little row of chocolate pom pom trim!
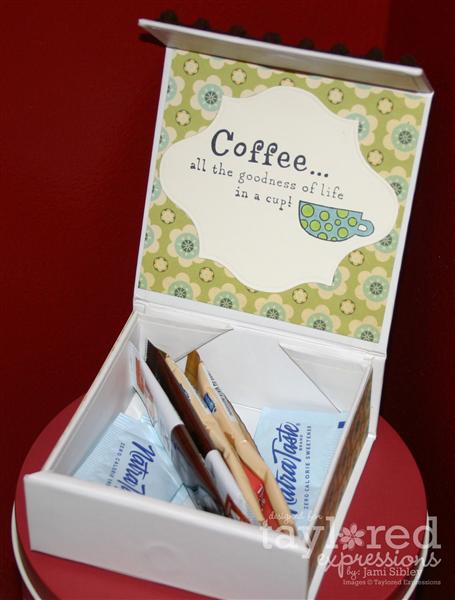
I stamped a couple of images from the set and colored them with Copic Markers. I also stamped this sentiment which totally reminded me of Pastor Jeff. Only he could inject coffee into a rockin’ Easter sermon and have it make perfect sense! I used Spellbinders Label 13 dies and a SU border punch and finished off the project with some red liquid pearls. (Can anyone tell me why I insist on using stickles or liquid pearls when I’m in a time crunch to get a project photographed? D’oh!)
This project would also work nicely with one of the new Tea Tins available now in the TE Store, but I don’t have any…YET! I do know that the coffee and creamer packets will fit easily in those tins.
Oh I cannot wait to see what the rest of the girls have come up with for today! Shall we do a little hoppin’?
Thanks for stopping by and happy shopping!

Taylored Expressions Sneak Peeks Day 2
April 7th, 2010
So what did you think of the 2 new upcoming stamp sets we showed you yesterday? I honestly thought all the girls’ samples were awesome! And what about that fabulous card kit? I can’t wait to get it! Today we have lots more to show you including a full stamp set (Make the Grade), a coordinating mini stamp set (Extra Credit), three A la Carte school-themed Cuppie images and some of the girls will have samples of another cool card kit! So let’s get to it.
My first sample showcases Make the Grade, a Whimsical Wishes stamp set designed by Nancy McKinney. Much of the set is geared toward Teacher Appreciation, but since I don’t have kids I decided to use a couple of the adorable images to create a Graduation congrats card. I think this set could also be great for scrapbooking – lots of fun school images!

I stamped the cute little owl grad and then masked his feet before stamping the books under him. The image was colored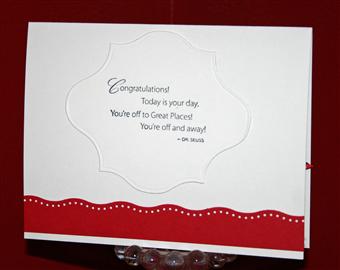 with Copics and die cut with Spellbinders Labels 13. Sentiment is from -the TE set A Year of Sweet Sentiments. Black panel was embossed with a Sizzix folder and I used the EK Success Dotted Wave border punch on the white strip. Ribbon was in my stash. Sentiment on the inside is from the TE set The Places You’ll Go. It was stamped on TE Choice Snow White cs and cut with the Labels 13 die to coordinate with the front.
My second card features one of the A la Carte Cuppies (Desk Cuppie) along with the mini set Extra Credit.
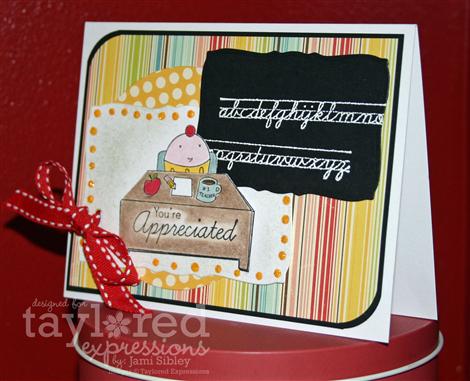
This time I colored with Prisma pencils and gamsol. I stamped the alphabet from Extra Credit with white craft ink and heat embossed with white ep on black cardstock and then die cut a chalk board with a Spellbinders Curved Rectangle die. Cuppie was stamped onto TE Choice white cs and also die cut with a Curved Rectange die. I cut around part of Cuppie and the desk with a craft knife so I could slip the corner of the chalkboard in behind. The desk was stamped a second time, cut out, colored and popped up on foam tape. Yellow stickles were added. Paper is October Afternoon Farm Fresh and ribbon was left over from my kitchen curtains.
Everything shown today will be available in the TE Store tomorrow (Thursday) morning at 8:00 am PST. And we still have another stamp set and card kit to share too! In the meantime let’s see what the girls have created today!
Thanks for stopping by.
Taylored Expressions April Sneak Peeks Day 1
April 6th, 2010
WooHoo! I am so excited to play along with the Baker’s Dozen girls in the Sneak Peeks for the upcoming release at  Taylored Expressions this week. We’ll have a couple days of peeks and then everything (and there’s A LOT this month) will be available in the TE Store at 8 am PST on Thursday April 8th.
Today we’re sharing peeks of 2 new Whimsical Wishes stamp sets (unmounted deeply etched rubber on EZ Foam) that coordinate wonderfully together. The first set is tea-themed. Visiting different tea rooms has been a hobby of mine for a number of years, so you know I was excited to find out about this set! Tea is not a beverage…it’s an event! It’s an afternoon spent in a beautiful environment eating beautiful and yummy food with cherished friends. The second set we are previewing contains four ATC sized background patterns that you will love!
I have two very different samples to show you and I think they speak to the versatilty of these sets. For my first sample I wanted to go subtle and vintage. I was inspired by a card I saw in Paper Crafts Magazine (March/April pg 83 by Ann Marie Pultorak.) This card features both stamp sets: CreativiTEA and Miniature Motifs. It is 5.25″ square. Isn’t that sentiment sooooo cute?
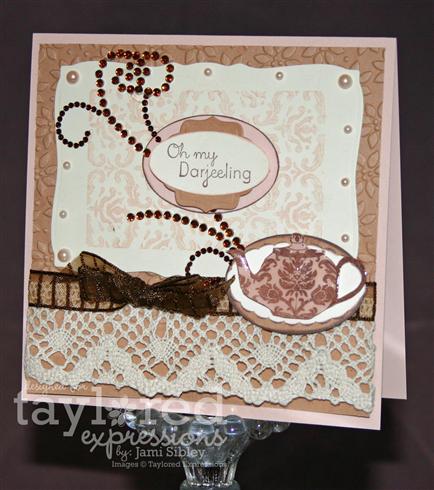
The teapot is covered in Ranger Glossy Accents for a thick shiny finish. The Miniature Motif was stamped onto TE Choice Buttercream cardstock with Blush Blossom craft ink and then die cut with a Spellbinders Curved Rectangle die. Brown crystal swirl is a Zva flourish from TE. Pearls are KaiserCraft Blush. Wide crochet trim is something I picked up at Joann’s last week after asking Melissa for some tips on where to get some more vinatge-y trims. Ribbon was something I had in my stash.
Another thing I picked up at Joann’s when I was there last week was a K&Co. 8.5″ x 8.5″ pad of dp called Berry Sweet. It’s bright colors were totally calling out to me. So my next sample goes in the opposite bold and bright direction. I decided to alter a bright orange tall skinny journal I had picked up from a Dollar Spot awhile back (don’t remember if it was Michael’s or Target.) I plan to give this to a friend at church who is on the committee to plan the Ladies’ Tea each year at Christmas time. Scroll down to my previous post to read the inpsirational story I plan to print out and attach to the inisde cover of this journal.
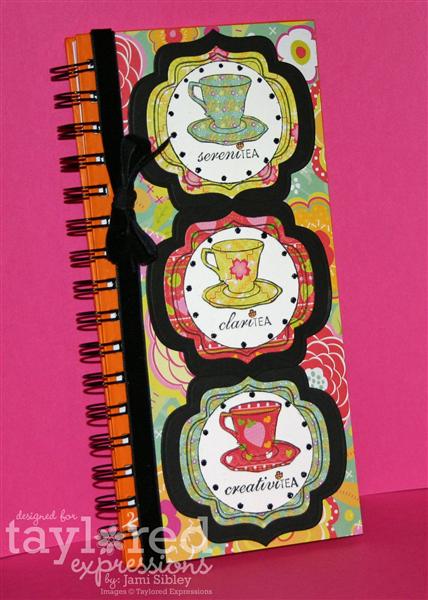
I stamped the teacup 3 times on TE Choice White cardstock and then stamped 3 more times on various papers from my K&Co. pad. Those were cut out and glued on (paper-pieced) the white stamped images. Then I stamped the 3 different sentiments and punched the images with a Marvy circle punch. Do you see the outline that matches the Nesties Label 9? That outline is a frame image in the stamp set. How cool is that? I stamped it 3 times on the different patterned papers and then die cut them. I die cut black cardstock with the next larger nestie and assembled all the pieces and added some black stickles. I covered the journal with the backside of one of the patterned papers I had used. Some black velvet ribbon tied in a bow finishes off the front of this journal.
I can’t wait to see what everyone has created for peeks today! Let’s do some blog hopping, shall we?
Thanks so much for stopping by! I’ll be back tomorrow with even more peeks of more new rubber!!!
The Teacup and The Potter
April 6th, 2010
I’ll have another post up in just a few minutes with some sneak peeks for the upcoming release of new stamp sets at Taylored Expressions. One of my projects in that post is a Tea-themed journal and I wanted to share the story I will be 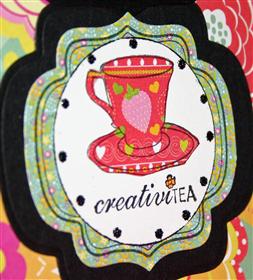 printing out and attaching to the inside cover of that journal. I received this story in an e-mail last week and I found it really touching. I wanted to pass it along to a friend who is on the committe at church to plan the annual Ladies’ Tea and I thought a little journal would make a great gift. I hope you have a few minutes to read this little story all the way through…
There was a couple who took a trip to England to shop in a beautiful antique store to celebrate their 25th wedding anniversary. They both liked antiques and pottery, and especially teacups. Spotting an exceptional cup, they asked, “May we see that? We’ve never seen a cup quite so beautiful.”
As the lady handed it to them, suddenly the teacup spoke, “You don’t understand. I have not always been a teacup. There was a time when I was just a lump of red clay. My master took me and rolled me, pounded and patted me over and over and I yelled out, “Don’t do that. “I don’t like it! Leave me alone,” but he only smiled, and gently said, “Not yet!”
Then WHAM! I was placed on a spinning wheel and suddenly I was spun around and around and around. “Stop it! I’m getting so dizzy! I’m going to be sick!,” I screamed. But the master only nodded and said quietly. ‘Not yet.’
He spun me and poked and prodded and bent me out of shape to suit himself and then he put me in the oven. I never felt such heat.. I yelled and knocked and pounded at the door. “Help! Get me out of here!” I could see him through the opening and I could read his lips as he shook his head from side to side, ‘Not yet’.
When I thought I couldn’t bear it another minute, the door opened. He carefully took me out and put me on the shelf, and I began to cool. Oh, that felt so good! “Ah, this is much better,” I thought. But after I cooled he picked me up and he brushed and painted me all over. The fumes were horrible. I thought I would gag. “Oh, please, stop it, stop,” I cried. He only shook his head and said. ‘Not yet!’.
Then suddenly he put me back in to the oven. Only it was not like the first one.. This was twice as hot and I just knew I would suffocate. I begged. I pleaded. I screamed. I cried. I was convinced I would never make it. I was ready to give up. Just then the door opened and he took me out and again placed me on the shelf where I cooled and waited and waited, wondering “What’s he going to do to me next?”
An hour later he handed me a mirror and said ‘Look at yourself.’ And I did. I said, “That’s not me; that couldn’t be me. It’s beautiful. I’m beautiful!!!”
Quietly he spoke: ‘I want you to remember, then,’ he said, ‘I know it hurt to be rolled and pounded and patted, but had I just left you alone, you’d have dried up. I know it made you dizzy to spin around on the wheel, but if I had stopped, you would have crumbled. I know it hurt and it was hot and disagreeable in the oven, but if I hadn’t put you there, you would have cracked. I know the fumes were bad when I brushed and painted you all over, but if I hadn’t done that, you never would have hardened. You would not have had any color in your life. If I hadn’t put you back in that second oven, you wouldn’t have survived for long because the hardness would not have held. Now you are a finished product. Now you are what I had in mind when I first began with you.’
The moral of this story is this:
God knows what He’s doing for each of us. He is the potter, and we are His clay. He will mold us and make us and expose us to just enough pressures of just the right kinds that we may be made into a flawless piece of work to fulfill His good, pleasing and perfect will.
So when life seems hard, and you are being pounded and patted and pushed almost beyond endurance; when your world seems to be spinning out of control; when you feel like you are in a fiery furnace of trials; when life seems to “stink”, try this:
Brew a cup of your favorite tea in your prettiest tea cup, sit down and think on this story and then, have a little talk with the Potter.
Thanks for stopping by. Please see my next post to see the Tea Journal along with a card sample.
Kitchen Curtains and a Thank You
April 5th, 2010
Finally! I have photos of my awesome new kitchen curtains to share with you. These were a long time coming considering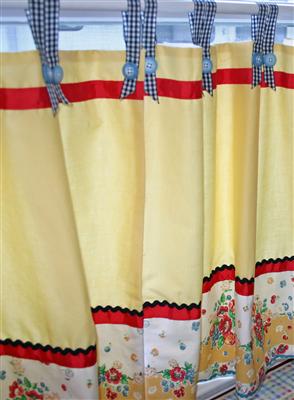 we painted the kitchen red last Summer! (Original post here and more here.) It took me a looooooong time to find the repro vintage fabric I wanted and then even longer to get all the fabrics and trims and design together. Now that they are done and up I am LOVING them! Exactly what I envisioned. My 17 year old seamstress did a fantastic job and now that she’s done I can actually recommend her to anyone else in the SoCal area! I was keeping her all to myself until now. LOL!
I found the repro vintage dishtowel fabric at Hart’s online thanks to the referral of a blog reader! They were really great to deal with. First I ordered several things to see what would really work and then I ordered all the yardage I needed of this particular pattern. It’s 16″ wide with finished edges so you can just cut to length and hem as dishtowels. I decided to cut it in half for the 8″ border at the bottom of my curtain panels. The solid yellow is from Joann’s. (I have a bunch left over so if anyone needs some I’ll sell it for less than I paid.) All the ribbon, ric rac and black pom pom trim are from Fabric Barn in Long Beach. Getting the buttons (72 of them) almost killed me. I should have just ordered them, but didn’t want to wait 3 weeks, so trekked to 5 different Joann stores.
More pics…

2 views of the banquette.
Above is the window that looks out to the front yard and street.
Below is the smaller window that faces the driveway.
I plan to re-cover the banquette cushions, but don’t have fabric yet.
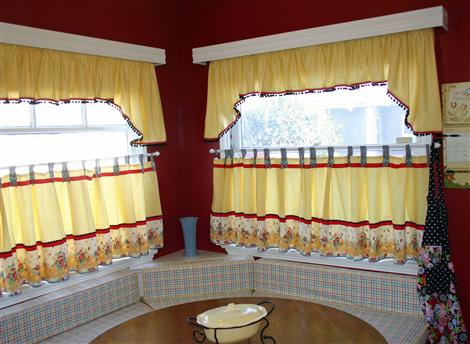
Bay window over the sink –
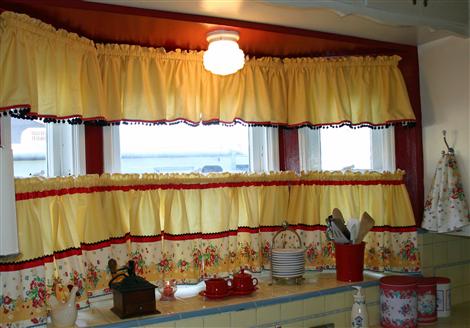
The ribbon and button loops –
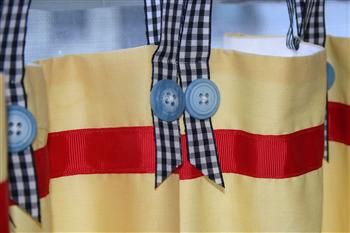
and my favorite little detail is the black pom pom trim! 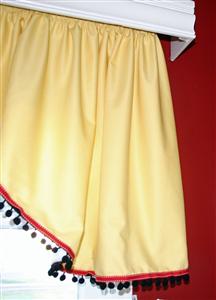
If you’ve ever considered having a red kitchen, I’s say DO IT! I absolutley adore mine!
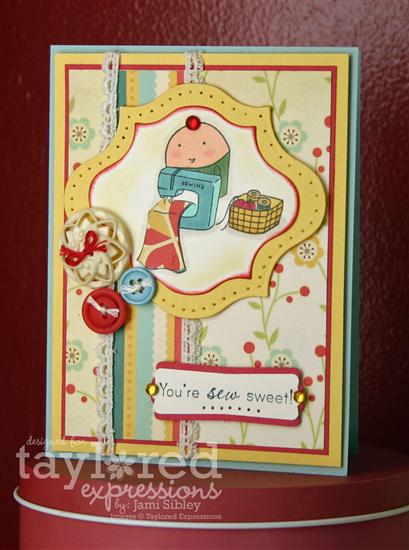
I wanted to make a thank you card for Deanna, my seamstress. I know she worked really hard on this project and I was excited to have just the perfect stamp set – Crafty Cuppie! My card was inspired by the colors of my kitchen as I used elements from the TE Early Bird Key Ingredients from last year. I believe Taylor has another kit coming soon featuring this paper line and I’m really glad because I sure do love it!
Cuppie was die cut with Spellbinders Labels 13. I was a little on the fence about getting this particular set of nesties, but I’m so glad I did! The fabric in the scene was paper-pieced with dp. The cherry on Cuppie is from the Bright Smooth Bling pack…I ADORE that stuff…if you haven’t tried it, you NEED to! The largest cream button is a Jenni Bowlin. The trim I used was from TE, but I don’t see it in the store now. I tend to hoard stuff for awhile before I use it. LOL!
Thanks for stopping by. I’ll be back tomorrow morning to play with the Baker’s Dozen in the Sneak Peeks for the upcoming Taylored Expressions release. Soooooo much FUN stuff – please stop back!
TESC107 He is Risen!
April 2nd, 2010
It’s Good Friday – the day we celebrate Jesus’ death on the cross. And the only reason we can celebrate such a horrific event is because we know that HE IS RISEN! The grave couldn’t hold Him and because of His death and resurrection we can have the gift of eternal life. Amazing grace!
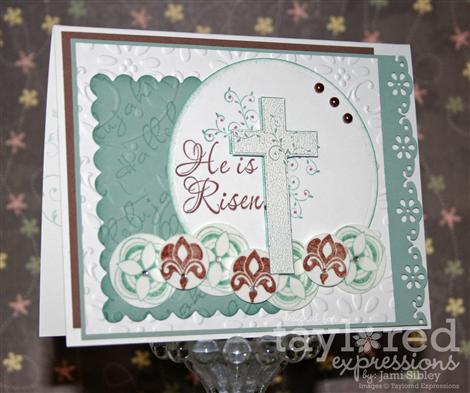
My Good Friday/Easter card is also a sample for Taylor’s sketch today – TESC107. I hope you’ll play along with us. Let’s see what the rest of the Sketch Crew has created today:
Card notes:
Stamps – TE Easter Blessings
Paper – white, Sage Shadow, Close to Cocoa
Ink – Sage Shadow, Close to Cocoa, White Craft, Versamark
Other – white and clear embossing powder, punches – circles and Martha Stewart border, Nesties – circle and scalloped rectangle, two CB/Sizzix embossing folders, Kasier Craft chocolate pearls, Taylor’s Tiny Twinkles, pink glitter glaze pen, foam tape.
Design specifics:
Cross was stamped in Sage Shadow ink on white cardstock and then die cut with a circle nestie. Then cross was stamped and heat embossed with white craft ink and white ep on Sage Shadow cs and cut out. That second cross was popped up with foam tape over the first one. Dots from a pink glitter pen were added to the vine for a tiny pop of color. The little circle elements are two images from the set, stamped onto white cs and punched out with a 3/4″ and 1″ circle punches. They were then covered with Versamark and clear ep and heat embossed before being attached to the card. Tiny Twinkles were added to each as a finishing touch.
Thanks for stopping by. I hope you have a blessed Easter weekend.


