Candy Box Z-Fold
January 10th, 2009
 As a card-maker I love Valentine’s Day and stamping for it, but coming so close on the heels of Christmas it seems I rarely get nearly as many Valentines done as I’d like. This candy box is one of my favorite images from the new SASI set Love is Sweet. I stamped the image on TE Choice Snow White cardstock, colored with Copic markers and die-cut it with Nestabilities Labels 2 die and my Cuttlebug. The edging is done with the gold end of a Ziggy Paint Pen and the top of the box was stamped and colored twice – the 2nd image being cut out and popped up on foam tape.
I had the image colored and layered onto black with a completely different card base and background for several days and just couldn’t seem to finish it. I finally decided to set aside that other base and background and go for a completely simple and elegant look.
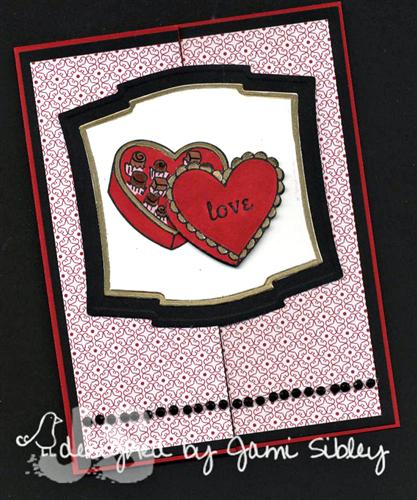
The dp is Stampin’ Up! from the hostess Patterns pack. The black crystals at the bottom are Zva Creative from TE. This is a Z-fold card and one of my favorite folds to work with. It’s so easy, but looks very impressive.
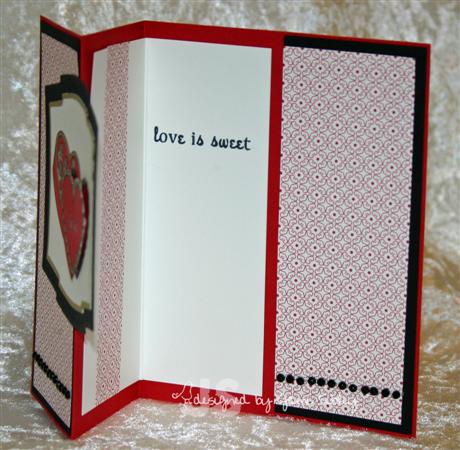
It’s just a standard card fold with the front of the card folded back in half on itself. Then the focal image is centered, but only attached on the left side. The trick is to layer the dp or stamped background so that when the card is closed it almost looks like a solid piece and the special fold is not obvious. It’s a little hard to photograph…looks much better IRL I think. Let me know if you have any questions.
Hope you are having a sweet weekend!


January 11th, 2009 at 5:55 am
I LOVE this! I love the z fold, the image and the black crystals!
January 11th, 2009 at 10:24 am
Beautiful, but how do you do the z-fold?
January 12th, 2009 at 4:53 pm
WOW — this is fantastic