Closet Cleaning and Kraft Cardstock
September 17th, 2007
What a productive day! After over a year on my to-do list I finally tackled the chore of cleaning out my clothes closet today. I have to thank several of my friends over at Splitcoast who cheered me on and assured me I could do it. That was just the push I needed to finally get started and it actually took less time than I anticipated. I had clothes in 4 sizes and the few clothes that I can currently wear would not fit into the closet making it a constant struggle to get dressed – especially on the days I work. The hallway is now lined with neat piles of folded clothes all sorted by type and size. I’m getting rid of a ton of stuff! I still have lots more sorting to do – drawers, shoes, the other closet where my dresses are – but I am so happy to have all the hanging stuff in this closet finally cleaned out!
Just before I started this morning I happened to read a very relevant litle blurb in the Editor’s intro in the new Fall 2007 issue of Renovation magazine. In part it read
“It’s not the letting go that hurts, it’s the holding on. I’ve learned that ‘letting go’ often refers to the guilt of expensive purchases I shouldn’t have made or of projects I’ll never get done. Holding on only creates a bigger clutter pile of unfinished business. Now I simply take a deep breath and rate clutter items on a scale of 1-10. Anything that gets a value of 8 or higher stays. Anything lower goes. It’s a little exercise that rewards me with all the breathing room I need.” -Luann Brandsen
That was the perfect message to get me in just the right frame of mind. Out out out it goes!!! Try it! It’s very freeing! My advice – if you are over 15 pounds away from your “skinny clothes” and it’s been more than a year since you’ve worn them…get rid of them! They will be hopelessly out of style when you get back to them and besides, once you get skinny it will be FUN to shop! Let ’em go!
After dinner I rewarded myself with some stamping time. I wanted to try another one of the Dirty Dozen challenges so I decided to try working with some Kraft cardstock and I ended up making 2 cards with a lot of the same tools and elements. Both cards have a Kraft base and use Wintergreen designer paper along with Artichoke and Soft Sky. I cut a 4 1/8″ square of Soft Sky and a 4″ square of Wintergreen and cut both in half on the diagnol to form triangles. Both cards also utilized my brand new photo corner punch and round rhinestone brads. Each is stamped with a different motif from True Friend using white craft ink for the background.
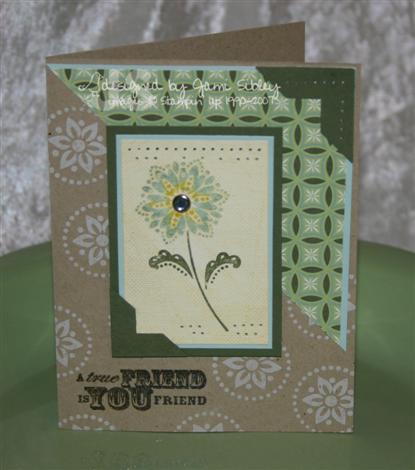
For the first card I stamped the flower from True Friend on a vanilla panel and overstamped it with the Linen BG in Banana ink. I used a blue rhinestone brad for the flower center. The main panel is popped up on foam tape. The sentiment is stamped in Artichoke craft ink and embossed with Irridescent Ice ep.
For the second card I used the left over triangle pieces of dp and Soft Sky, but went a different direction with the design.
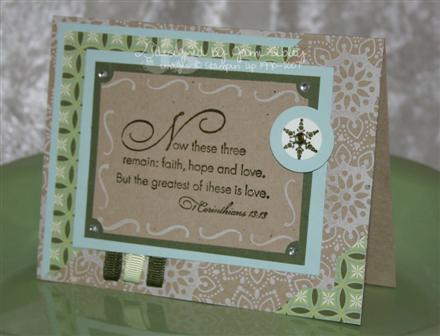
I decided to use a verse from Elegant Inspirations as my focal point – it is stamped in Artichoke craft ink and embossed with clear ep. The little jewels in the corners are Adorn It jewels from eclectic Paperie. There are little grosgrain ribbon loops in Artichoke and Celery and the finishing touch is one of the little snowflakes from Snowburst embossed with Artichoke craft ink and clear ep on white cs and punched with a 5/8″ punch from EK Success. That is layered onto a 1″ circle of Soft Sky and in the center is a celery Rhinestone brad. That whole piece is up on foam tape. I wasn’t sure what I thought of this color combo at first, but the subtle look of it is growing on me.
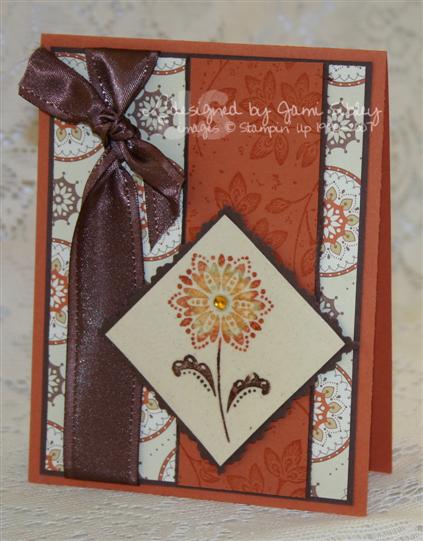
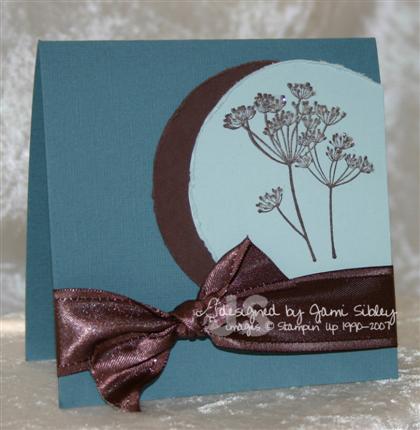
Speaking of color combos – Emily used my Rust True Friend card for the Color Combo this week – Really Rust, Chocolate Chip and River Rock. I’m so excited. I hope you’ll play! Click here for details.
We’ve lost power twice while I’ve been typing this post! The second time was long enough for us to find and light a bunch of candles. I’m going to to get to bed and hope the power stays on at least until I get there. Thanks for stopping by.
More Dirty Challenges
September 15th, 2007
The Dirty Dozen Gallery opened this morning at Splitcoaststampers and the Director, her Royal Rubberness Julie, announced some Ch-ch-ch-changes! They have added some challenges for Fan Club members to go along the monthly Gallery theme – how FUN!! I was so honored to find out that Julie included a More is More challenge based on mine during Dare to Get Dirty Week. 🙂 If you’re a Fan Club member click here to read all about it. If you’re not a Fan Club member and you enjoy anything at all about Splitcoaststampers I strongly encourage you to join. The administrators of the site are determined to keep it a free site and it’s quite expensive to keep it running as it continues to grow and grow. Your Fan Club membership helps to support the site.
I didn’t have any big goals to complete today…not feeling the best and kind of laying low…so I decided to try the DD Sketch Challenge. I had so much fun making this card!
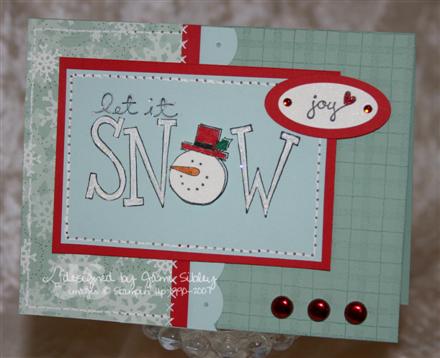
With the sketch in mind I grabbed Big on Christmas and the new Wintergreen designer paper that I just got yesterday. I matched up the dp with some Sage Shadow and Soft Sky cardstock and immediately knew I wanted a strong accent color for some pop. Real Red was my choice for this Christmas card. Having the colors, layout and stamp set picked out, it became a matter of playing with all the details which is what I enjoy most.
The letters in “snow” are colored with my Signo white gel pen and then glittered with Dazzling Diamonds Glitter (super sparkly). That was inspired by a swap card I received from the ever lovable JanTink. The snowman face was stamped on Shimmer White cs and colored with markers and cut out. It’s popped up on double thick foam tape. I pulled out an old retired BG stamp – Stipple Plaid and inked it up with Sage Shadow ink for a tone on tone BG on the card base. The Soft Sky scallop edge was done with an SU corner rounder with the guide taken off. This card seemed to be begging for faux stitching and I complied – LOL! The cross-stitch is actually a Doodlebug rub-on. The little “joy” is from the retired Perfect Endings set (I just love that little set) and the heart is covered in red stickles. A couple of tiny red K&Co. sticky rhinestones from eclectic Paperie are added to accent the little sentiment. I think my favorite part though is the three big brads at the bottom. They were silver and I colored them with a red Sharpie – I love the red metallic finish. I fiddled forever with buttons, brads, rhinestones and pearls trying to figure out that last little element. Now that it’s all finished I am loving this slightly non-traditional Christmas color combo. I hope to do some more of the Dirty Dozen Challenges soon. I hope you’ll check them out and play too.
Friday Yummy
September 14th, 2007
Recently I was reminiscing and telling Curt how my Great-grandmother would make me pospsicles with Dr. Pepper using those old tupperware popsicle molds. I told him that I needed to get some of those molds so I could make Dr. Pepper popsicles – except I would use Diet now. So this week as I’m perusing the frozen aisle at the grocery store, you’ll never guess what I found!
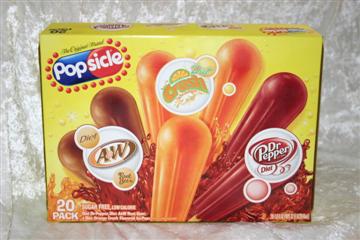
YEP! Popsicles made with Diet A&W Root Beer, Diet Orange Crush and……..*giddies* Diet Dr. Pepper! How cool is that?! I was so lucky to have my Great-grandmother live until I was 20 years old and I have tons of wonderful childhood memories with her.
I woke up feeling like I’m getting that dreaded cold so I’ve been running around all day getting important stuff done in case I crash at some point today or tomorrow. I received my Club’s SU order today so I scurried and got it all sorted and bagged and ready for pick up. There were a few fun items in it for me too *wink* so hopefully I’ll feel like playing some tomorrow. No big plans or committments this weekend – looking forward to just playin’ it by ear and relaxing a bit. Hope you have a fantastic weekend and hope you can find a childhood treat to enjoy. I’m off to eat a popsicle! Thanks for stopping by.
Time for Play
September 12th, 2007
WooHoo! Any day I get to stamp two cards is a good day! And I was even somewhat productive around the house besides. I made time to do the SCS Sketch Challenge today and ended up making two cards for it. 🙂
The first card turned out nothing like my original plan, but I’m quite happy with the direction it went anyway. The base is Really Rust (I’ve used more Really Rust in the past 2 weeks than in my entire stamping career! LOL!) and it’s layered with Chocolate Chip and Apple Cider designer paper. The sketch has 2 *strips* and the first thing I thought when I saw it was that I wanted to try this wide chocolate satin ribbon for the narrow strip. I love the way it worked out. I had originally stamped an image from Heartspeak to be watercolored (see next card), but just couldn’t make it work here, so I used the flower from True Friend. To get the mottled effect on the flower I started by inking the whole thing with River Rock ink, then I went over it with markers (pumpkin, rust and chocolate) and lightly misted the rubber before stamping on Naturals Ivory cardstock. I then covered the whole piece with Versmark and heat embossed with two layers of clear embossing powder. I wish the smooth finish showed up better in the photo – it’s cool IRL! The gem in the center of the flower is an orange Adorn It Jewel from eclectic Paperie. I used blue ones on the next card. I just love those things!
So I had this image from Heartspeak stamped on a Shimmer White diamond of cardstock and here’s what it turned into:
Is that such a sweet little image? I had to have that set the minute I saw it in the catalog and I haven’t played with it nearly enough yet. I played around with some different colors for this card and finally settled on Blue Bayou, Artichoke, Rose Red and Soft Sky. I made the patterned background on Shimmer cardstock by stamping the Bouquet Jumbo wheel in Soft Sky and watercoloring the berries and leaves and adding some dots of Rose Red with Itty Bitty Backgrounds. The Rose Red and Artichoke grosgrains are from Fabric Barn here in Long Beach – they match amazingly well (better IRL than in the photo). The sentiment is from So Many Sayings and in order to layer it I simply punched out 2 pieces of Rose Red with the Word Window punch and glued them slightly offset behind the Soft Sky piece.
This was a fun sketch and I’m so glad I was able to make time to play today! I think it’s really cool how one sketch can produce two such different cards from the same person!
My poor hubby is sick with a terrible cold. He managed to work about 3/4 of the day today, but he’s miserable and went to bed super early. Practically everyone at my office has been sick over the past two weeks. Both my parents and my uncle have all been sick. I feel like I’m just waiting for the inevitable – ugh. It will be a small miracle if I come through unscathed! I’m praying for that small miracle! Just in case, though, I went to the grocery store today and got provisions! LOL!
I still need to share the cards from my Holiday Mini swap – soon I promise. Thanks for stopping by.
Time for Coffee
September 10th, 2007
I love when a card just comes together. This was a fun one for a friend starting a new job at Starbuck’s.
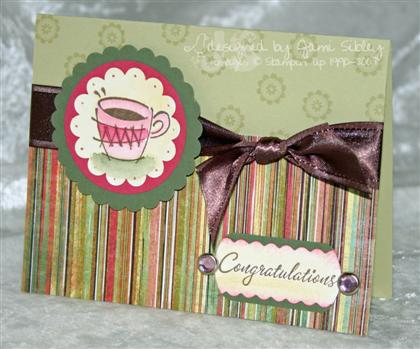
The coffee cup is from Voila on the Go (which I haven’t returned yet). You know, that set has some fun versatile images in it that could be useful even without the Voila chef. I was so happy to see how well River Rock coordinates with this yummy stripe from my Basic Grey Stella Ruby 6×6 pad. I stamped an image from Little Flowers with River Rock ink for a simple background on the card base. The cup was stamped with Palette Hybrid Burnt Umber ink and watercolored. Bring on the punches and more of that yummy chocolate satin ribbon!
***Recipe***
stamps: Voila on the Go, Little Flowers, Warmest Regards
paper: River Rock, Artichoke, Rose Red, Shimmer White, Stella Ruby 6×6
ink: River Rock, Palette Hybrid Burnt Umber
other: Punches – key tag, scallop circle, Marvy jumbo circle and giga scallop circle, chocolate satin ribbon, Hippie Chick pink rhinestone brads, aquapainter with markers
This weekend I went to my friend Darla’s very first Pampered Chef presentation and she did such an awesome job – I was super proud of her! She went overboard and made 3 yummy recipes. The dessert was to die for if your a pumpkin fan and since it goes so perfectly with coffee I just have to share it along with the coffee card. *wink*
This is a super easy recipe that I will be trying soon – it’s a variation of the ever-popular dump cake. Let me know how you like it if you try it out.
Pumpkin Crunch
Ingredients:
1 pkg yellow cake mix
1 can (16oz) solid pack pumpkin
1 can (12 oz) evaporated milk
3 eggs
1 ½ c. sugar
4 tsp pumpkin pie spice
½ tsp salt
1 c. chopped pecans
1 c. melted butter
Whipped topping
Directions:
- Preheat oven to 350 degrees
- Grease bottom of 9×13 pan
- Combine pumpkin, evaporated milk, eggs, sugar, spice, and salt in a large bowl.
- Pour into pan
- Sprinkle dry cake mix evenly over pumpkin mixture
- Top with pecans
- Drizzle with melted butter
- Bake for 50-55 minutes or until golden.
- Cool completely
- Serve with whipped topping
- Refrigerate leftovers (if there are any!)
Time for Class
September 7th, 2007
I’m getting ready for my Stampin’ Up! Class tonight and wanted to share the cards we’ll be making. First is another Carved and Candlelit card using Scratch’n’Sniff embossing.
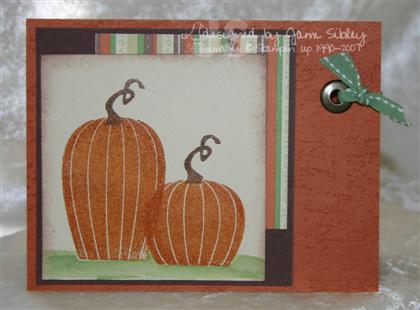
The pumpkins are stamped with Pumpkin Pie Craft Ink and embossed with a mixture of clear embossing powder and cinnamon. The Really Rust base is stamped with the Rough Edges jumbo wheel in Really Rust Classic Ink. Thanks Tex (Beverly Gerard) for the idea for the layout of this card – especially the use of the jumbo eyelet and ribbon. She created a card for my last swap that inspired this one.
The next card was inspired by the card on page 21 of the catty. The funny thing is that I couldn’t for the life of me remember where I CASEd this from and then I came across the picture again and had a V-8 moment. LOL!
This card is 4″x 4″ because I needed to get the most out of a sheet of 12 x12 textured cardstock since it only comes in variety packs. The texture doesn’t show much in the photo, but I think it makes a big difference in the look of the card. The circles were cut with the coluzzle and then distressed with the tool from the SU Cutter Kit. There is dazzling diamond glitter on the flower tips. Although this card is really not my style at all, I find it calming and I like it. I often search out inspiration for cards to teach in my class so that my customers are not just getting “my style” all the time. Besides “my style” isn’t always condusive to class cards anyway. I have no problem using ideas from the catalog or from SCS. 🙂
The third card is just a simple happy card (had to slip some pink in there *wink*).
My friend Leann brought over her Convention swaps awhile back for some of us to drool over. As soon as I saw a pink and regal rose card (almost just like mine above) made by Alysabeth Johnston I knew I wanted to use it for a class. I asked Leann if I could scan it, but as we were going through the rest of her swaps we discovered that she had two of these! It was kismet! Leann, friend that she is, let me keep the second one. I changed the Regal Rose to Pomegranate and added some embossed dots at the bottom made with the Crop-a-dile. I just love this sweet little card. I’m thinking this could make a great gift set using some different colors and different images from the Take Three set.
I have lots more to share. My Holiday Mini Swap was completed this week. But that will have to wait since I have a class to teach. Thanks for stopping by. I hope you have a teriffic weekend!
Cinnamon Pumpkin
September 3rd, 2007
Just a quick post to share a card I made while playing with Scratch’n’Sniff embossing for my class coming up this Friday. I was going to borrow Carved and Candlelit from a friend, but I have always liked it so I decided to just go ahead and order it. It’s such a cute set!

The base of this card is Really Rust and I wheeled it twice with the Spooky Skyline jumbo wheel – first in Rust and then in Chocolate. It has that scary double-vision effect. LOL. The jack-o-lantern was stamped in craft ink (pumpkin pie, close to cocoa and black) and heat embossed with a mixture of clear embossing powder and cinnamon – mmmmmm…smells yummy! I used orange eyelets (’cause I had my Crop-a-dile out and wanted to try setting eyelets with it) and then used some Only Orange cs for matting. The new wide satin chocolate ribbon is tied in a knot for the finishing touch. When I first saw this ribbon in the catalog I honestly couldn’t see myself using it on cards, but now that I have the chocolate I love it and I need to order the pomegranate too! Big surprise, huh?
I have a few spots left for my class this Friday night. If you’re in the area and want to come, let me know. Fee is $12 and we will make 3 projects (one of them using Scratch’n’Snif embossing). 🙂
Happy Labor Day and thanks for stopping by.


