Inspiration Friday
June 22nd, 2007
Woo Hoo!! I am so excited to be an eclectic Paperie Friend and have my blog featured this week in the eP Expose! 🙂 Joy and Daisy truly are friends and I am so blessed to know them and get to hang out with them. I am very excited by the success of their venture in feeding our creativity. If you are not on the e-mail list, you can go to their site and sign up for their weekly newsletter.
I am also super excited to share the card I have today. I actually made it last week, but had not had a chance to photograph it. Do you ever envison something and then make it and get so excited you just smile from ear to ear? Well that’s how I feel about this.
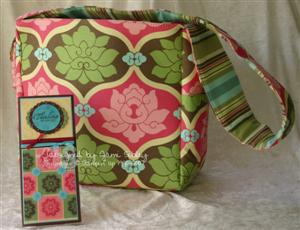
I was looking at my Sola Bag from eP and felt inspired by the fabulous pattern. 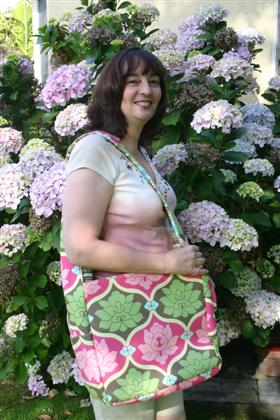
I started pulling out cardstocks to see what would match up. I came up with Chocolate Chip, Wild Wasabi, Regal Rose, Rose Red, Barely Banana and Cool Caribbean. I must have had the cardstock combo out on my stamp table for almost two weeks before I even sat down to play with them. By the time I did sit down to play I knew I wanted to use Baroque Motifs.

I also knew I wanted to make a tall card (4″ x 9.25″). I started by stamping with Craft ink and cutting the motif squares and placing them to make the bottom portion of the card. I used Crystal Effects between the squares to form *tile grout* and then added the little Caribbean flowers and covered them in CE. This part was smooth sailing. Once I got to the top portion I struggled for quite awhile trying lots of different things. Finally I settled on this sentiment from Sincere Salutations. It was stamped on Caribbean in Chocolate Chip and some little Caribbean flowers were added, then the piece was heat embossed with three layers of clear embossong powder. This was then mounted on a Chocolate mega scallop circle and then onto a Wasabi giga scallop oval. Some A Muse twinkle dot stickers, grosgrain ribbon and paper piercing are the finishing touches. I hope you like it. I am just doing the *happy dance* over it! 🙂
I just love taking inspiration from fabrics and everyday things around me! Here’s a challenge to you – find something in your home to be inspired by. You don’t need to copy the pattern – you might just take the color combo, or the layout from a package – whatever it is – post a picture of your creation with it’s inspiration either in your SCS gallery or on your blog and come back here and give me a link in the comments section. I’d love to see what you come up with.
By the way if you don’t have one of these bags I’m guessing you need one! They are huge – big enough for a laptop or 12×12 album or just about anything you can think of. The strap is nice and wide and padded. I know some people are even using them for cool diaper and toddler bags.
Next week it will be time again for some blog candy, so be sure to check back! If you’re not already a subscriber, I’d love to have you join by clicking the icon in my sidebar. Thanks for stopping by and I hope you have a fantastic weekend!
Baby Joy
June 20th, 2007
This card is for my friend Sue (jsbrooketrout on SCS) who just had a sweet little baby girl. 🙂 Traditional baby cards are not really my thing. I know most people love making them, but I don’t have many stamp sets that lend themselves to it. So I usually make more non-traditional baby cards….like this one.
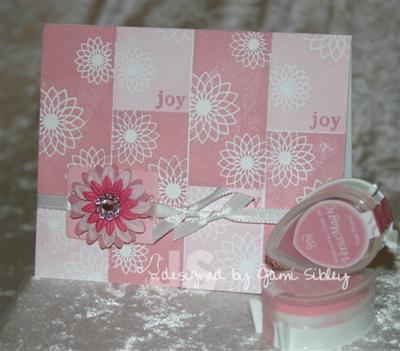
This is another one-layer card using Paper Trey’s white cardstock and Text Boxed stamp set. The image was stamped repeatedly in Versamagic Chalk ink – rotating between Pixie Dust and Pink Petunia. Then the word “joy” was stamped in all the lighter pink boxes with the darker pink ink. Pretty darned simple, huh? Once I had that done I struggled a bit with what to do without covering up to much of the pattern I had created. I decided to cut some sliders and flowers from white coasters with my Cuttlebug. Next I dyed them with the chalk ink by dabbing the pads directly on my coaster pieces. Then I just played around with several combos of sliders, coaster flowers and Primas until I came up with this – rectangle slider, chipboard flower, 2 Primas, pink rhinestone flower brad. Just a little white satin ribbon and it was done!
The inside sentiment is from SU’s God’s Blessings and reads “A baby is a gift from heaven above – bringing down joy to earth, filling hearts full of love.” I thought that was so perfect to go with the “joy” on the front of the card! So do you think this works for a baby card??
I’m actually needing another baby card besides this one and am debating if I want to just make another one similar to this or try for something more traditionally baby-looking. Hmmmm…we’ll have to see what strikes me next time I sit down at my stamp table.
I so wanted to do the Sketch Challenge at SCS today, but just didn’t get to it. I have some ideas floating around so maybe I’ll get to it later this week. Gosh I’ve got to start blogging earlier in the evening. I had all sort of stuff to talk about, but now I’m too tired to be coherent. LOL! Good night and thanks for stopping by.
Paper Trey in Da House!
June 19th, 2007
I finally jumped on the Paper Trey bandwagon. I’d been teetering on the edge for probably 2 months. I tend to mull things for quite awhile, because I find I’m not usually happy in the long run with impulse purchases of stamp sets. But after hemming and hawing for so long, when PT released the new Text Boxed set last week I threw caution to the wind and placed an order that night. In addition to Text Boxed, I got Faux Ribbon and a package of the white cardstock to try out.
I am NOT a fan of acrylic stamps and if Stampin’ Up ever gives up rubber and wood I will be inconsolable. But everyone I have talked to has assured me that Paper Trey acrylics are the best quality and worthy of a try. Certainly both the images and samples I have seen are adorable! So my order arrived yesterday, but as things worked out there was no time to play with it. I definitely knew what I wanted to do when I got home from work tonight. *wink*

Today’s SCS Color Challenge (Barely Banana, Real Red, Creamy Caramel) sounded like fun and I love having a jumping off point when working with a new set. I still had simple/quick cards on my mind from yesterday’s challenge so I decided to start with a one layer card to try out the new PT cardstock.
The focal image was stamped with Versamagic Chalk ink in Red Magic (available at eclectic Paperie) and then the outline box image was stamped in Creamy Caramel Craft ink. I placed the 3 different sized flowers together on one acrylic block and inked them with Banana Craft ink and stamped repeatedly for the background. I then removed the 2 larger flowers from the block and stamped just the smallest flower in red. Finally I overstamped (slightly offset) some of the largest flowers with Creamy Caramel Craft ink. Final touches were Dazzling Diamonds Glitter applied over Sakura Quickie Glue pen (much more sparkly in person) and some red grosgrain and caramel gingham ribbon. Very simple.
I must say that so far I am very happy with the quality and *stampabilty* of these stamps and look forward to playing more with them. I really want to experiment with Classic inks to see how they work. At least I have some stuff to hold my interest while waiting for the new Stampin’ Up catty. I definitely need the distraction at this point. The last week or so of waiting is the worst!
Quick Card for Cheer
June 18th, 2007
I didn’t think I would have time to stamp today, but I decided to check out the Technique Lover’s Challenge on SCS anyway. I loved the idea of the challenge “create cards that are QUICK and EASY to either produce in bulk or create in 5-10 minutes. Her idea is inspired by her desire to encourage stampers use their talents to make card for the people in need of some good cheer in the Need a Lift Forum.” Surely I could spend 10 minutes stamping! 🙂
Now you know quick cards are not my thing, but I was determined to come up with something I liked in less than 15 minutes. Here it is.

So here’s how I managed to design and make a card in 15 minutes –
Stamps – I haven’t had nearly enough chance to play with Baroque Motifs yet so that is the first thing I grabbed. The other two sets (Take Three and Label Classics) were sitting out from another card I made recently (to be shared soon) so I decided to try to incorporate them also.
Color Combo – I used this combo (Real Red, Buckaroo Blue, Creamy Caramel and a touch of Regal Rose) in the past and really liked it. Lately I have been wanting to use it again so I grabbed my cardstock scraps files for each of these colors as well as the ink pads.
Design – I stamped the focal image using a stamp-a-majig. Then I stamped the background panel and sponged it with Caramel ink. From there it was just a matter of layering. The Buckaroo Blue layer was trimmed with scallop scissors to coordinate with the scallop design of the label image. To cut a straight scallop first adhere the white panel to the blue panel – then the white panel will act as a guide for the scissors.
Finishing Touches – A Muse Twinkle dot stickers in rosy pink were used in the flower centers. A red tab was punched with the word window punch and folded in half with a white grosgrain knot attached.
If I’d had more time would I have futzed around with this more? You bet! But I can honestly say that I am happy with it as is. I might even make a few more to have on hand for RAKs as needed.
Happy Father’s Day!
June 17th, 2007
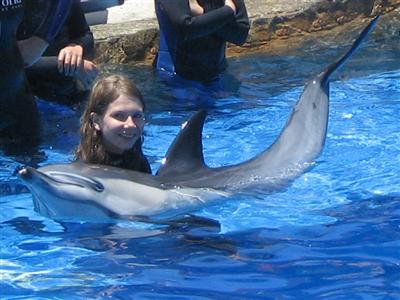
Wow – what a weekend! Curt picked up our niece Britta after work Friday night to spend the night. We got up early Saturday morning to go to Sea World with another family – we had reservations for all three kids to do the Dolphin Encounter (Britta’s birthday present) and between traffic and some other issues we just made it by the skin of our teeth! The Dolphin Encounter is a really cool program that includes a class on dolphins and about 30 minutes in the dolphin pool.

Participants are broken up into groups of 4 and each group gets a trainer and a dolphin. This time we just signed up the kids to go, but someday I’d like to do it myself. We were able to watch from a close vantage point so I snapped a bunch of pictures while Curt took video.
Here’s Britta posing with her dolphin.
The weather was beautiful and the park was a bit crowded, but not overly so. Walking until I was almost ready to drop – thank heaven for the shows and a chance to sit for awhile! The shows are truly amazing! We stayed at Sea World until 10pm and didn’t arrive home until almost 1am. Exhausted does not begin to describe the feeling. Even all day today I have felt totally spent.
Of course today was Father’s Day and we met my Uncle and my parents for lunch at a local BBQ joint. Here’s the card I made for my Dad.
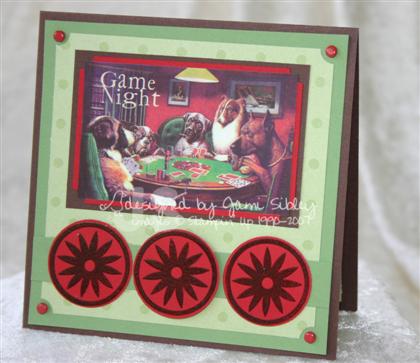
My parents enjoy poker tournaments, so when I saw this image from a Crafty Secrets Vintage Booklet I knew I had to make my Dad a card with it! It’s just too funny! I mounted it on a piece of Real Red cardstock that had the corners punched with the ticket corner punch, then that was layered onto Chocolate Chip. I found that this polka dot Celery paper from the SU Palette o’ Prints went perfectly with the new Wild Wasabi cardstock for layering. Big Pieces were embossed on Real Red cardstock using Chocolate Chip Craft Ink (gotta love those Craft Spots for having the full color range available) and clear powder. Some red brads are the final touch.
The card I made for my uncle is in my SCS Gallery – the first time I tried a Stampscapes card – really fun stuff to play with! Wow – I just looked that up to link it and I can’t believe I made that last August and saved it for Father’s Day.
After lunch we went to pick up Curt’s new-to-us pre-owned truck. His current truck is 12 years old and pretty rough looking at this point, so the shiny red paint is pretty exciting! We drove 30 minutes to get it, only to realize that I had left the checkbook at home (changed purses for Sea World yesterday – oops) and had to drive back home and back again to get the truck. D’oh!!
After my last post showing my Prisma pencil holder I was asked about how I separated them by SU color families. There is a wonderful chart on SCS made by fiona51 of the Prisma matches to SU colors. That link will take you to the thread on SCS where she has posted it.
Hope you all had a fabulous weekend. I need a vacation after mine! *grin*
Just a Little Something
June 15th, 2007
 I needed a *little gift* for a lady who is a client of my work’s and has over the years become a friend. She is a crafter so I knew she would appreciate something handmade. I loved the coaster box I made for Joy so much that I decided to make a coaster box for this lady as well. Instead of dividers, though, I decided to make a little gift set to go inside it – 2 jumbo clippies, a beaded pen and a covered note pad.
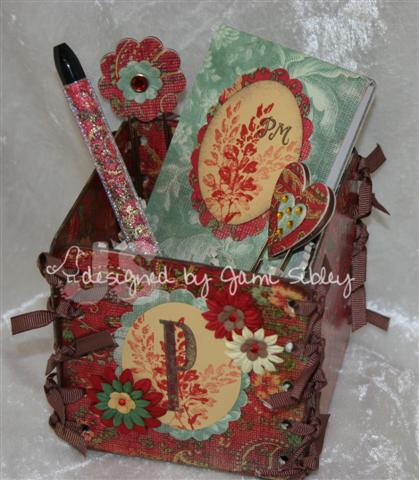
The designer paper is by DaisyD and is very rich looking – I just love it! Plaid Royal Coat was used to adhere the paper to the coasters and as a top coat all over as well. SU Chocolate Chip grosgrain ribbon was used to tie the coasters together and Petal Prints was used to stamp the embellishments along with some Primas from ecelectic Paperie. Taylor presented a wonderful tutorial on SCS showing how to make these boxes – check it out!
 Here’s the gift all wrapped in cellophane with a Petal Prints tag to match. The gift was delivered Wednesday by my company’s Client Rep and the recipient called me and RAVED about how much she loved this. She went on and on and made me feel so good! Being a crafter she, of course, wanted details on how it was made. Isn’t it just the best when someone really *gets* what you’ve done? I put quite a bit of time into this project for what was supposed to be *just a little something*, but it was totally worth it!
After making Joy’s box I decided that I would also need one for myself to hold my Prisma Pencils. I was working on mine late one night and *D’oh* forgot to attach the elastic cording for the Gamsol bottle. *eye roll*. Oh well! I love it anyway. Basic Grey Romani paper was used and the huge flower is something I got at Winter CHA – sorry I don’t remember which booth it came from – except I know it’s not Prima. I have my pencils divided by SU color family, plus a section for neutrals (and I will add the new In-colors there as soon as I get them figured out). The last section of the 6 is for stumps and the sanding paddle.

When I posted Joy’s box I got some requests for directions. The detailed directions for making the dividers are in Laura’s blog (click her name in blue) which I also posted previously. Much thanks to Laura for sharing this idea!
I have to say that between the ModPodging (Royal Coating in my case), Crop-a-dile hole punching, and knot tying these boxes definitely take some time. Even so, I do love the results. If you make one I’d love it if you’d leave me a comment here with a link to a photo of yours on your blog or in your SCS gallery!
Our niece is spending the night tonight and tomorrow we are taking her to Sea World to do the Dolphin Encounter for her birthday present. Then Sunday we have lunch with my uncle and my parents for Father’s Day. And after that Curt will hopefully get to pick up his new (pre-owned) truck. It’s a FULL weekend for sure! I have a Father’s Day card I want to share with you, so hopefully I can get back here Sunday sometime. Hope you have a fabulous weekend. Thanks for stopping by!
Kaleidacolor Garden
June 14th, 2007
One of the ideas I had rolling around in my head for Garden Silhouttes (GS) was a Rainbow Strip Flip (RSF) card. RSF is a technique I learned from the Technique Junkies Newsletter 2 or 3 years ago and it was love at first try! I have a lot of Kaleidacolor and Spectrum pads – that was one of the very first things that impressed me in the rubber stamp world and I began collecting them even before I was really a *stamper*. One of my favorites is the Caribbean Sea K-pad used for these cards.
RSF is such an easy and fun technique and I think it gives a *wow* effect. Essentially you just brayer a glossy piece of cardstock with a K-pad, randomly stamp an image in black, then cut the cardstock in 1″ strips. Keeping the strips in order, flip every other one upside down as you mount them on a piece of black cardstock. Then simply stamp a coordinating focal image and play with the layout. I’ve considered writing up and photographing a tutorial for this technique. If that would interest you, please let me know. For this card I used Gable Green for my base, but Taken with Teal and Tempting Turquoise also looked quite striking. The sentiment was stamped by using marker to ink just one word on a stamp from the set God’s Blessings and punched using SU oval punches. Trim is some fun stuff from my stash. It’s kind of fuzzy – almost like velvet -and gives a nice contrasting texture to the glossy cardstock.
When I was making that card I stamped 2 different focal images to see which I would like better with the RSF background. Well I couldn’t let that second image go to waste, so here’s what I came up with.

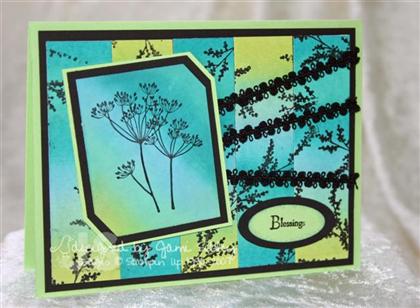
Since I had the Gable Green out I decided to stick with that for my card base. Taken with Teal was used for the main layer and was stamped tone on tone with Linograph in Teal ink. Another markered sentiment in an oval, some back brads and a scrap of ribbon from Jacksonbelle Embellishments and I was done. Wow – I am loving this set and I’ve barely gotten started with it!
As I close tonight it’s just about time for this month’s SCS Dirty Dozen Fan Club Gallery to open. Can’t wait to see who the new girls are! If you spend any time on SCS at all…use the gallery for ideas…enjoy the tutorials…chat or lurk on the forums….then you really really need to donate to a Fan Club Membership! And just like when you donate to support PBS, you’ll get a thank you gift from SCS – access to the Dirty Dozen Galleries, instant uploads and some other perks. Check it out!
Tomorrow I have a little gift set to share. Be sure to check back and have a great weekend!


